Start Using PagerDuty Today
Try PagerDuty free for 14 days — no credit card required.
Okta is a single-sign on provider, which makes it easy to manage your SAAS application logins and permissions. PagerDuty is available within the Okta app catalog, making it easy to manage access to your PagerDuty account. Follow this simple guide to get your Okta account tied to your PagerDuty account.
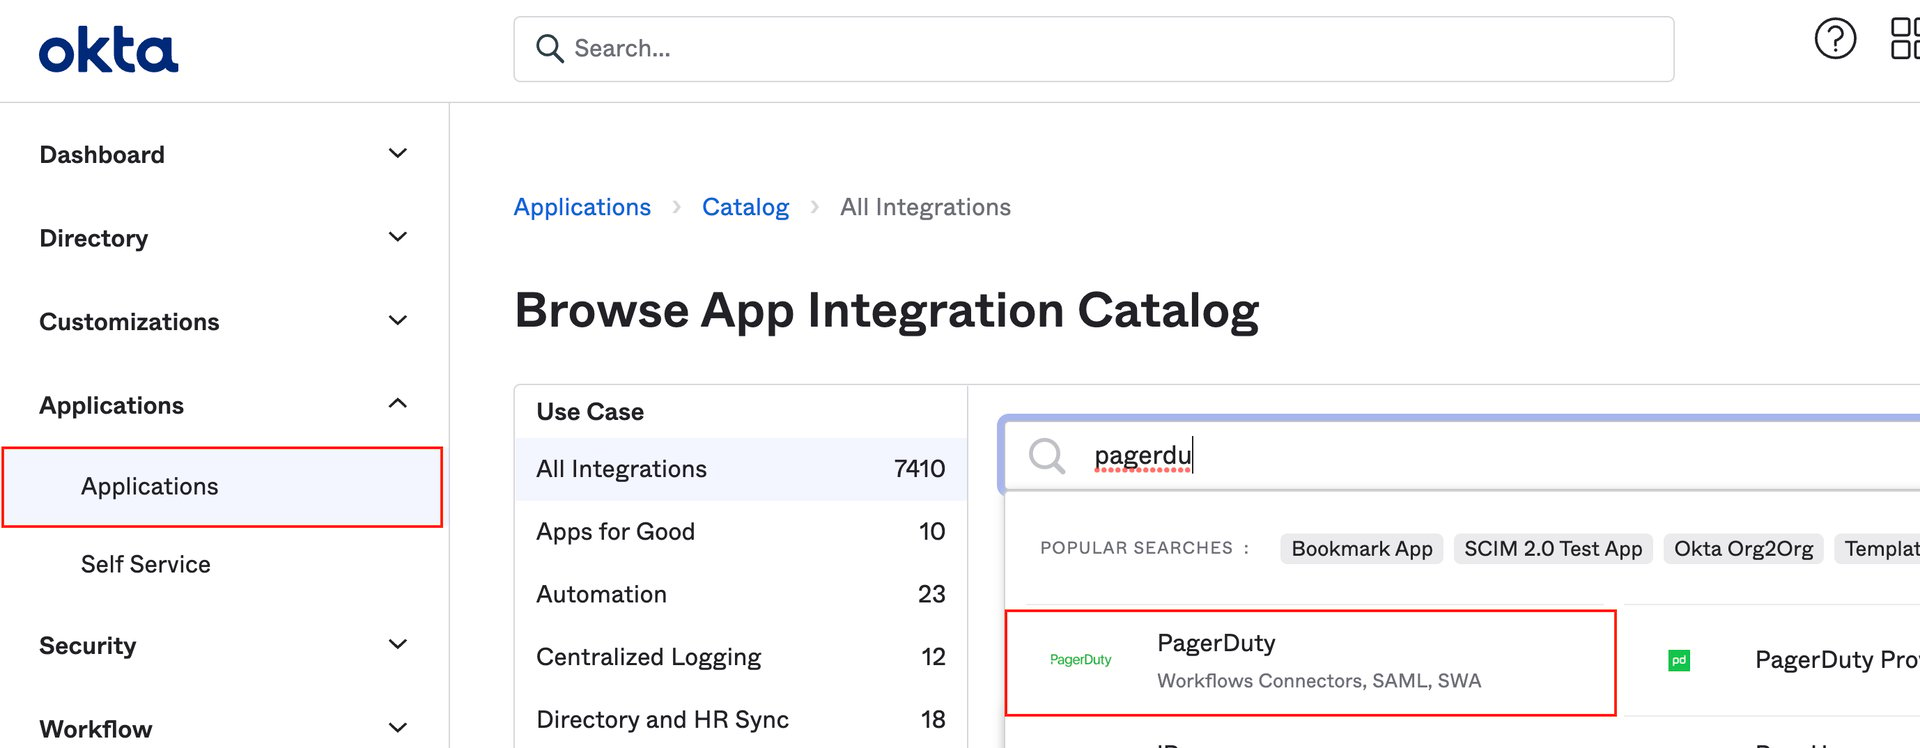
1. Navigate to the Applications section of the Okta Admin dashboard, then click Browse App Catalog.
2. Type “PagerDuty” in the search box, then select the result named simply “PagerDuty” and click Add Integration.
3. In the Base URL field enter the full base URL for your PagerDuty account (for example, https://yoursubdomain.pagerduty.com). Select optional settings according to your preference and click Next.
4. Click the SAML 2.0 radio button, then click View Setup Instructions. Follow the instructions in the guide that opens in a new tab, which includes steps that must be performed in PagerDuty.

5. Back in Okta, make sure the Application username format is set to Okta username. Click Done once you’ve completed the Setup Instructions. If you would like to enable Okta’s provisioning features, continue to the next step. If you are not using the provisioning feature, please skip to step 9.
6. Optional: If you wish to enable Okta’s provisioning features, you must first create a REST API key in your PagerDuty account. Note: Copy the key to your clipboard and keep it in a safe place, as you will not be able to access it again. Once you have generated your PagerDuty REST API key, navigate back to your Okta account, select the Provisioning tab and click Configure API Integration. Check enable API Integration and enter in your REST API key and login email. Click the Test API Credentials button, and you should see a dialog confirming that PagerDuty was verified. Click Save to continue.
7. Next, navigate to the Provisioning tab, and select To App in the left menu. Click Edit to select what provisioning options you would like to enable, and then click Save.
Notes:
Update User Attributes option in Okta will automatically enable each Okta <- -> PagerDuty mapping with the “Create and Update” setting. Be sure to change any individual Okta <- -> PagerDuty mapping (instructions in the next step) if you don’t intend on changing the PagerDuty field for the user on each Okta update. For example, it’s not recommended to set the role attribute to “Create and Update”.Create Users will create PagerDuty users that you will be billed for when the PagerDuty app is assigned users in Okta. When enabling this setting, users will still be created in PagerDuty even if the users do not attempt to log in to PagerDuty. If you prefer to only create users when they attempt to log in to PagerDuty through Okta SSO, navigate to PagerDuty > SSO > User Provisioning, disable the Create Users setting in the Provisioning tab and then enable Auto-provision users on first login.8. In the Provisioning tab, scroll down to the PagerDuty Attribute Mappings section and optionally edit these to your preference using the pencil icon, or delete them with the x icon.
9. Next, navigate to the Assignments tab, click the Assign button and either click Assign to People or Assign to Groups, which will assign the PagerDuty app to users or groups in Okta.
10. Search for and/or find the user’s name and click Assign. You will have the options to edit the user’s User Name and User Role on this page. Click Save and Go Back when finished.
11. You’re done! Users that have been given access to PagerDuty will now see the the PagerDuty app in the Okta dashboard and will be able to log in with just one click. Alternatively, users can go to the PagerDuty login page for their PagerDuty subdomain and sign in using Okta by clicking Sign in with your Identity Provider.
If Deactivate Users is enabled under the Provisioning tab, yes. When the setting is enabled and a user’s access to PagerDuty is revoked in Okta, that user will be deleted from the PagerDuty account. This also means that they will be removed from any incidents they had been assigned to, and their assigned schedules and escalation policies. If your account has the offboarding feature, it will prompt Team Managers, Admins and Account Owners to complete the offboarding flow. If your account does not have this feature, these objects will need to be modified manually.
Important Note: If your account has the offboarding feature, in order to delete PagerDuty users via Okta, you must have your User Offboarding settings (found in Configuration > Account Settings > User Offboarding) set to Automatically restart incidents on their escalation policy:
If this is set to Fail the removal of any user with assigned incidents, PagerDuty users will not be able to be deleted from Okta.
Try PagerDuty free for 14 days — no credit card required.