PingOne SSO Integration Guide

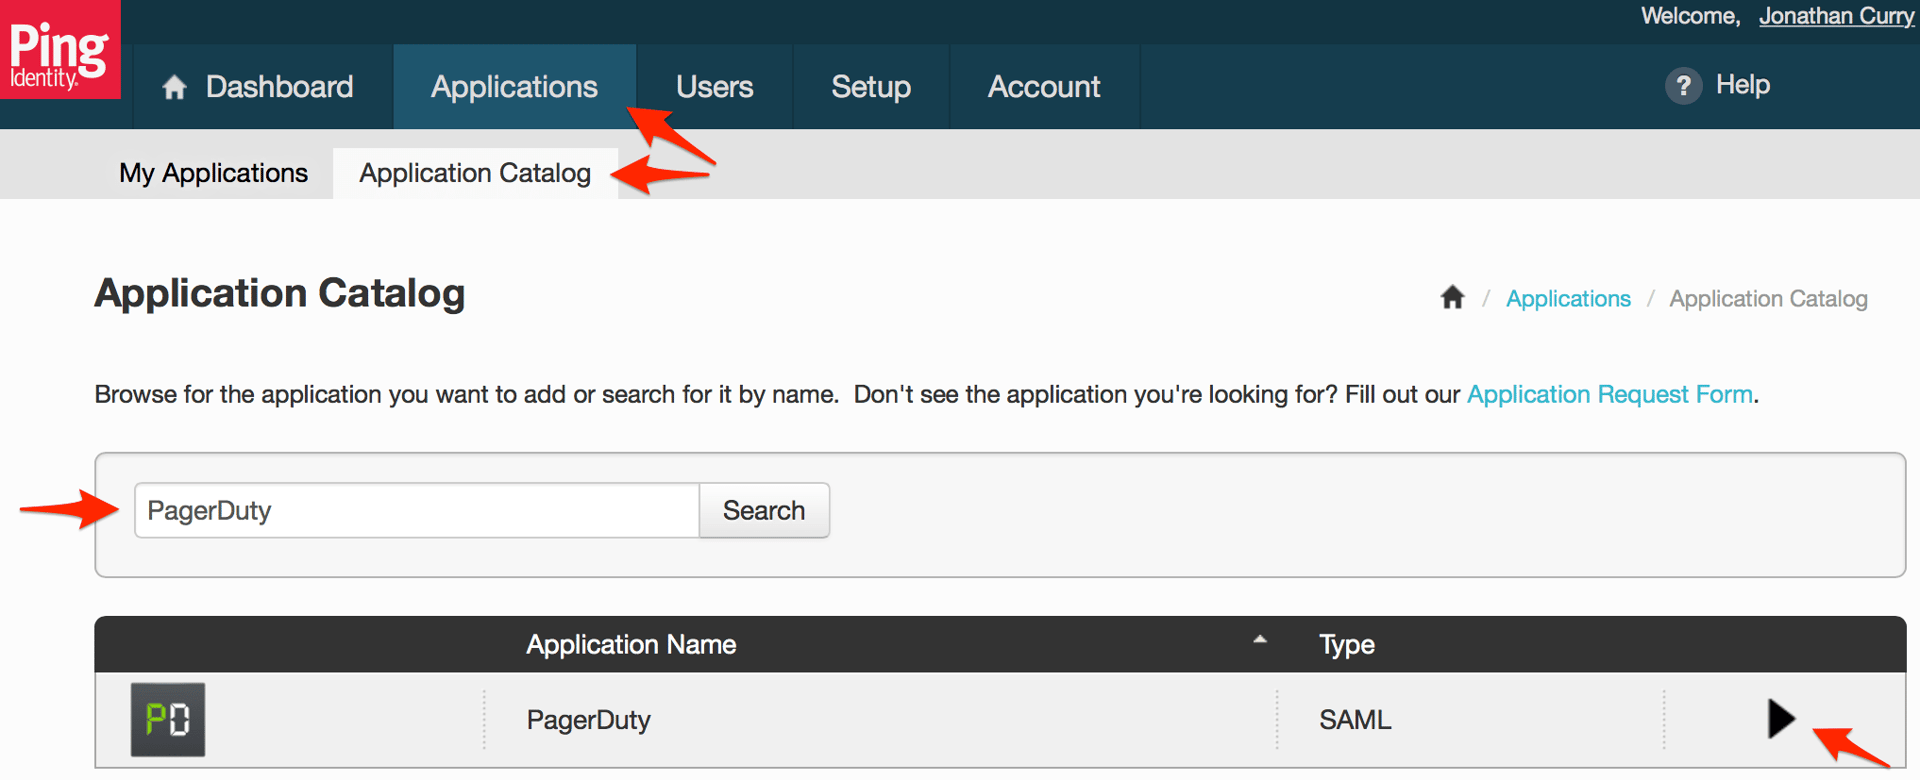
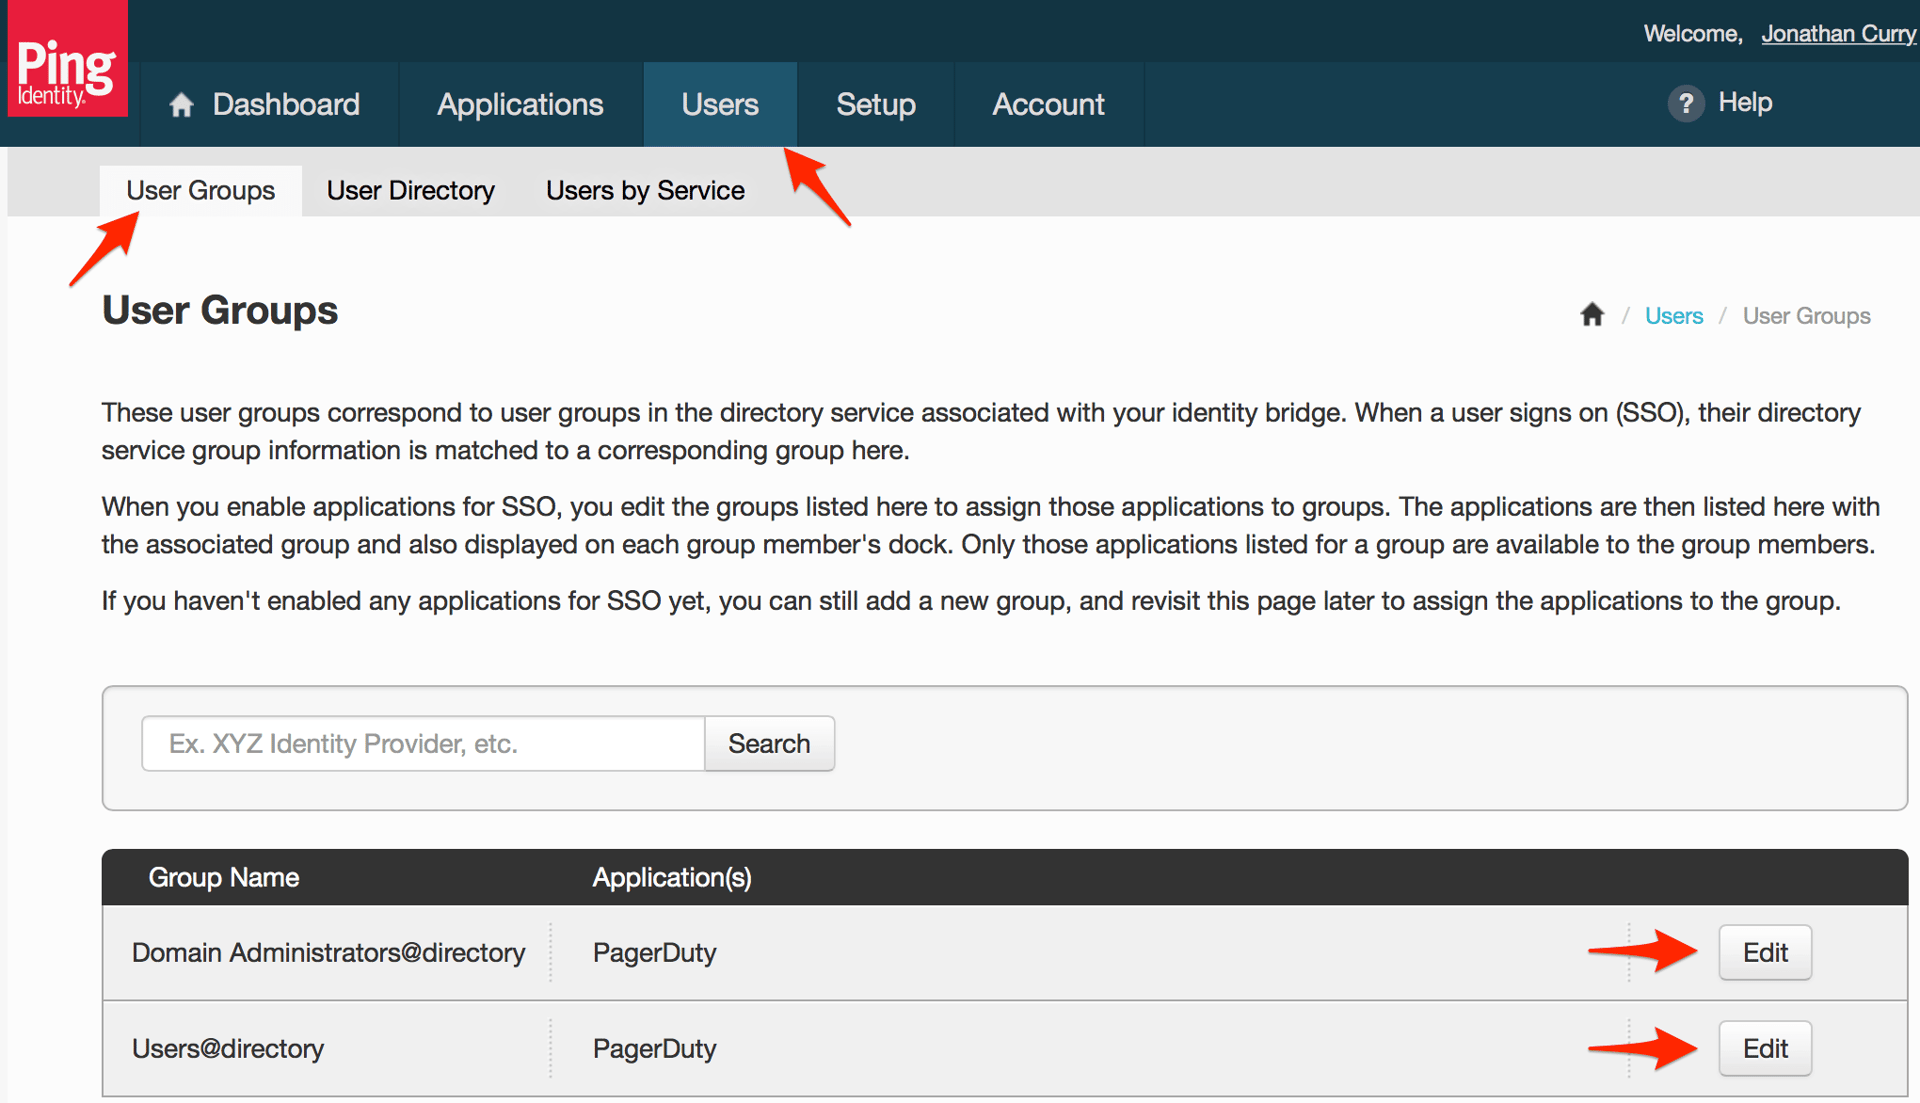
PingOne is a single-sign on provider, which makes it easy to manage your SaaS application logins and permissions. PagerDuty is available within the PingOne app catalog. This makes it easy to manage access to your PagerDuty account. Follow this simple guide to get your PingOne account tied to your PagerDuty account.

Note

You must be the Account Owner of your PagerDuty account in order to make these changes. Additionally, SSO capabilities within PagerDuty are only available on our Business and Digital Operations plans. Please contact our sales team if you are interested in upgrading your plan.


Start in PingOne

  1. Go to the Applications tab in PingOne, click on the Application Catalog sub-tab, then enter PagerDuty into the search box and click the Search button. Click the arrow when you see the PagerDuty application.
  2. Click the Setup button.
  3. Click the Certificate Download link, then copy the SSO URL provided.
  4. Log in to your PagerDuty account, go to the Configuration menu and select Account Settings. When you get to the Account Details page, click Single Sign-on on the sidebar to the right.
  5. Click the SAML radio button to configure Single Sign On in PagerDuty, then paste the SSO URL you copied in step 3 in the Login URL field. Open the certificate file you downloaded in step 3 in a text editor, then copy the certificate data and paste in to the X.509 Certificate field.
  6. Copy your PagerDuty SAML Endpoint URL.
  7. Paste the SAML Endpoint URL you copied in step 6 in the ACS URL field, then enter your PagerDuty subdomain (including the https:// protocol handler) in the Entity ID field.
    Note: PingOne displays 
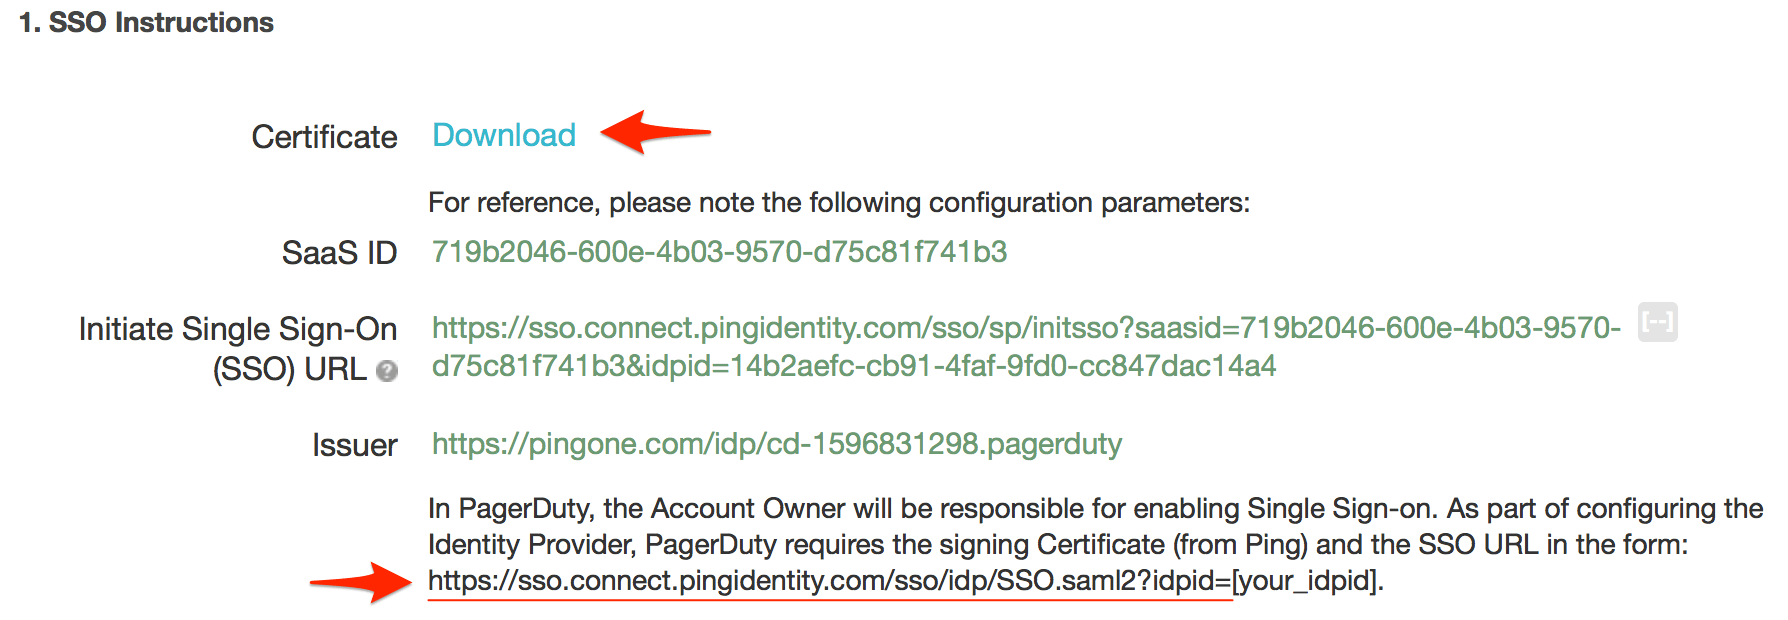
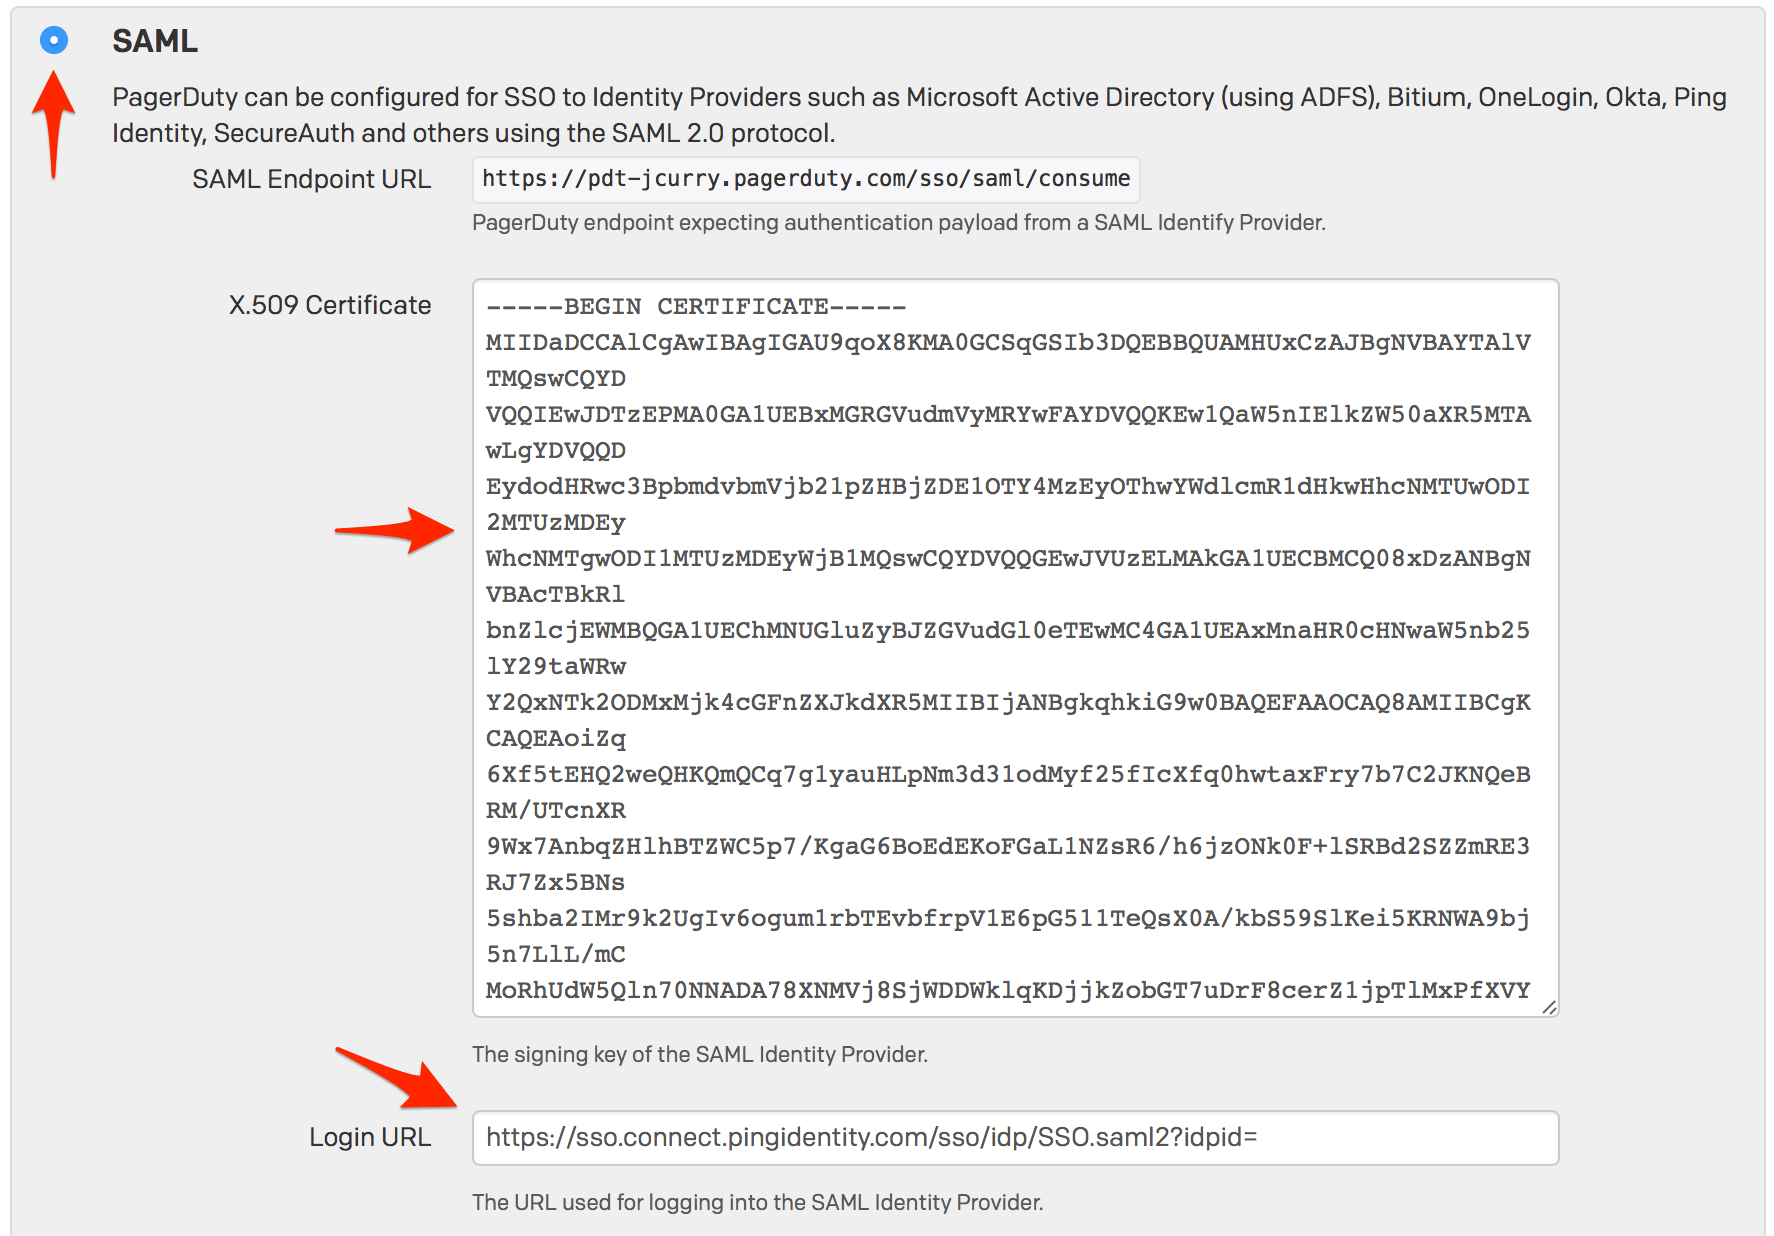
${accountid}.pagerduty.com in the Entity ID field by default and provides instructions to simply replace ${accountid} with your PagerDuty subdomain. Unfortunately replacing only ${accountid} with your subdomain will not work; you must also enter https:// before your subdomain.
  8. Scroll down to the PingOne dock URL section and copy the value of the idpid parameter from the Default PingOne dock URL.
    For example, if your Default PingOne dock URL was this:
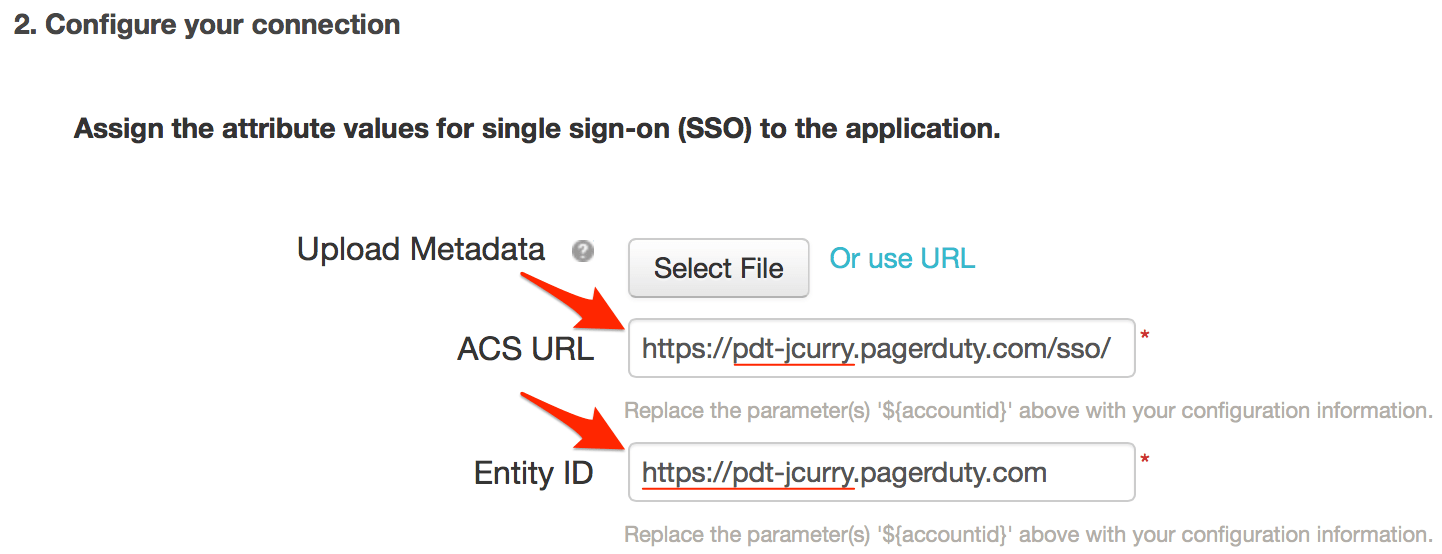
    https://sso.connect.pingidentity.com/sso/sp/initsso?saasid=00000000-abcd-0000-efgh-xyz123456789&idpid=11111111-xxxx-1x1x-1111-xxxx1111xx11
    You would want to copy this portion:
    11111111-xxxx-1x1x-1111-xxxx1111xx11

    Click Continue to Next Step after you have copied the idpid parameter.

  9. In PagerDuty, paste the idpid parameter you copied from the Default PingOne dock URL in the previous step at the end of the Login URL you entered in step 3.
    Using our previous example, if your idpid was 
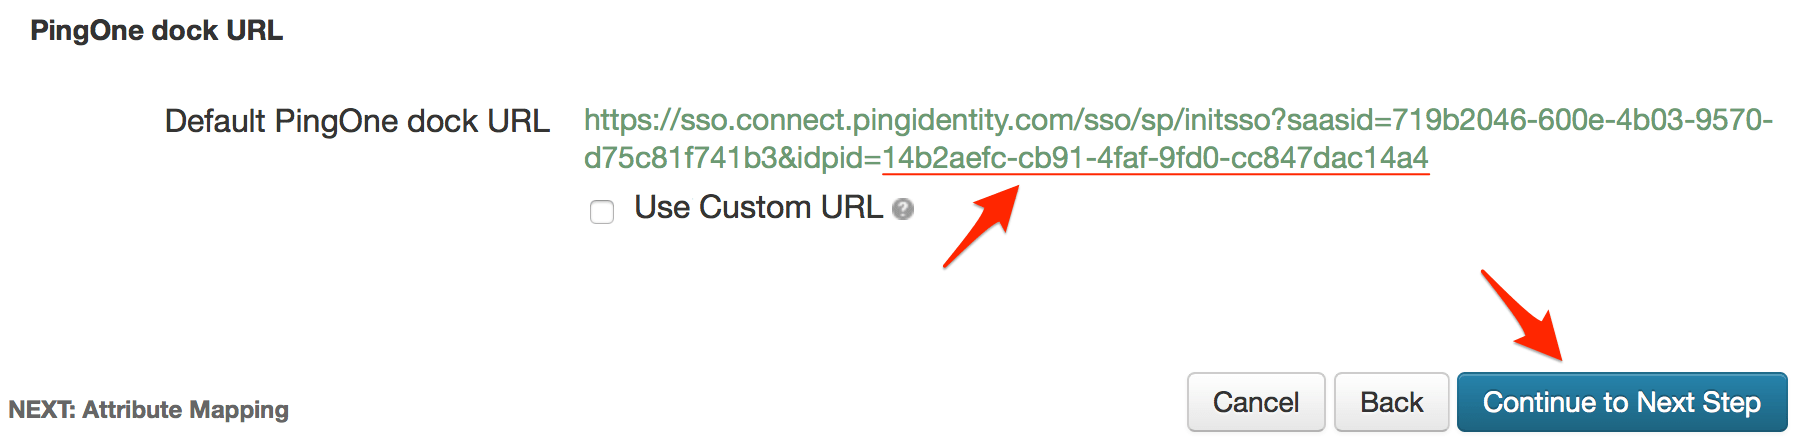
11111111-xxxx-1x1x-1111-xxxx1111xx11, the Login URL in PagerDuty should be set to this:

    https://sso.connect.pingidentity.com/sso/idp/SSO.saml2?idpid=11111111-xxxx-1x1x-1111-xxxx1111xx11

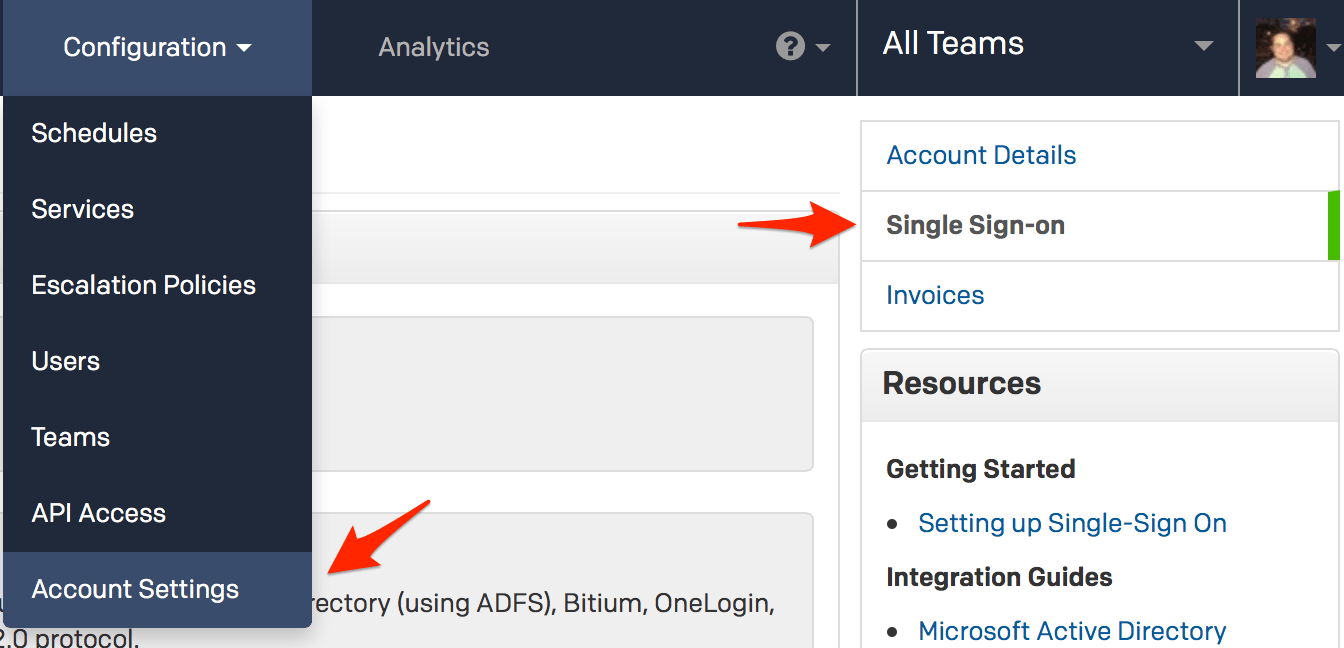
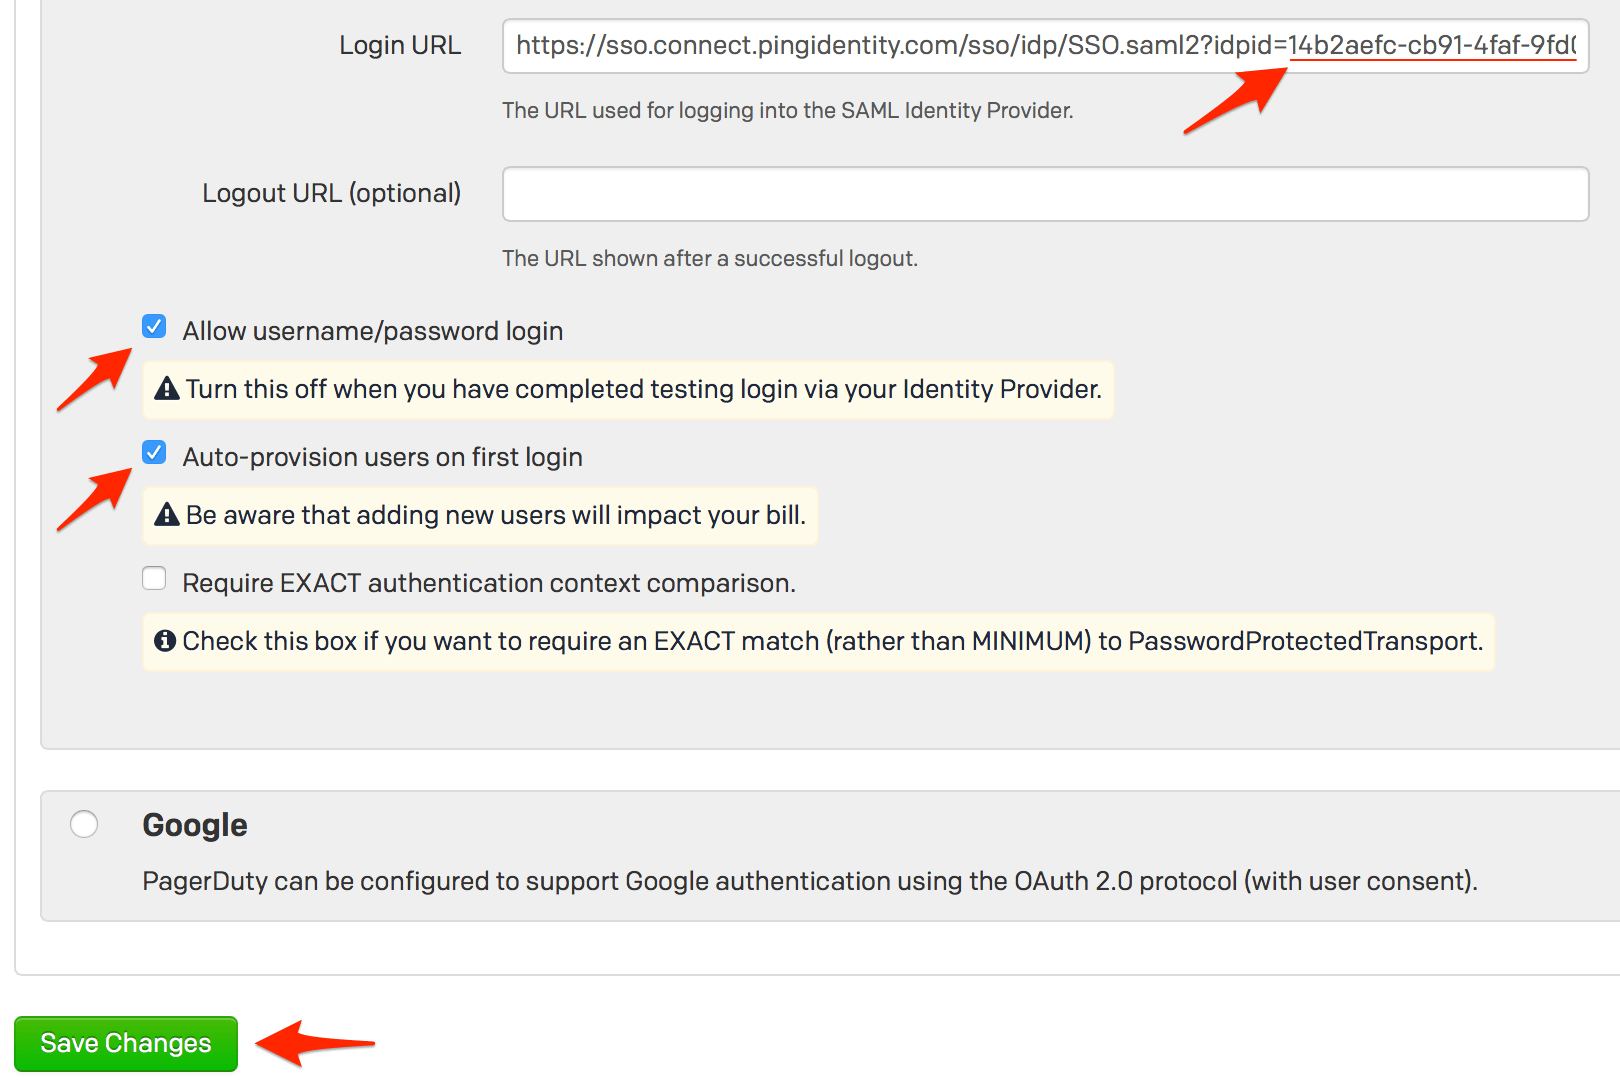
    When you complete the steps in this guide and are done testing, you can return to this page to disable user logins via username and password.

    With auto provisioning enabled, you can allow SSO users to create a PagerDuty account without manual intervention, however please keep in mind that adding additional users will affect your billing if you go over the number of users included in your pricing plan.

    Click Save Changes when you are done on this page.

  10. Back in PingOne, click the Advanced button in the Attribute Mapping section.
  11. In the Advanced Attribute Options window, set the Name ID Format to send to SP to 
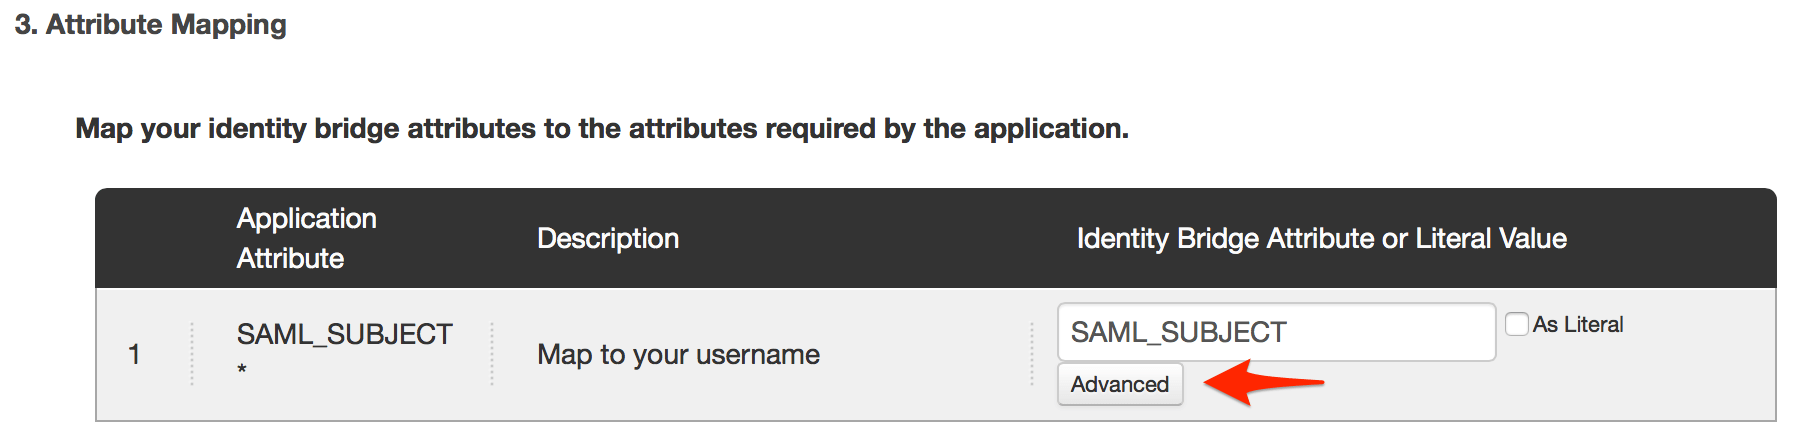
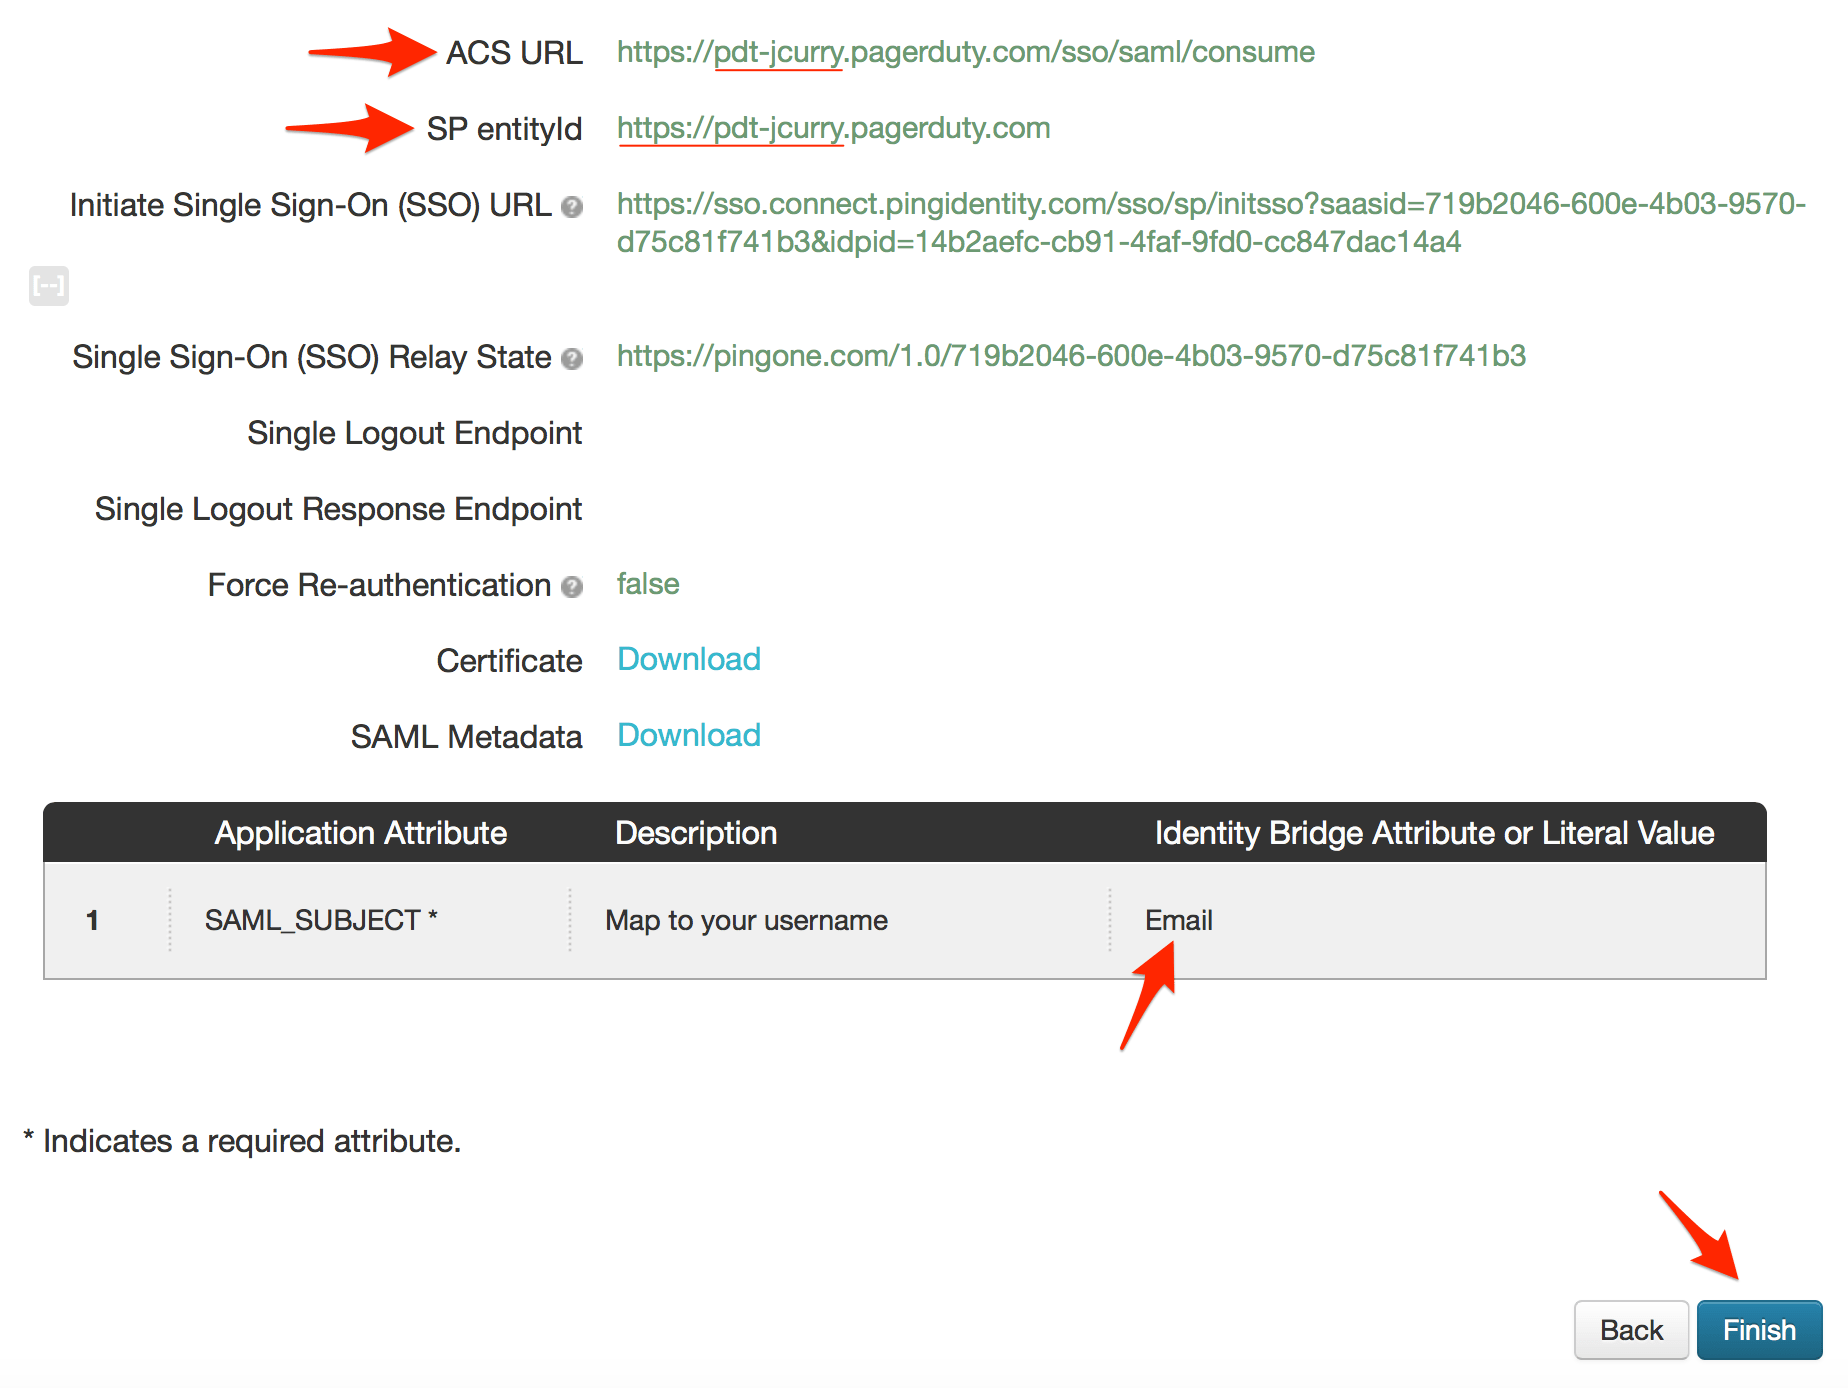
urn:oasis:names:tc:SAML:1.1:nameid-format:emailAddress, and set the IDP Attribute Name or Literal Value to Email, then click Save.
  12. Verify that the Identity Bridge Attribute or Literal Value column now says Email, then click Continue to Next Step.
  13. Click Save & Publish.
  14. Verify that the ACS URL and SP entityId include your PagerDuty subdomain, with both values including https://, and that your Email is being mapped as your username. Click Finish.
  15. Congratulations! You should now be able to login to PagerDuty using PingOne.
  16. Although your users should now be able to access PagerDuty directly, they may not see the PagerDuty app in the PingOne dock. To give users access access to PagerDuty from the PingOne dock, go to the Users tab, then click the User Groups sub-tab. Click Edit for the group you want to give one-click access to PagerDuty.
  17. Check the PagerDuty (SSO) app and click Save. Repeat this for all groups you want to have one-click access to PagerDuty from the PingOne dock.
  18. You’re done! Users in groups that have been given one-click access to PagerDuty (SSO) will now see the the PagerDuty app in their PingOne dock.

FAQ

Can the account owner log in without SSO if username and password authentication is disabled?

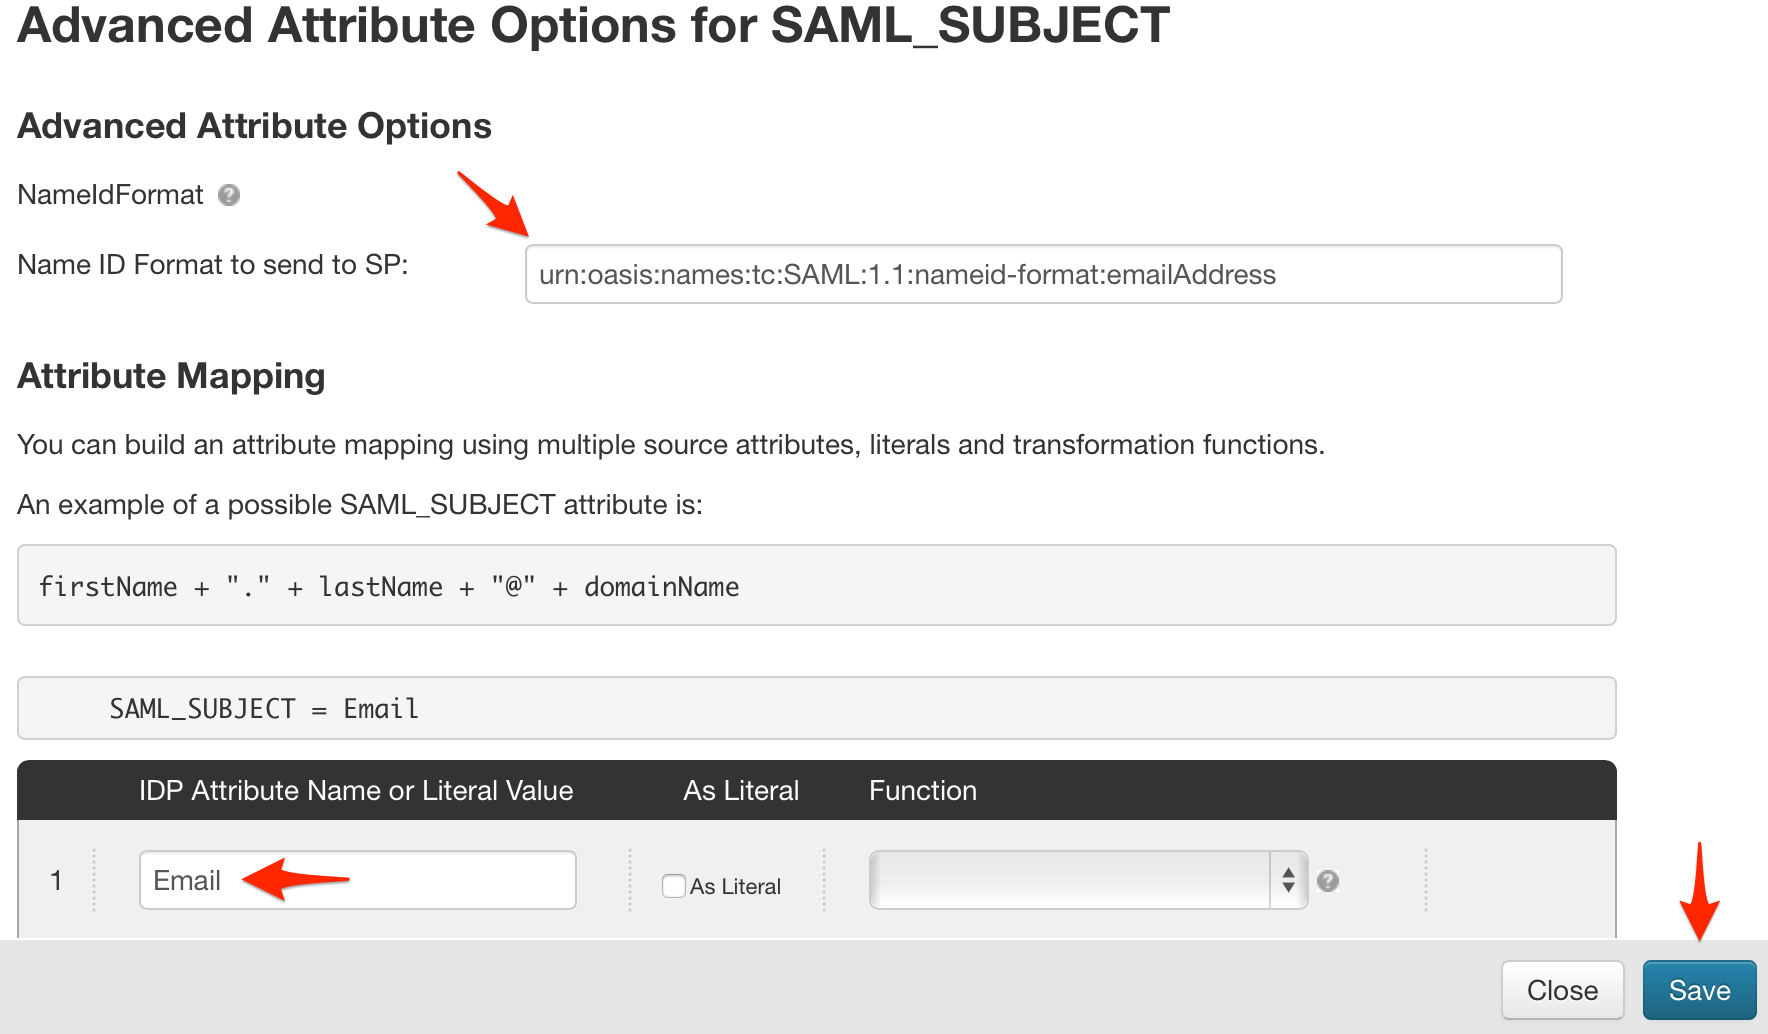
Even with username and password authentication disabled for users, the Account Owner will always be able to login with their username and password as a backup option should you need to change the SSO configuration or disable it completely.

Why don’t I see the Single Sign-on option when I go to Account Settings?

SSO is only available in accounts on our current Standard or Enterprise plans. Please contact our sales team if you are interested in upgrading your plan.

Start Using PagerDuty Today

Try PagerDuty free for 14 days — no credit card required.