- PagerDuty /
- Integrations /
- CA UIM (Unified Infrastructure Management) Integration Guide – Email
CA UIM (Unified Infrastructure Management) Integration Guide – Email
CA UIM (Unified Infrastructure Management, formerly Nimsoft Monitor) is a scalable IT monitoring solution that provides 360-degree visibility into systems and infrastructure performance. It delivers a single, unified architecture for both traditional and cloud environments, enabling you to proactively monitor performance and availability to ensure that your customers are up and running.
Note: This guide has been replaced by a new CA UIM Integration Guide, which uses a PagerDuty probe that sends events using our API. Please try following the steps in the new integration guide first, and use this one only if you have a system which the PagerDuty probe can not be installed on.
In this guide, desired alert notifications are sent from UIM to PagerDuty via the UIM emailgtw probe and nas auto-operator profiles. Please note that this integration also supports the ability to automatically resolve triggered alarms within PagerDuty once UIM detects an error condition or threshold has returned to normal (via e-mail based "clear" alerts).
In order to deploy this integration, please follow these steps.
In PagerDuty
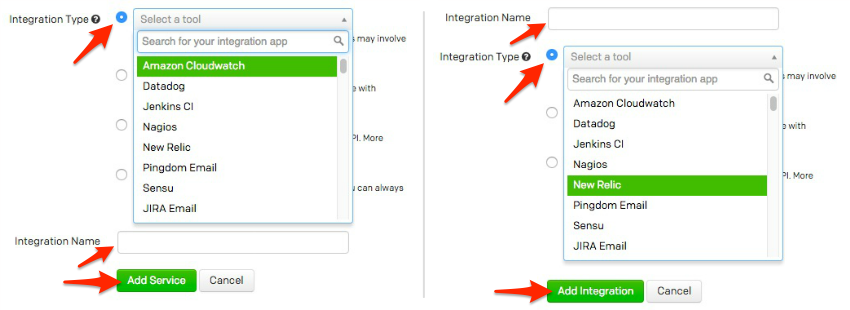
- From the Services menu, select the Service Directory.
- On your Service Directory page:If you are creating a new service for your integration, click +New Service.
If you are adding your integration to an existing service, click the name of the service you want to add the integration to. Then click the Integrations tab and click the Add a new integration hyperlink.
- Select your app from the Integration Type menu and enter an Integration Name.
If you are creating a new service for your integration, in General Settings, enter a Name for your new service. Then, in Incident Settings, specify the Escalation Policy, Notification Urgency, and Incident Behavior for your new service.
- Click the Add Service or Add Integration button to save your new integration. You will be redirected to the Integrations page for your service.
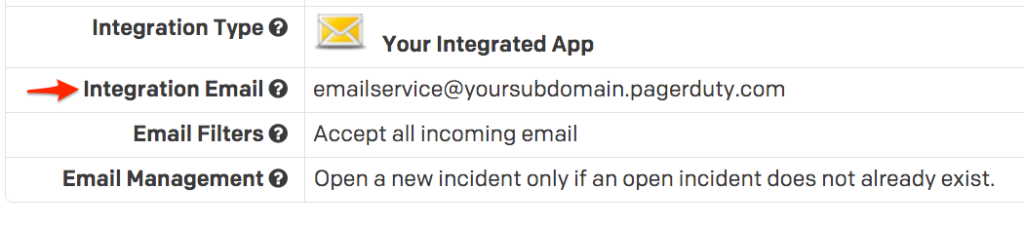
- Copy the Integration Email for your new integration:
- Now that you have created the integration for UIM, edit the integration's settings from your service's Integrations tab by clicking on the name of the integration and selecting Edit.
- Select the option for “Create and resolve incidents based on custom rules”.
- You should now have the ability to modify Rule 1. Configure this rule as follows:
- Resolve an incident if All of the following conditions apply:
The email body matches the regular expression:Level:.*clear - Within the "Incident Key" section of Rule 1, configure your entry as follows:
In the email body, match this regular expression:NimID:([^n]+)
- Resolve an incident if All of the following conditions apply:
- Now you will need to create a second rule, Rule 2. To do this, select the Add Another Rule button.

- You should now have the ability to modify Rule 2. Configure this rule as follows:
- Trigger an incident if All of the following conditions apply:
The email Subject Contains:
UIM alarm - Within the "Incident Key" section of Rule 2, configure your entry as follows:
In the email body, match this regular expression:NimID:([^n]+)
- Trigger an incident if All of the following conditions apply:
- As a final step, be sure to set the setting of If an email does not match any of the rules above to
discard it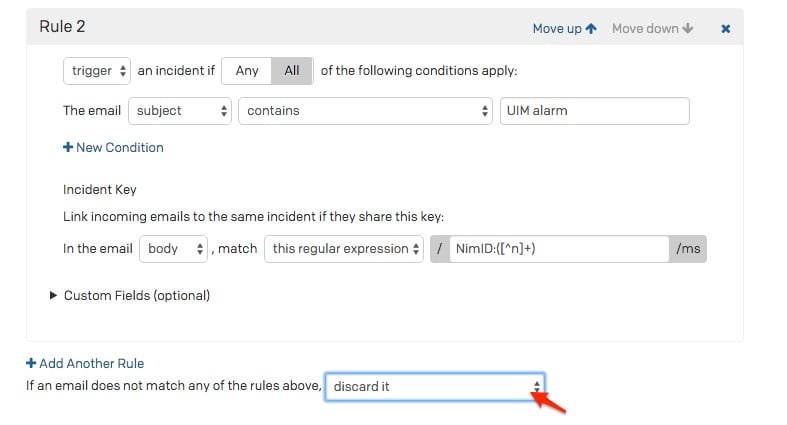
- Click Save Changes.

In CA UIM:
-
Configure your emailgtw probe to be able to send email
notifications. You will need to define your email server settings to work
in your environment.
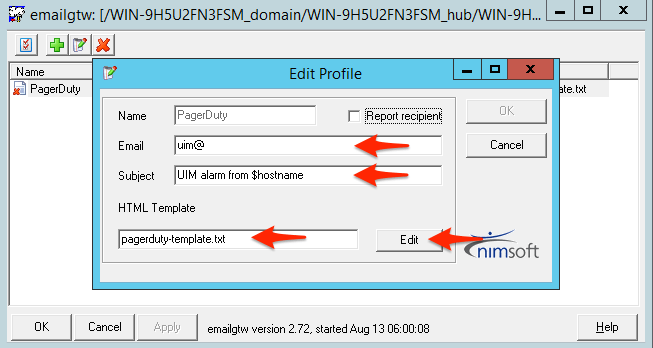
For information on how to configure your CA UIM emailgtw probe, reference CA documentation here. - Within the emailgtw probe, right mouse click to create a new profile called “PagerDuty”.
- Reference the email address you created in step 2 when configuring your UIM Service within PagerDuty. Enter this email address into the “Email” field. This is mandatory as this is how UIM will communicate to PagerDuty.
-
Modify the Subject field to the value of
"UIM alarm from $hostname".
Note that if you do not wish to use this Subject, you will need to modify the value in Step 10 (Rule 2) from earlier in these instructions. This is due to the fact that new PagerDuty incidents will be triggered when seeing this value.
-
Change the HTML Template field to “
template.txt”, or, if you are using this template for other e-mail notifications with UIM, you can alternatively make a copy of thetemplate.txtfile to a brand new file that can be used strictly for PagerDuty notifications.
To do so, copy the file$NIMROOTprobesgatewayemailgtwtemplate.txtto a new file within the same directory (i.e. pagerduty-template.txt). When you select the “Edit” button at this point, you need to then add the following new line to the template:
NimID: $nimid -
The final template.txt should look something like this (the new line can
appear anywhere in the template).
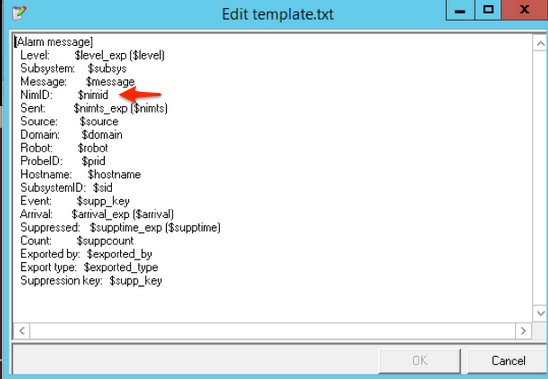
Please note that you can remove and/or reorder any of the other attributes that you do not care about in order to make the PagerDuty incident appear more concise. You must, however, keep the attributes of
NimID, Level, Message and Suppression Keyat a minimum.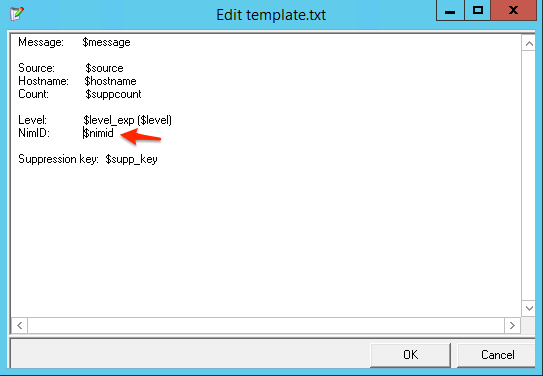
- Within the nas probe, create a new Auto-Operator profile called “PagerDuty”.
- Within the auto-operator profile, select “EMAIL” as the Action type.
- Within the auto-operator profile, within the Recipient(s) field, enter “PagerDuty” (which matches the profile name we created in the emailgtw probe in step 6.
- Within the auto-operator profile, select “On message arrival” under “Action Mode”. Note that this option will send the email notification immediately. If you prefer, you can also use the option of "On overdue age". This options gives UIM some time to further process the alarm in case it were to clear within the configured time interval.
-
Enter any filter criteria that should be used before an email is sent to
PagerDuty. For example, if you only want critical alarms to trigger in
PagerDuty, only select the red alarm filter option. Be sure to also select
the "Green" (clear) severity to inform PagerDuty of "clear"
events from UIM.
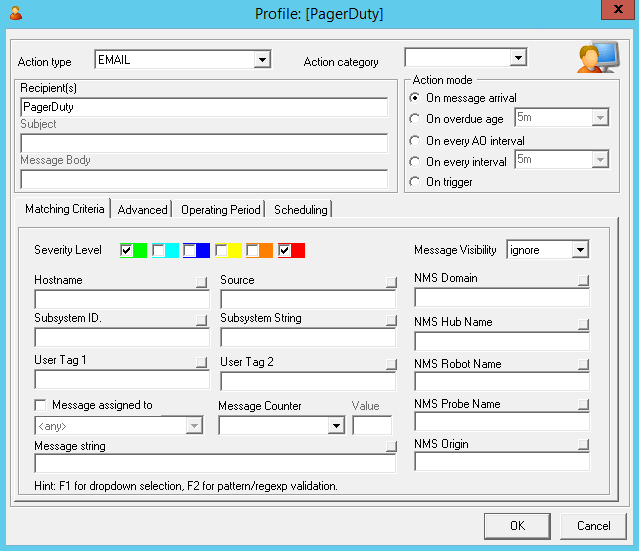
- Please note that you can create as many PagerDuty auto-operator profiles as you require, based on your operational or business preferences.
-
You should now be ready to test the integration between UIM and PagerDuty.
To do so, follow these steps:
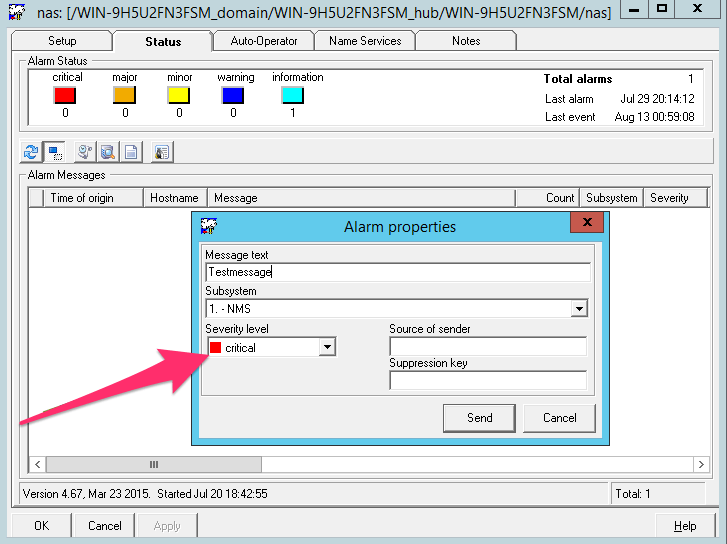
- Within the “nas” probe, select the “Status” tab.
-
Right mouse click in the lower half of the tab. Select
“Send Test Alarm”.
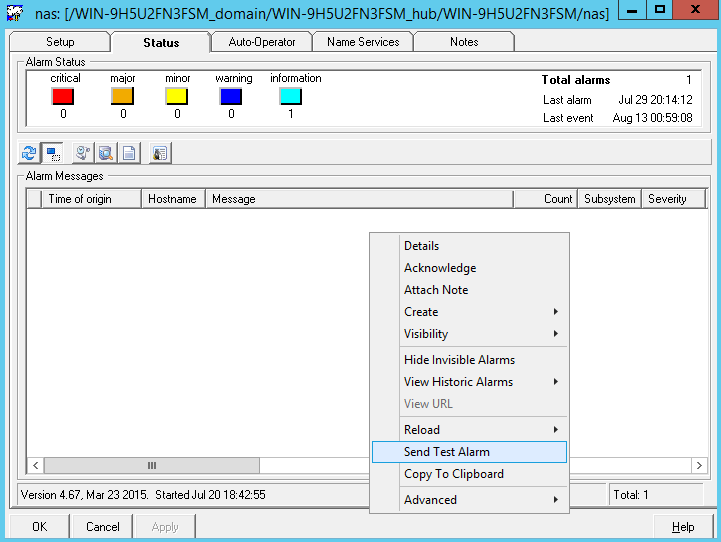
-
Be sure to select the proper alarm severity level in your test alarm in
the event you set any filters in step 10. In our example above, we need
to send a critical (red) alarm.
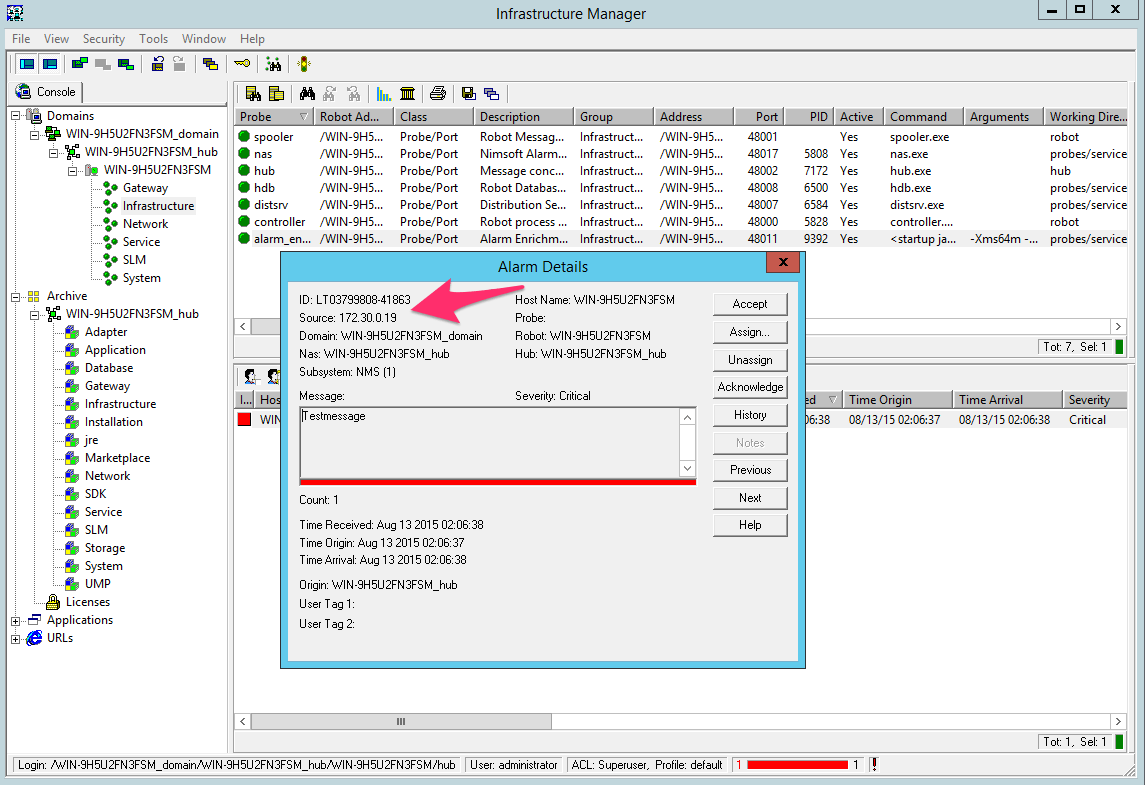
-
Wait for the alarm to appear in UIM. Note the
alarm ID of your test alarm.
-
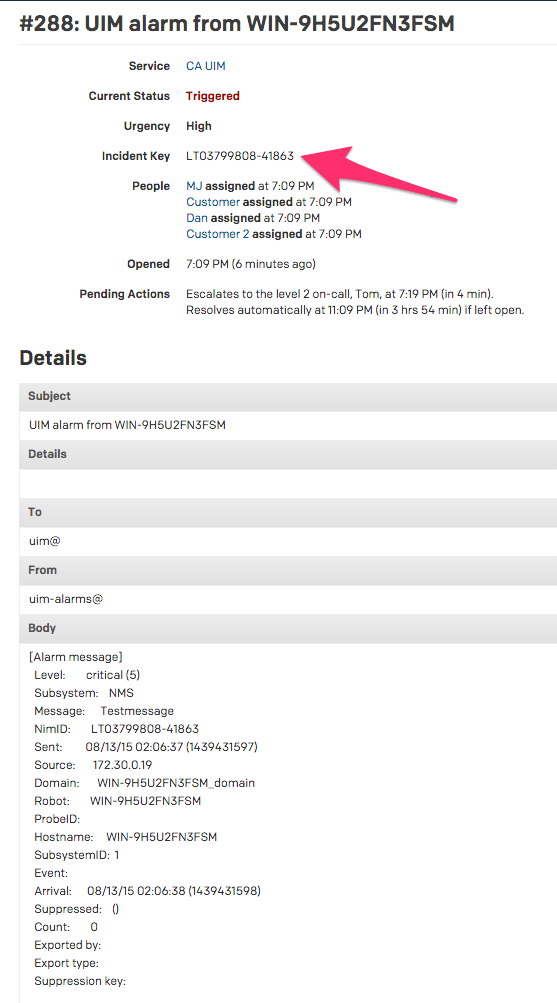
You should then see the incident appear within PagerDuty. Notice the
Incident Key matches the alarm ID from
UIM in the prior step.
- Acknowledge the alarm within UIM.
-
You should then see the PagerDuty incident auto-resolve. This
auto-resolve occurs due to the parsing rules we configured in step #7
against the Nim ID.
If this works, the integration is complete!
Ready to get started?
Try any product on the Operations Cloud for free.
No credit card required.