- PagerDuty /
- Integrations /
- ignio Integration Guide
ignio Integration Guide
Digitate’ s flagship product, ignio, is an award winning cognitive automation product suite for the enterprise that enables smarter and faster decision-making to accelerate transformation, improve performance, and predict & prevent problems.
Unique pre-built knowledge significantly reduces the time required for ignio’s AI to learn and understand the infrastructure and its business context. ignio makes IT operations automations both simple and powerful. Out-of-the-box skills enable ignio to execute many routine tasks on its own. Complete automation workflows can be built without the need for static programming or scripting. As a result, IT Operations staff can devote more time to innovation and transformation.
Benefits
Minimize or eliminate business revenue loss due to IT failures
- Handle Incidents - Reduces time required to recover from an IT outage by 90%
- Manage Alerts - Reduces operational risks by more than 90%
- Optimize Proactively - Helps identify and eliminate up to 30% of issues proactively
Enable positive business growth through improved user experience
- Perform Actions - Reduces up to 90% of time required to process user requests
- Learn Context - Automation that is adaptive, easy to scale and agile
Enhance efficiency of IT Operations
- Up to 60% reduction in manual effort spent on managing IT Operations
How it Works
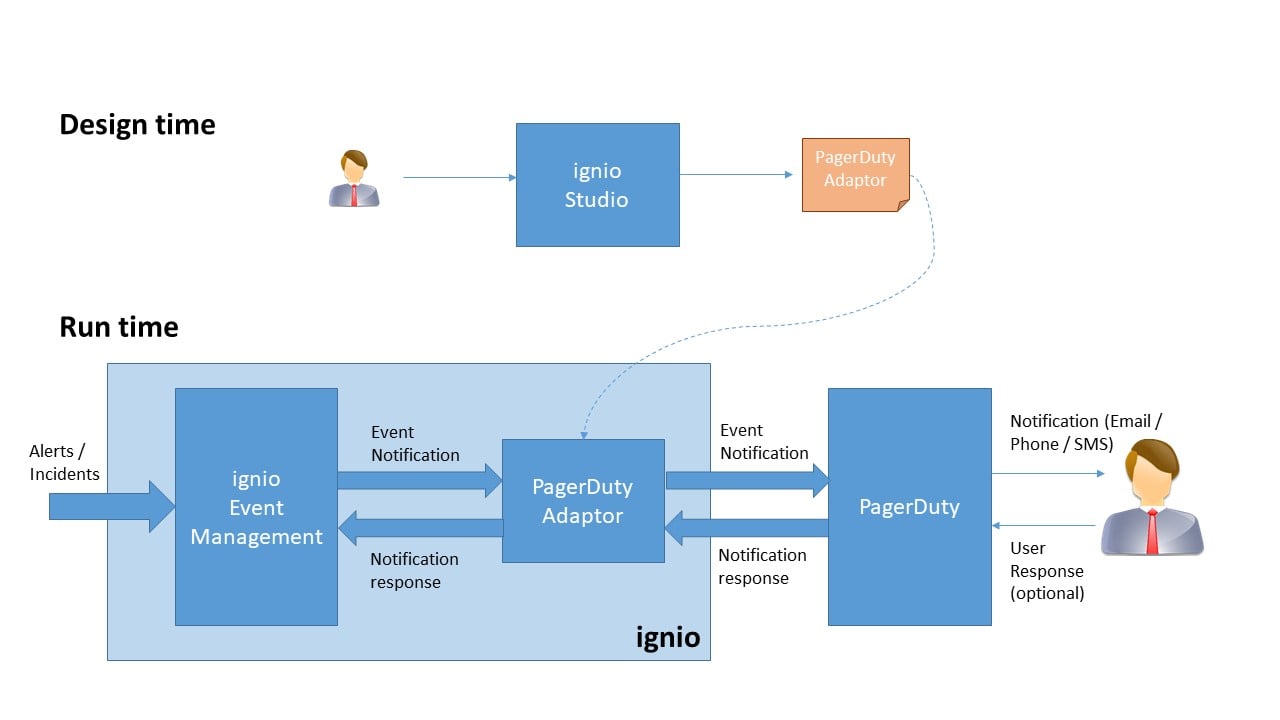
- Ignio takes help of PagerDuty to route notifications which are consumed by the recipient(s) as is without taking any action, while in the other case notifications are acted upon by the recipient(s) to help ignio resolve the incident.
- Actionable events or incidents that are required to be acted upon in-order to be resolved will be routed to PagerDuty. Some of these notifications will be resolved or they would be escalated to other recipients who would act on these events for resolution.
- In case of escalated incidents, ignio provides enrichment to assist triaging by providing notes in PagerDuty, and PagerDuty allows the provision to select automation actions for ignio to execute and assist in incident resolution.
- In some customer integrations, pure notification messages are routed to PagerDuty for end user consumption. For instance, frequently occurring events getting suppressed which can indicate possibility of optimization of thresholds, alerting frequency at the source, etc. Or through notifications, provide the incident status to the interested stakeholders.
Requirements
- PagerDuty integrations require an Admin base role for account authorization. If you do not have this role, please reach out to a PagerDuty Admin or Account Owner within your organization to configure the integration.
Support
This integration is built and supported by Digitate. If you need help with this integration, contact ignio.support@digitate.com.
Integration Walkthrough
In PagerDuty
Integrate with a Service
-
- From the Configuration menu, select Services.
- There are two ways to add an integration to a service:
- If you are adding your integration to an existing service: Click the name of the service you want to add the integration to. Then, select the Integrations tab and click the New Integration button.
- If you are creating a new service for your integration: Please read our documentation in section Configuring Services and Integrations and follow the steps outlined in the Create a New Service section, selecting ignio as the Integration Type. Continue with the In ignio section (below) once you have finished these steps.
 Add Service - Image 1[/caption]
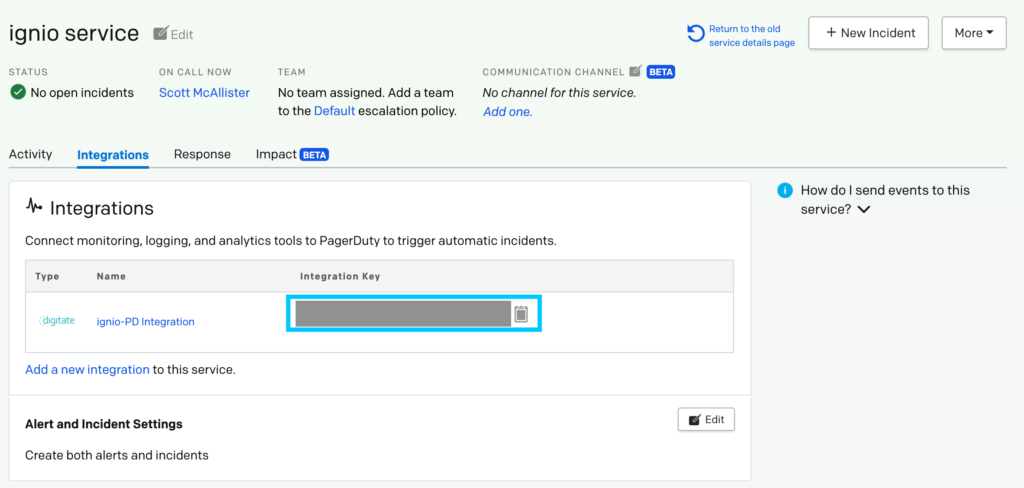
- Enter an Integration Name and select ignio from the Integration Type menu.
- Click the Add Integration button to save your new integration. You will be redirected to the Integrations tab for your service.
- An Integration Key will be generated on this screen. Keep this key saved in a safe place, as it will be used when you configure the integration with ignio in the next section.
 Ignio Service Integration Key[/caption]
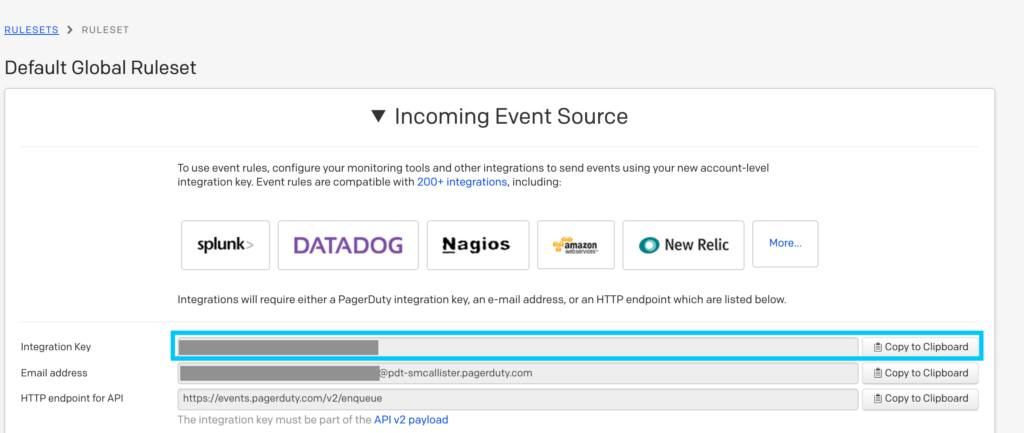
Integrate with a Ruleset
- Go to Configuration -> Event Rules -> Default Global Rules -> Incoming Event Source
- Copy the Integration key. (Marked in blue rectangle in below image)
Note: The Integration Key is generated only by an Admin account
Ignio – PagerDuty Integration Depiction
In ignio
Perform the following steps to setup the PagerDuty integration in ignio
- Login to ignio using credentials with administrative privileges
- Go to Maps.
- Create a node under an appropriate org unit
Note: Typical hierarchy of the entities is as follows. Enterprise (Org Unit) is the global org unit on the top in the hierarchy.
User creates appropriate org units under the “Enterprise” Org Unit and creates the said entity under this org unit.
In the current case an org unit named “Integration” is created, and the “Add Entity” operation is carried on this Org Unit.
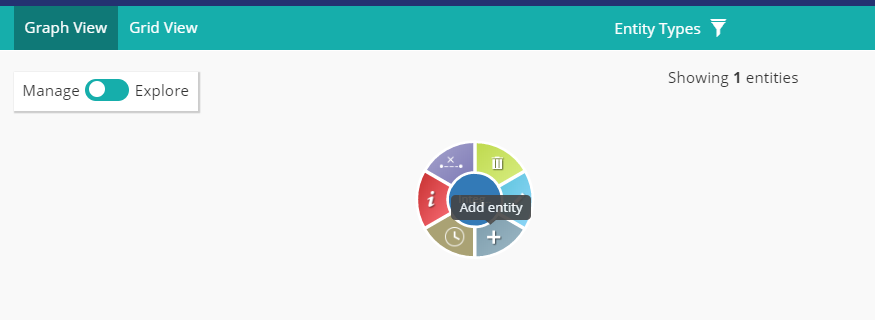 Adding Entity: Image – 3
Prerequisite:
Ensure the capability named “Notification” is already installed in ignio.
Note: The “Capability” in ignio parlance is an executable code which performs certain operations. In the current case sending a notification using PagerDuty is the expected operation. This Capability is developed using an in-house tool called studio.
- Select the “Entity” option and search for the entity type “PagerDuty”
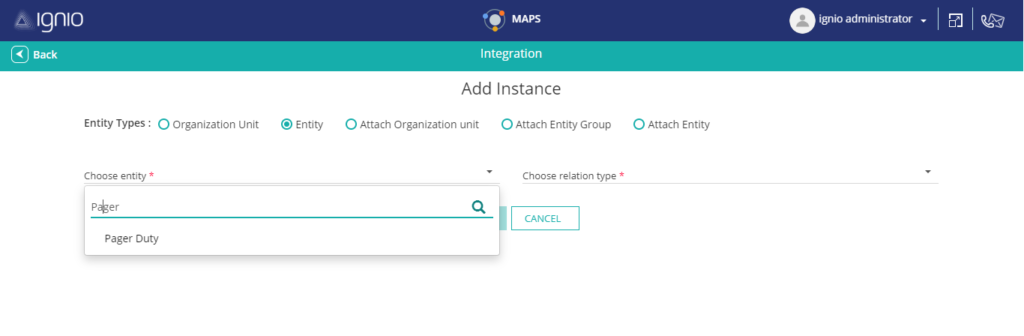
Select Entity Instance: Image – 4
- Fill in the name of the integration and routing key as shown in the below screen.
Note: This routing key is also known as the Integration Key generated in PagerDuty. (Refer step 8 “Get Integration key” above)
Add Entity Instance
- Pager Duty instance is ready to be used. Next, configure scenarios for notification sending.
Go to Settings Policy Configurations
- Select the org unit for which you want to configure the policies for notifications.
Note: You can opt to apply the policies at the top at the Enterprise level or at the specific Org Unit level under it. Applying the policies at the Enterprise level cascades it to all the org units under it.
[caption id="attachment_61264" align="alignnone" width="554"]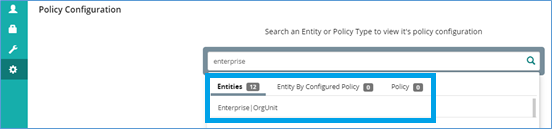 Selecting Org Unit for Policy Configuration: Image – 6[/caption]
- Select the “Events” configuration parameter and select the “Alert notification” option, click Next as shown below.
Note: Below is a simplified view of a Policy Configuration. Normally, there are many other parameters listed with "Events". Th same is the case with the policies under “List of policies”.
[caption id="attachment_61266" align="alignnone" width="390"]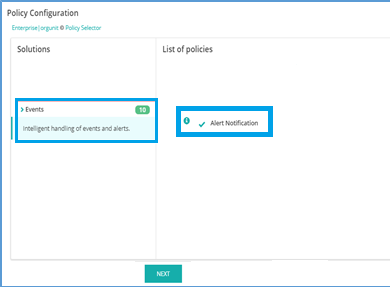 Selecting Policy to be applied: Image – 7[/caption]
- Click on the Alert notification entry
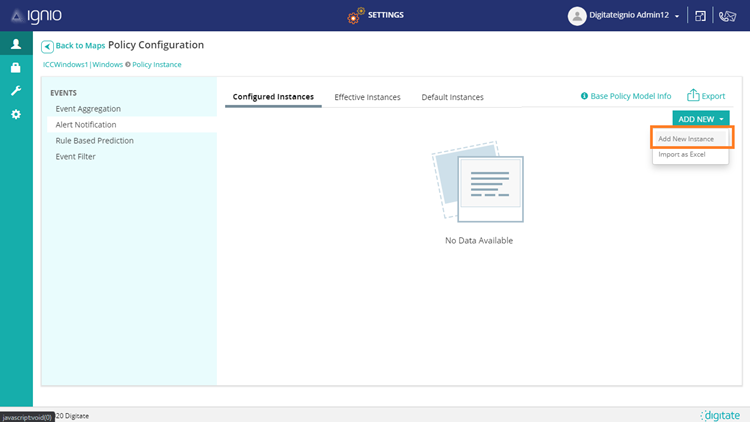
- Click on “Add New”
- Click on “Add new instance”. (Marked in blue rectangle in image –8) This shows a new policy configuration screen as shown in step 9.
[caption id="attachment_61268" align="alignnone" width="625"]
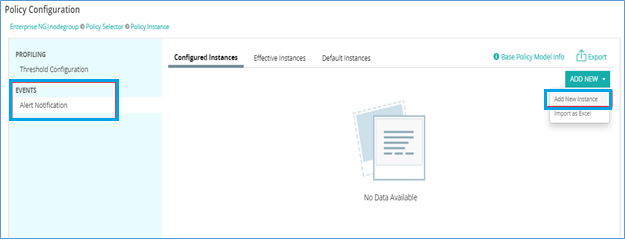 Adding instance of selected policy: Image –8[/caption]
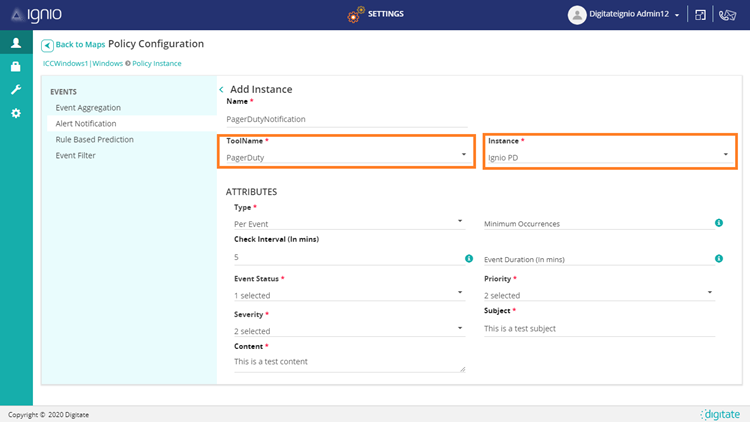
- Select the tool as “Pager Duty” and fill in the other details.
[caption id="attachment_61269" align="alignnone" width="946"]
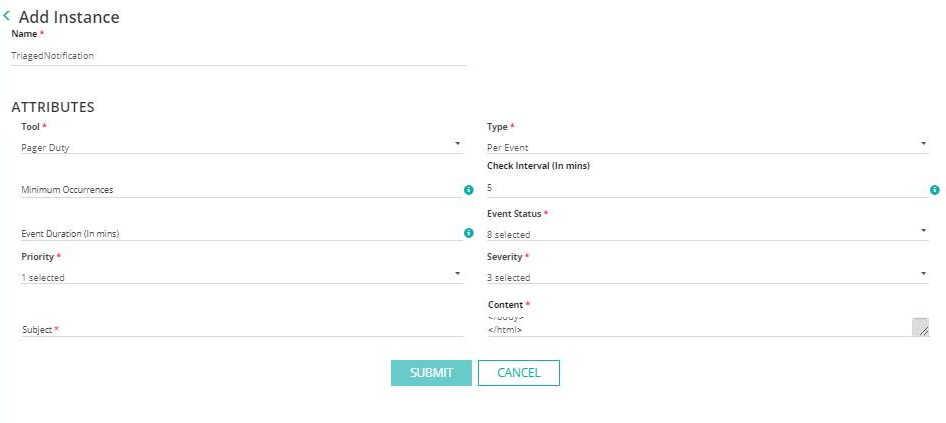 Populate “Alert Notification” policy configuration: Image – 9[/caption]
An explanation of the Instance parameters are found below. (Refer Image - 9)
- Tool – Select value “Pager Duty”
- Type – Per Event / Batch
- If Batch is selected “Minimum occurrences”, “Check Interval” and “Event duration” should be populated.
- Event Status –Event status for which notification is sent. For e.g. Duplicate, suppressed etc.
- Priority – Select the event priority on which the notification is sent
- Severity - Select the event severity on which the notification is sent
- Subject –Title or summary for this notification.
- Content - The content of the notification sent out to the user.
- Any alert from ignio on a specific entity, for which a policy is set, gets applied to it. In this case the “Alert Notification” policy. This event is sent to PagerDuty and as a result appropriate notification is sent out by PagerDuty to various recipients through various channels as configured in PagerDuty.
Bidirectional Use Case
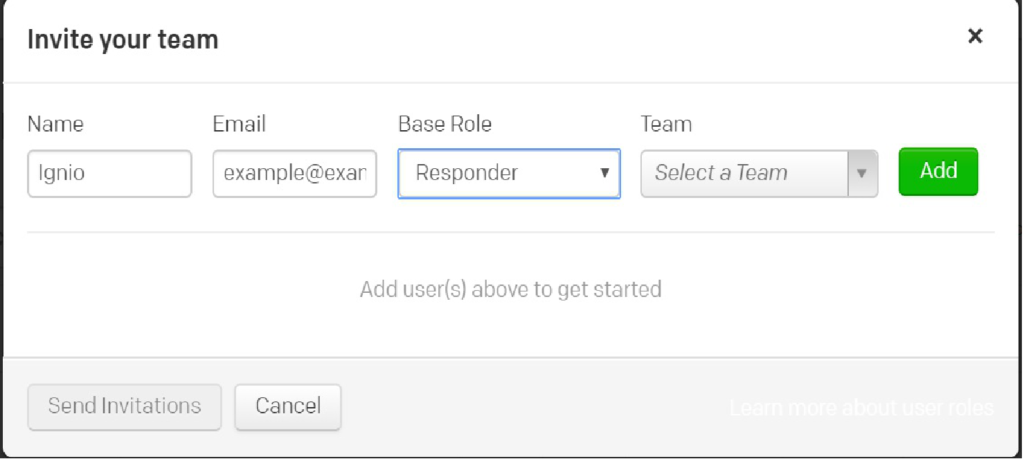
- Login to PagerDuty
- Create user named 'Ignio' with the role of 'Responder'.
Prerequisite
Ensure the capability named “Notification” is already installed in ignio.
In PagerDuty
Generate a new API Key.
In the Configuration menu select API Access.
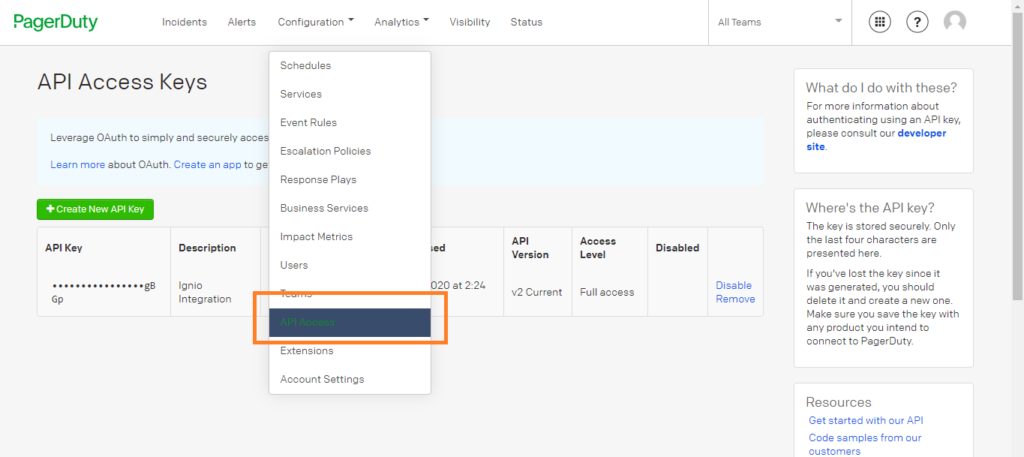
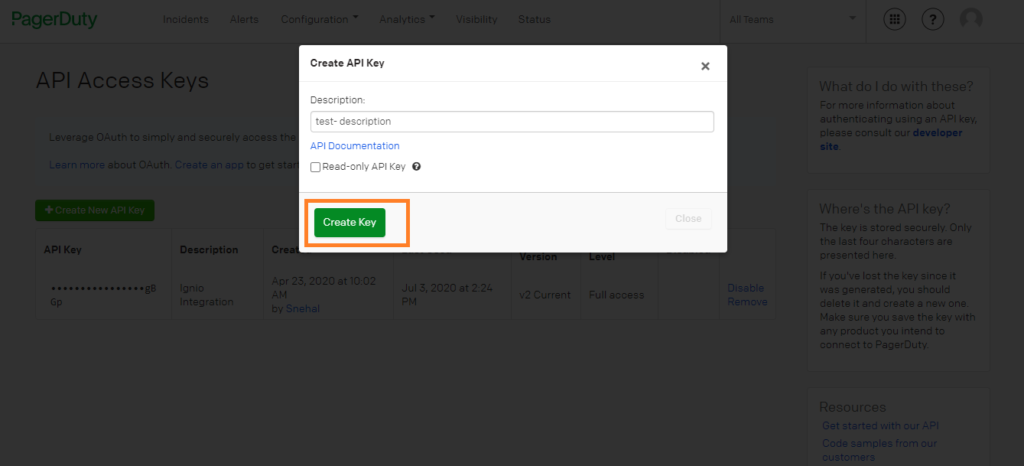
Click the "+Create New API Key" button.
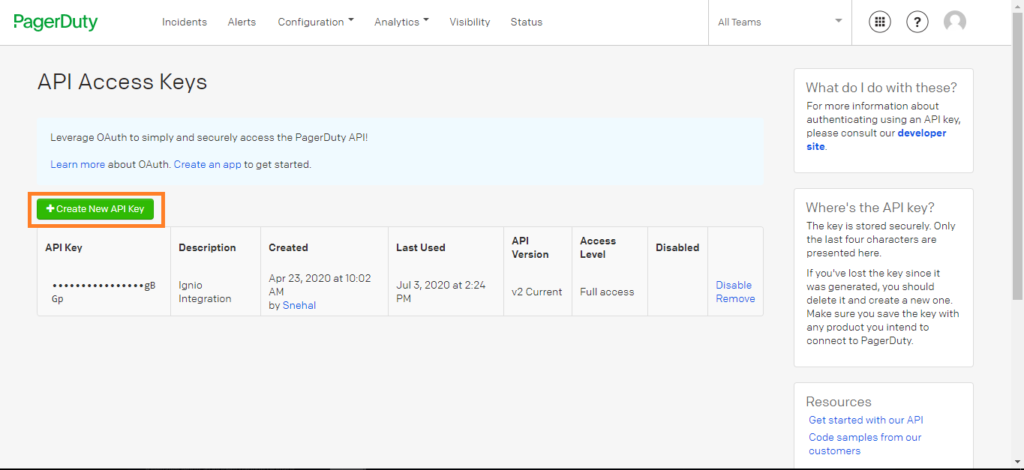
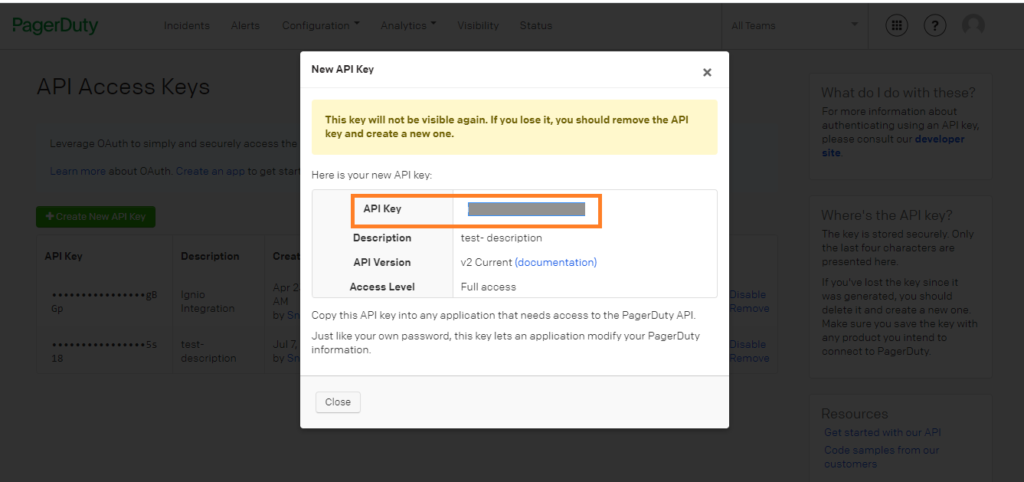
Give the key a name, and click Create Key.
Copy the API Key and save it for later in the process. NOTE: The key will not be visible again in your PagerDuty account.
You'll also need an Integration Key, see the section above in this document for Integrate with a Service or Integrate with a Ruleset to see how to generate an Integration Key.
In ignio
Perform the following steps to setup the PagerDuty integration in ignio
- Login to ignio using credentials with administrative privileges
- Go to Maps.
- Create a node under an appropriate org unit
Note: Typical hierarchy of the entities is as follows. Enterprise (Org Unit) is the global org unit on the top in the hierarchy.
User creates appropriate org units under the “Enterprise” Org Unit and creates the said entity under this org unit.
In the current case an org unit named “Integration” is created, and the “Add Entity” operation is carried on this Org Unit.
Adding Entity: Image – 3
Note: The “Capability” in ignio parlance is an executable code which performs certain operations. In the current case sending a notification using PagerDuty is the expected operation. This Capability is developed using an in-house tool called studio.
- Select the “Entity” option and search for the entity type “PagerDuty”
Select Entity Instance: Image – 4
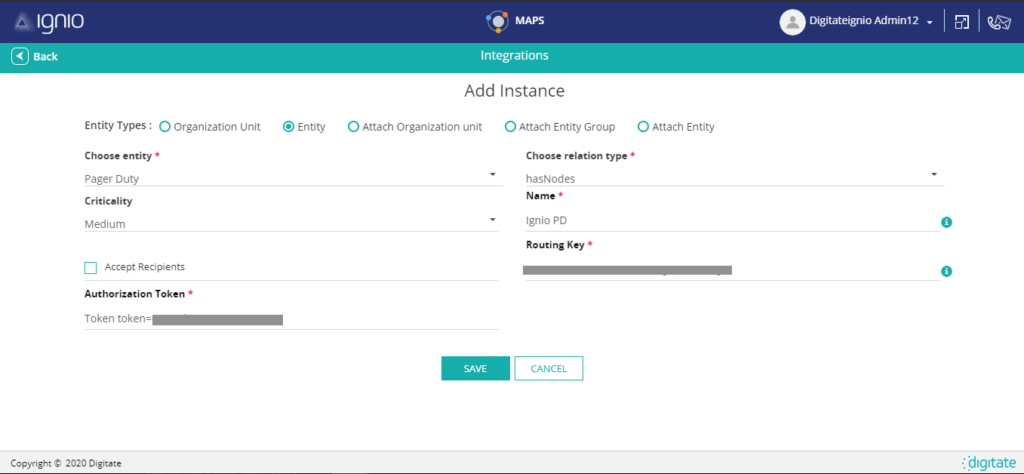
- After selecting the entity user should input the attributes for PagerDuty instance.
- There are three mandatory attributes that user should enter i.e. Name, Authentication Token and Routing Key.
- Give your Instance a name, choose a relation type and add the PagerDuty Integration Key for Routing Key as well as the PagerDuty API Key as shown for Authorization Token, as seen below.
Configuring HttpEndpoint for PagerDuty
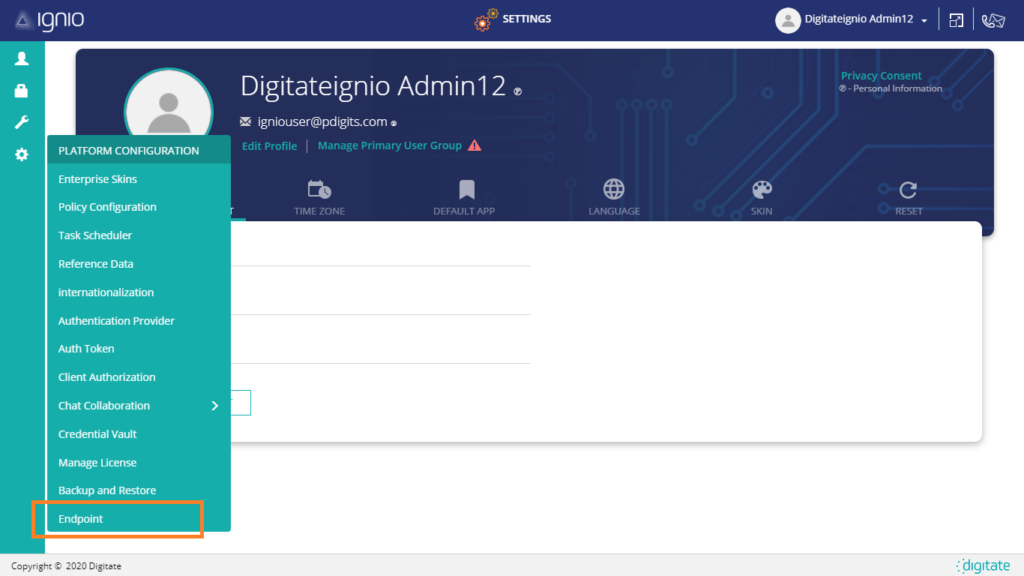
- To create an HttpEndpoint, go to Settings > Platform Configuration > Endpoint. Click on Endpoint.
- Click ADD NEW
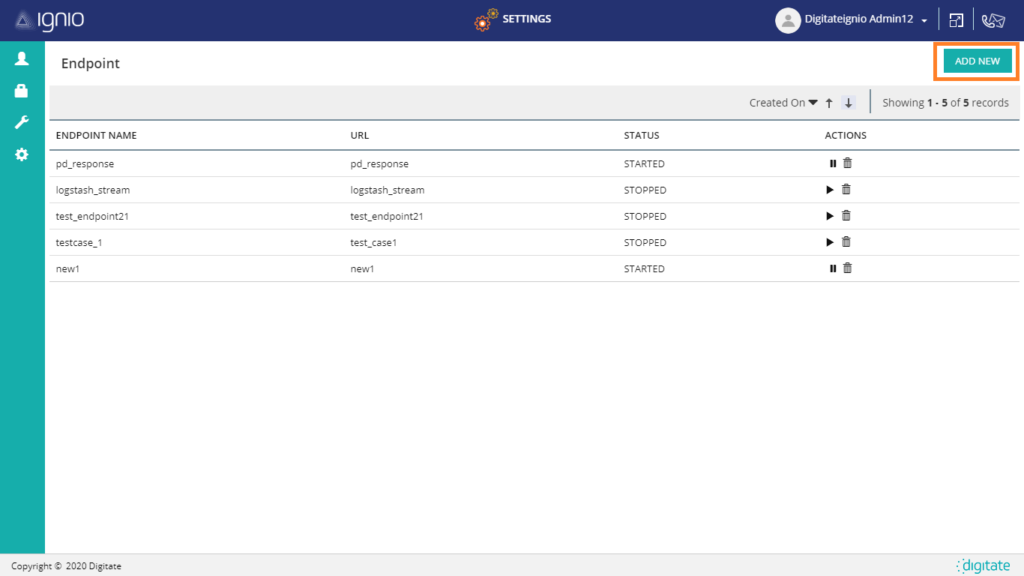
- Enter information in the required fields. Also, enter only the suffix of the URL in the URL field.
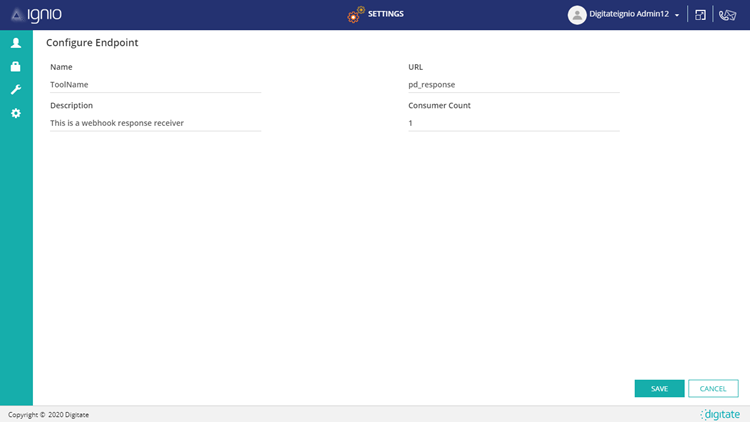
- After entering the required information click on SAVE.
- Click and open the created endpoint and click on ADD TRANSFORMATION.
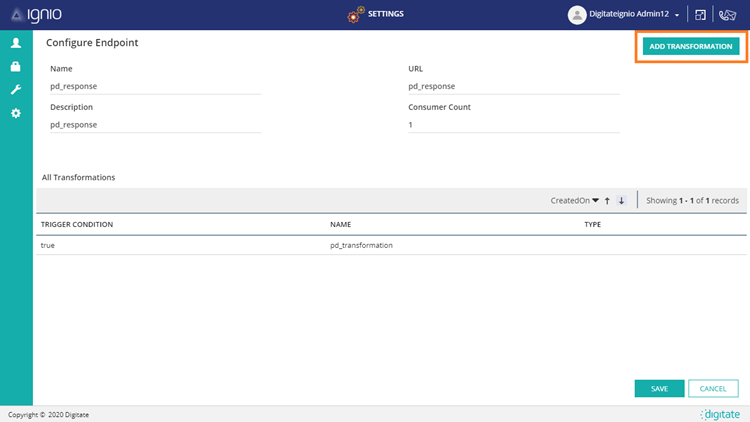
- Add Transformation is used to provide the script which will run after the endpoint will be invoked.
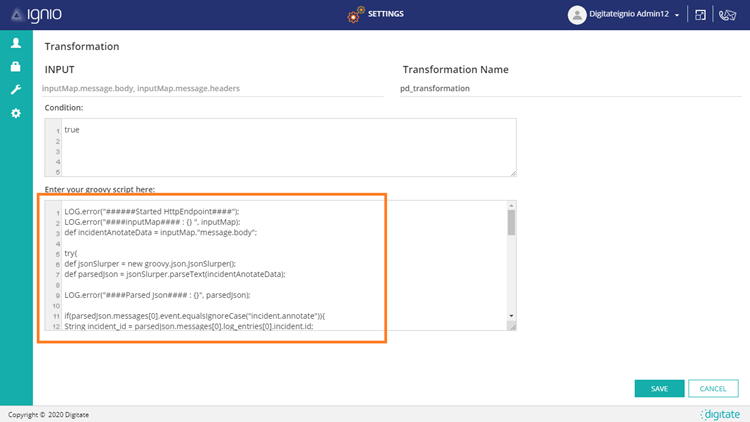
- Enter true in CONDITION field and Configure the HTTP endpoint to accept the call backs from Pager Duty. For details refer to ignio documentation.
- Click on SAVE and an http endpoint in ignio will be created.
Getting Auth Token in ignio
- To generate an Auth token, go to Settings > Platform Configuration > Auth Token. Click on Auth Token.
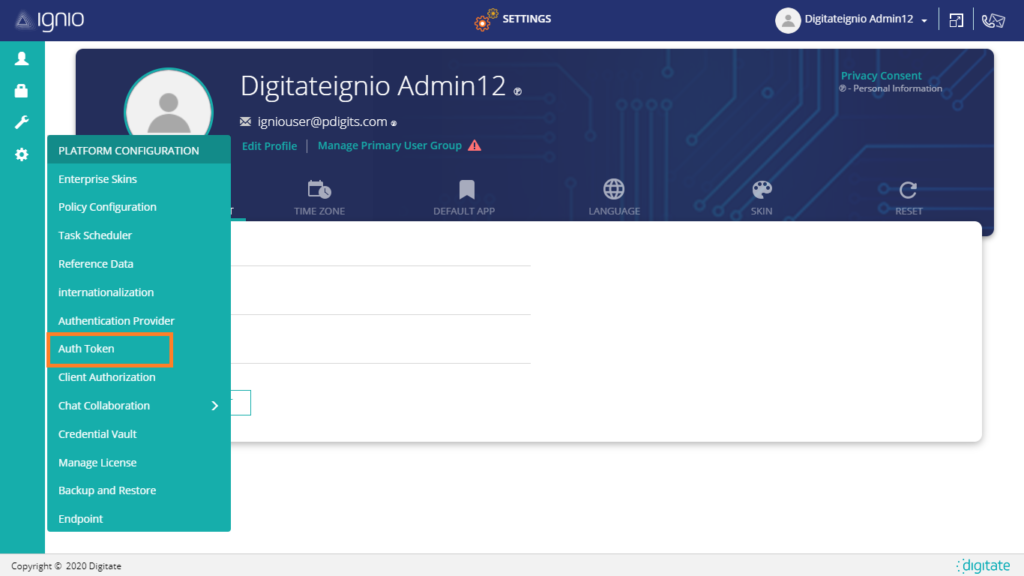
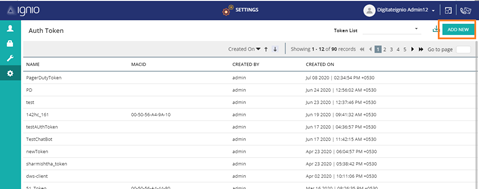
- Click on ADD NEW and a pop up will appear.
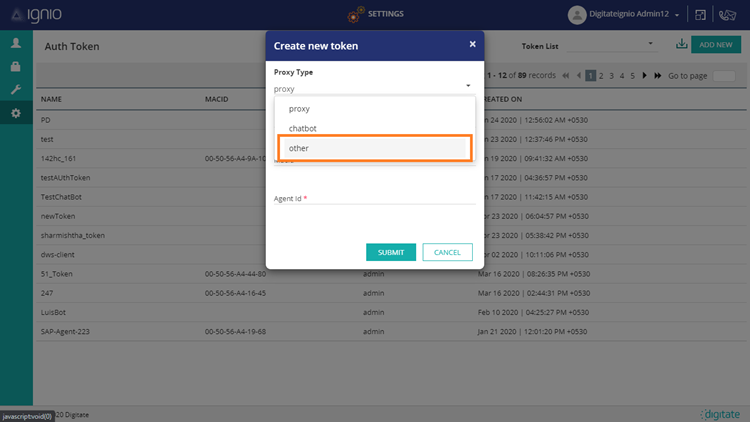
- Select "Other" from the Proxy Type dropdown.
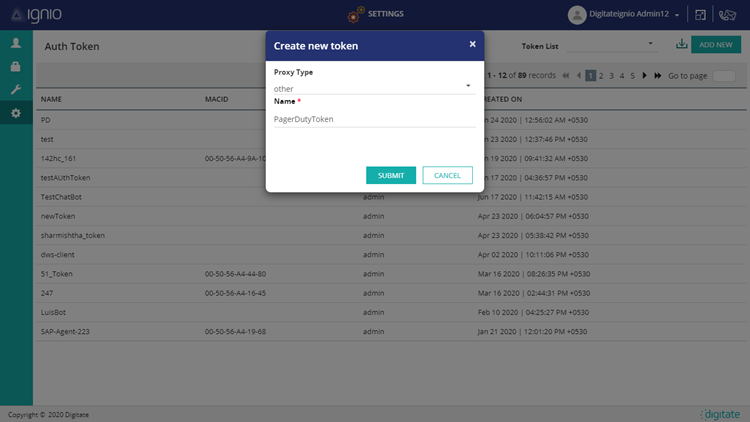
- Enter a relevant name in the Name field, and click Submit.
- With the Auth Token generated you should now search for it in your Token List drop down at the top right of your window. Once you find it, click on it to select it and then on the Download icon to download.
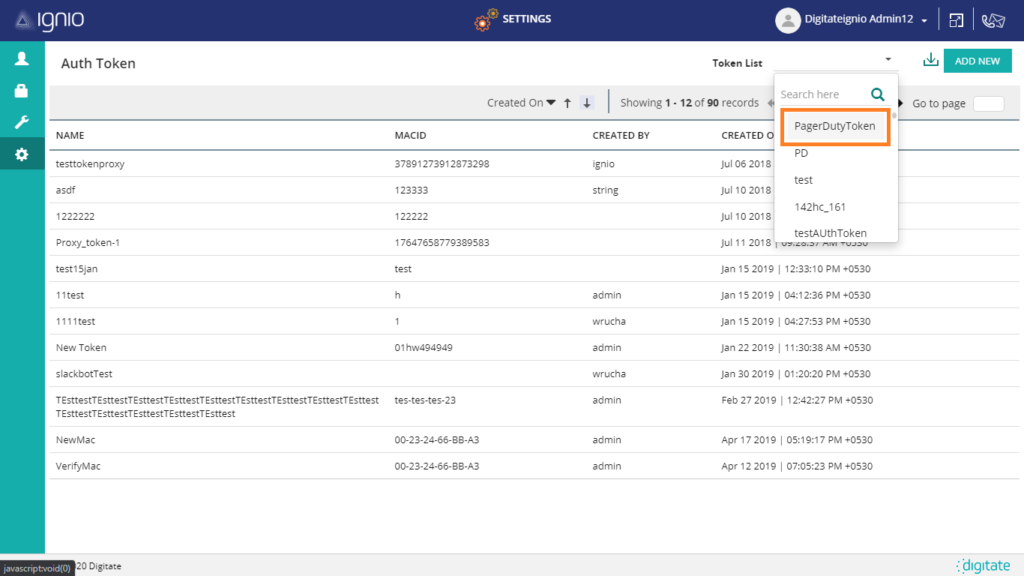
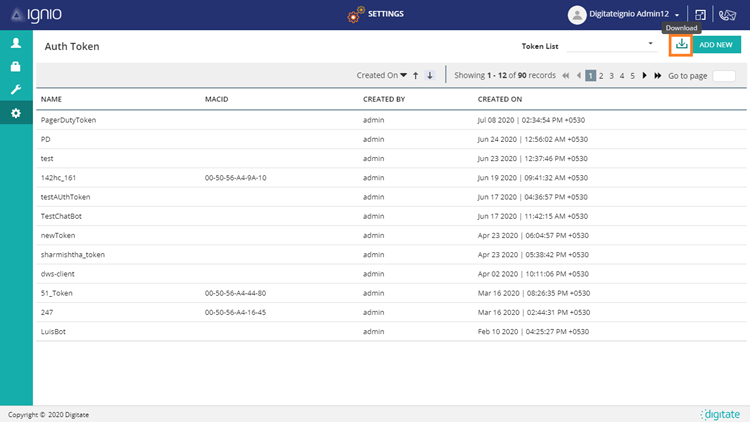
- A text file containing the auth token will be downloaded.
ignio Endpoint Format
<domain name>/edge/core/platform/streams-endpoints/streams/ingest/<url suffix entered while creating the endpoint>? applicationauthorizationparam=<Auth token generated by ignio>.
For example:
https://abc.com/edge/core/platform/streams-endpoints/streams/ingest/pd_response?applicationauthorizationparam=Y2lwweegadggASDSVVBB6S2dPZ2VtdldwdXFnN1NiRi9iNkhQbWhmeppppseec0JiUUFQcEtMTADFEGAGVssfwaktYOWZ9
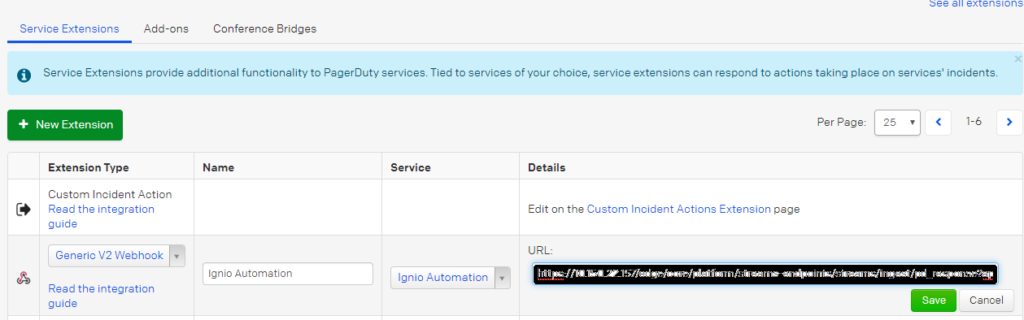
Setting up Webhook in PagerDuty
- In PagerDuty, go to Configuration > Extensions.
- Click on New Extension
- Under Extension type drop down select “Generic V2 Webhook”
- Give name to your webhook in the Name field.
- Under Service drop down select the service for which user wants to receive alerts.
- In the URL field give the http endpoint created in the above steps.
Setting Up Notification Policy in ignio
- Go to the policy selector screen and select Alert Notification from the available check boxes and click on NEXT.
- Select Alert Notification and then click NEXT.
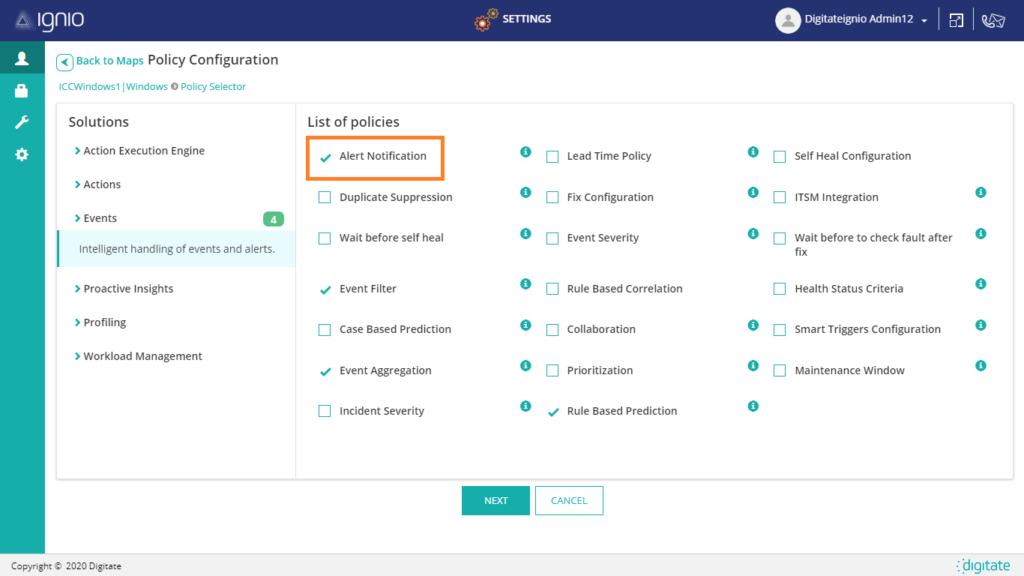
- Click on ADD NEW, a dropdown will appear. Then click on Add New Instance.
- Select PagerDuty from the ToolName dropdown and select the created instance in earlier steps from the Instance dropdown.
- Input other fields as specified in Alert Notification Policy.
- Click on Submit and save the policy.
Action/Selection
- Whenever an alert will be raised, which satisfies the conditions of Alert Notification policy a notification will be sent to the user.
- Notification will be available in the PagerDuty.
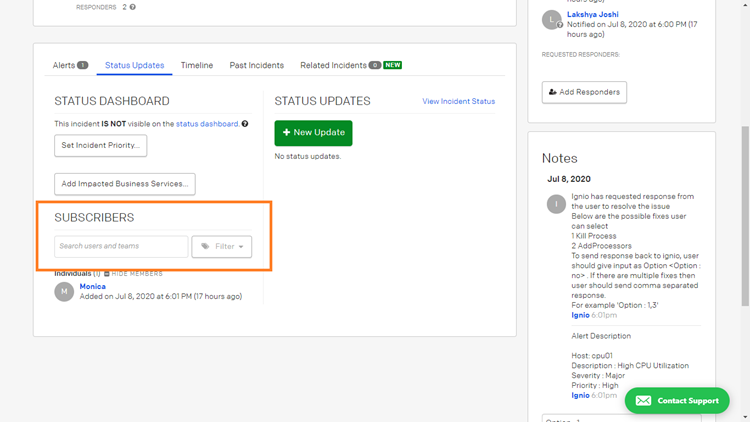
- If ignio has requested a response from the user to solve any issue, the user can input their response in the notes area of the app.
- To get the status update of each action taken by ignio in PagerDuty, you can subscribe to the alert.
Subscribing to an Incident
- Go to the ‘Incidents’ tab. Open the incident. Click on ‘Status Update’ sub-tab.
- In the ‘Subscribers’ field, the responder has to select his own name.
- After subscribing to the incident, the responder will get notified whenever a status update gets published.
Ready to get started?
Try any product on the Operations Cloud for free.
No credit card required.