Zendesk is a popular web-based ticketing system. This guide will show you how you can use Zendesk’s built-in functionality to integrate it with PagerDuty. This allows you to send notifications to your team even if it’s after hours. The PagerDuty system allows you to define how and when members of your team should be notified. You can also set up optional email parsing and a two-way integration to allow Zendesk to autoresolve PagerDuty incidents, and to allow PagerDuty to leave internal notes on Zendesk tickets when actions are taken on the corresponding PagerDuty incident. Steps to set up the two-way integration are outlined after the basic Zendesk to PagerDuty integration, below.
If you are having trouble completing the installation, please contact us.
Version:
This guide is for our Zendesk V1 integration, a legacy version.
Our Zendesk v3 integration is the most current version. The Zendesk v2 integration is also available.
In PagerDuty
- Navigate to Services → Service Directory.
- On the Service Directory page:
- If you are creating a new service for your integration, click +New Service.
- If you are adding your integration to an existing service, click the name of the service you want to add the integration to. Then click the Integrations tab and click the Add a new integration link.
- Select your app from the Integration Type menu and enter an Integration Name.If you are creating a new service for your integration, in General Settings, enter a Name for your new service. Then, configure the Incidents Settings and Incident Behavior for your new service.
- Click the Add Service or Add Integration button to save your new integration. You will be redirected to the page of your service.
- Copy the Integration Email for your new integration.
In Zendesk
Setting up an Email Target
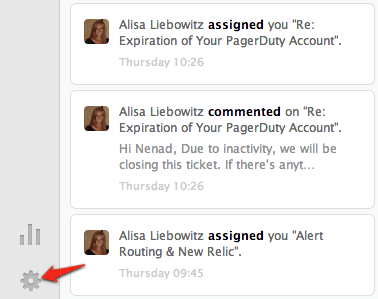
- Click on the Admin cog in the lower left of the Zendesk UI.
- Under SETTINGS click on Extensions.
- Click on the Targets tab and then select add target.
- Locate the icon for Email target and click on it.
- Fill out the Title, Email Address (from your integration), and Subject line. The subject can use Zendesk placeholders. The subject is what you will see within your PagerDuty alert. Note: The email address is the integration email that you created earlier in PagerDuty. If you’re using the email parsing and/or two way integration option described later in this guide and following our email parsingexamples, add parentheses around the ticket ID placeholder, for example:
({{ticket.id}})
should be used as opposed to just
{{ticket.id}}
This is shown in the example below, but is optional if you’re only using the one-way Zendesk integration (Zendesk incidents sent to PagerDuty, no autoresolving in PD or updates to ZD tickets from PD).
-
Change the Dropdown to Create target and click Submit.
Setting up a Trigger
-
Click on the
Admin cog in the lower left of the Zendesk UI.
- Under BUSINESS RULES click on Triggers.
- Click on add trigger.
- Enter a Trigger title and adjust the conditions to which you want to trigger a PagerDuty alert. The below example will trigger a PagerDuty alert any time that a new Zendesk ticket is created, but your conditions may vary. Under Perform these actions, select Notifications: Notify target and select the target that you created earlier. Enter a message that you would like to include within the PagerDuty notification. This field is also customizable with Zendesk placeholders. Click on Add trigger when you’re done with your configuration.
Below is the text that we used for the example message:
A new Zendesk ticket (#{{ticket.id}}) has been created.To review the status of the ticket and add updates, follow the link below:http://{{ticket.url}}
{ticket.comments_formatted}}
Now when you receive a ticket within Zendesk, a corresponding incident will also be triggered within PagerDuty.
Setting up email management and the two-way integration
Hide Guide
———START OF EMAIL MANAGEMENT GUIDE———
Introduction Many customers use PagerDuty in conjunction with Zendesk to notify teams or individuals if a ticket has been opened, changes status, or is out of SLA. The email management feature will allow you to automatically resolve PagerDuty incidents when a Zendesk ticket changes status (i.e. a ticket is closed). This article will explain how to create custom email management rules for incidents coming from a Zendesk email integration. Keep in mind, you may choose to build your rules differently depending on your use case. Review Zendesk Triggers and Email Templates To automatically resolve incidents in PagerDuty you will need to complete the PagerDuty/Zendesk integration and create both an email target to reach your PagerDuty integration, as well as Zendesk triggers. Zendesk fires triggers when specific events take place (i.e. a ticket is opened or solved). These triggers can then send emails from a customizable template. You’ll use these emails to create an incident key which tells PagerDuty when to append new incidents to an existing incident. Creating Triggers and Email Templates, Below are two Zendesk triggers which we’ll use to create email management rules – the first fires when a ticket is opened and the second fires when a ticket is solved. If you’ve followed the examples in the integration guide above, your email target that reaches your PagerDuty Zendesk integration is set up so that the ticket ID number always appears in the subject line. We’ll later use this ticket ID to create our incident key. You can optionally also include the ticket ID in the email body, which we’ve shown below.Example Zendesk Triggers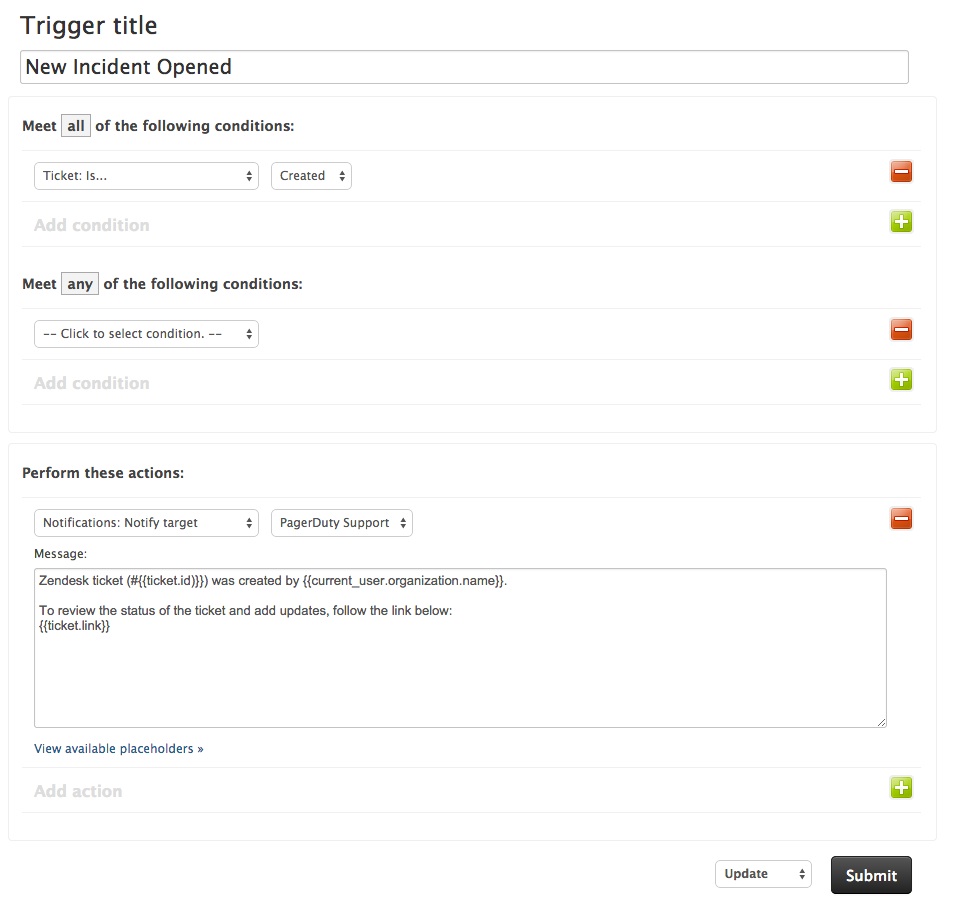 Zendesk ticket (#{{ticket.id)}}) was created by {{current_user.organization.name}}.To review the status of the ticket and add updates, follow the link below:
{{ticket.link}}Zendesk ticket (#{{ticket.id}}) has been marked as solved.To review the status of the ticket and add updates, following this link https://{{ticket.link}}.
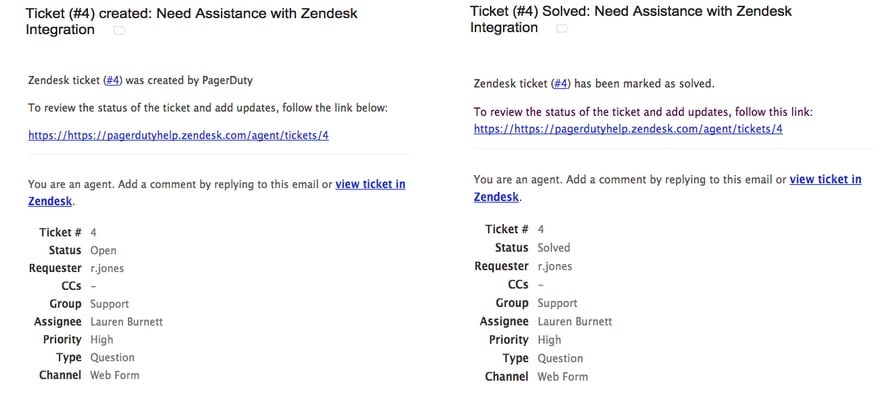
Example Emails from Zendesk Triggers
First Rule – Triggering an Incident in PagerDuty
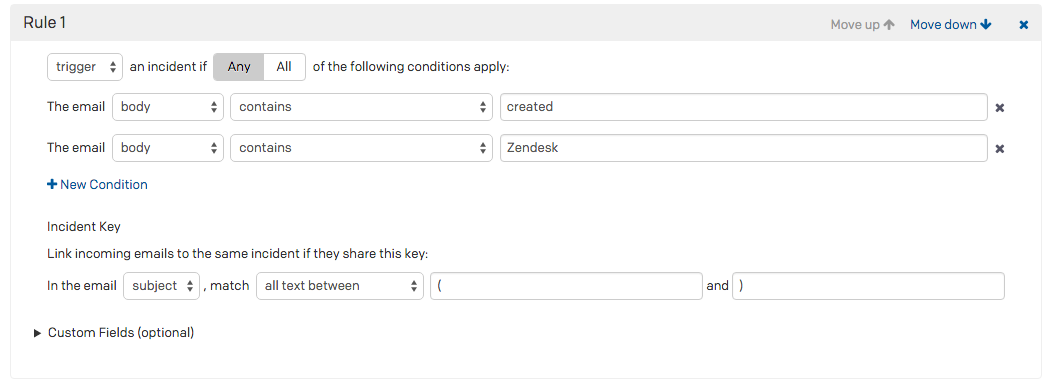
Now that our Zendesk triggers are setup, we need to create email management rules in PagerDuty. In our first rule we will define the conditions which must be met to create an incident in PagerDuty (i.e. a ticket is created in Zendesk).
In this example, an incident should be triggered if the email contains created AND Zendesk in the email body. Make sure the conditions you use for the trigger email are not the same as ones that would be found in a recovery email. Also note that email management rules are case sensitive, so emails containing created will not trigger for a rule that says Created, as well as the other way around.
Next we’ll create the incident key which will be used to append new emails to existing ones. The incident key should always be a unique identifier that appears in both the trigger and recovery email. In this case we’ll tell PagerDuty to append emails on the Zendesk ticket ID, which per the email target mentioned earlier is located in the email subject line between the parentheses (ticket ID).
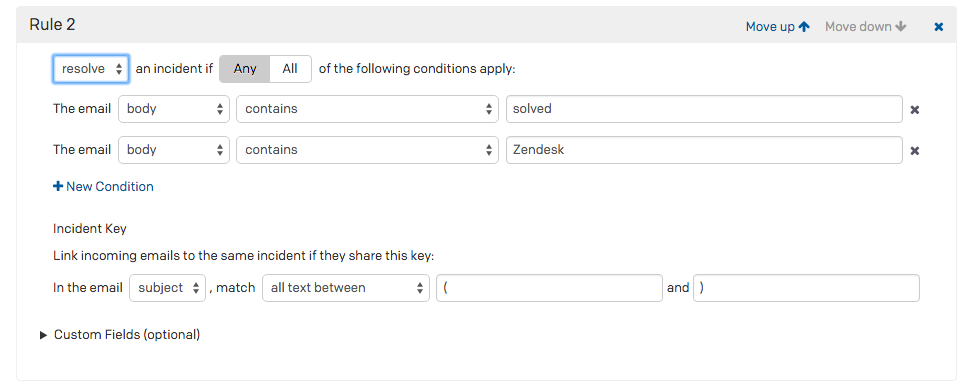
Second Rule – Resolving an incident in PagerDuty
In the second rule, we’ll tell PagerDuty to resolve incidents that contain solved AND Zendesk in the email body.
We’ll use the same incident key as we did in the first rule, so PagerDuty knows that these emails are linked to the same incident and that it should be resolved.
What if Incident Emails Don’t Match Rules?
Finally, we’ll specify what PagerDuty should do with an email if it doesn’t meet the rules established in the rule conditions – either create a generic incident or discard it. If you’ve selected create a generic incident, the incident will still be created but won’t match any of your rules or be able to be resolved. You’ll also see the incident key pulled as the full subject line, rather than the ticket id or other criteria you specified in your trigger rule.
Testing Management Rules
It’s a good rule of thumb to test if your email management rules are set up correctly. To do so, forward an email to trigger an incident, as well as an email to resolve an incident, to the Integration Email address displayed on the service’s Integrations tab.If your management rules are setup correctly, the incident activity log will show the incident as having been triggered and then resolved.
Congratulations! You can now automatically trigger and resolve incidents via email for Zendesk.
Appendix
How do I create incident keys using regex?
If you’d like to review creating an incident key for Zendesk integrations using regex, see the following article: How to use a capture group when creating an incident key.
———END OF EMAIL MANAGEMENT GUIDE———
The instructions above will set up Zendesk to send notifications to PagerDuty when a ticket is created, but you can also set up Zendesk to autoresolve PagerDuty incidents, and set up PagerDuty to comment on Zendesk tickets when the corresponding incident is triggered, acked, or resolved. To have Zendesk automatically resolve PagerDuty incidents, you can follow our Zendesk email management guide above. If you’re following our email management examples exactly, make sure to edit your Zendesk email target and add parentheses around the ticket ID placeholder, for example:
({{ticket.id}})
should be used as opposed to just
{{ticket.id}}
(See Setting up an email target under In Zendesk above for a screenshot of this configuration).
To use the two-way integration, you’ll need to have a Heroku account already set up as well. Once you have set up your basic Zendesk integration, email management rules, and Heroku account:
- In PagerDuty, confirm that your email management rules extract the ticket_id (as a custom field) and that they match the information that will be sent over from your Zendesk trigger. Your rules may differ slightly, but please note that ticket_id is necessary for the two-way integration, so you’ll need to make sure it’s being sent to PagerDuty from Zendesk, and extracted in your management rules.
- You will also need to have the tag pd_integration added to new tickets created in your Zendesk account. You can manually add this to each ticket, however, we created a trigger for this example which will both notify PagerDuty as well as add this tag when a new ticket is created. We have also pointed out here where the ticket_id (Zendesk placeholder: {{ticket.id}}) is defined in the trigger message. The trigger below follows examples earlier in this guide, however, you can customize this message as long as the ticket ID is included in the message and extracted properly.
- Once you have your rules and triggers in PagerDuty and Zendesk set up, visit the following link and click Deploy to Heroku: https://github.com/ryanhoskin/pd2zendesk. This will prompt you to create the app in your Heroku account, where you can fill in the env variables: ZENDESK_USERNAME (your Zendesk login email), ZENDESK_API_TOKEN (visit Admin > Channels > API in Zendesk to view/create tokens), ZENDESK_SUBDOMAIN, PAGERDUTY_API_TOKEN (from your API Access page in PagerDuty), and PAGERDUTY_SUBDOMAIN. Once you’ve filled these in, click Deploy.
- When you see the message Your app was successfully deployed, right click View it and copy the link address, or click View it and copy the URL from your browser’s address bar. In your PagerDuty Zendesk service, click to the Integrations tab, and click Add an extension; for the Extension Type select Generic Webhook, then enter a name for your webhook, and paste the Heroku URL you copied in the Endpoint URL field. Before saving the webhook, add pd2zendesk.php to the end of your url, so that the finished product reads https://[YOUR-HEROKU-APP-NAME].herokuapp.com/pd2zendesk.php. Click Save. You can now test your integration.
- To test: create a new Zendesk ticket. You can keep the ticket open to see changes automatically update as they happen. Add the pd_integration tag if you haven’t set up your trigger to add this already, and once the tag has been added you should see an internal note on your ticket noting that the ticket has been triggered in PagerDuty, with a link to the incident.
- Acknowledge the incident in PagerDuty. You will see an internal note on the Zendesk ticket noting that the PagerDuty incident has been acknowledged.
- Resolve the incident in PagerDuty. You will see an internal note on the Zendesk ticket noting that the PagerDuty incident has been resolved.
- OPTIONAL: You could customize this integration by adding additional triggers to take different actions on your Zendesk tickets, based on the comment text added by the PagerDuty integration. You should explore the options when creating a Zendesk trigger for a full scope of what’s possible, but here are some ideas:
- Set ticket status to open, pending, on-hold, or resolved based on “This ticket has been acknowledged” or “This ticket has been resolved” comment text.
- Assign the ticket to a specific Zendesk agent based on comment text.
- Set Zendesk tags or priority based on comment text.
FAQ
Will Zendesk tickets automatically resolve PagerDuty incidents?
Yes, after following the steps in the Zendesk email management guide section of this article.
How do I setup Zendesk to work with multiple PagerDuty services?
In order to use Zendesk with multiple PagerDuty services, you would setup multiple PagerDuty services with Zendesk email targets and triggers specific to each different service.If you run into any problems with the integration, please contact our support team for assistance.
For Zendesk, I have the Essential plan; am I able to use this integration?
This integration only works with the Zendesk feature to notify external targets; notifying external targets is not included on the Essential plan, but it is included on the Team, Professional and Enterprise plans.