Start Using PagerDuty Today
Try PagerDuty free for 14 days — no credit card required.
Checkmk is built on top of Nagios, which is one of the leading providers of open source and enterprise-grade IT infrastructure monitoring tools. Used by hundreds of thousands of users worldwide, Nagios allows its users to monitor their entire IT infrastructure, spot problems before they occur, detect security breaches and plan/budget for IT upgrades. By integrating PagerDuty into your existing Checkmk monitoring solution, you can have alerts go directly to the the person on-call in your PagerDuty schedule.
This guide describes how to integrate Checkmk 1.2.x, by itself or as part of the Open Monitoring Distribution (OMD), with PagerDuty using a simple Perl-based plugin. Note that you must be logged in as root to complete the installation. You might need to slightly alter these instructions depending on your exact Linux distribution as well as your Checkmk configuration and version. Please contact our Support team if you have any trouble completing the integration.
Note: This guide has been replaced by the Checkmk Integration Guide that uses the PagerDuty Agent. Please try following the steps in the new integration guide first, and use this one only if you have a system which the PagerDuty Agent cannot be installed on.
This guide includes steps for Debian-based (i.e. Ubuntu) and RHEL-based (i.e. CentOS, Fedora) Linux distributions, and the standalone version of Checkmk as well as the OMD version. You do not need to execute all commands in this guide, only the ones for your type of system, and you will need to adjust the paths used depending on the version of Checkmk you’re using. Note that all commands provided are intended to be run as the root user.
apt-get install libwww-perl libcrypt-ssleay-perl
For RHEL-based systems:
yum install perl-libwww-perl perl-Crypt-SSLeay
pagerduty_nagios.pl from GitHub, copy it to /usr/local/bin, and make sure the file is executable by Nagios.
wget https://raw.github.com/PagerDuty/pagerduty-nagios-pl/master/pagerduty_nagios.pl
cp pagerduty_nagios.pl /usr/local/bin
chmod 755 /usr/local/bin/pagerduty_nagios.pl
nagios user’s cron table:
crontab -u nagios -e
If you’re using the OMD version of Checkmk, use su to become the user for your OMD site:
su - {site-name-here}
* * * * * /usr/local/bin/pagerduty_nagios.pl flush
If you’re using the OMD version of Checkmk create a file under your site’s cron.d directory (usually /omd/sites/{site-name-here}/etc/cron.d) and add the following line to the file:
* * * * * /usr/local/bin/pagerduty_nagios.pl flush
Save the file as pagerduty and run the following for the change to take effect, then return to root:
omd reload crontab
exit
pagerduty-perl from GitHub and make it executable:
wget https://gist.githubusercontent.com/jcurreee/b8f4472659d7c2e402a6/raw/5f7fff04b45a62538eda458e287b2b3e0c61156e/pagerduty-perl
chmod +x pagerduty-perl
pagerduty-perl is a notification script for Checkmk and is not the Perl script or a replacement for it. You must still keep the Perl script (pagerduty_nagios.pl) on your system as well.
/usr/share/check_mk/notifications:
mv pagerduty-perl /usr/share/check_mk/notifications
For the OMD version of Checkmk this is usually /omd/sites/{site-name-here}/local/share/check_mk/notifications:
mv pagerduty-perl /omd/sites/{site-name-here}/local/share/check_mk/notifications
 If you are using Checkmk 1.2.4 or earlier, check enable notifications and set the Notification Method to Flexible Custom Notifications. Click Add notification and set the Notification Plugin to PagerDuty (Perl). Paste the Integration Key you copied from PagerDuty earlier in the first Plugin Arguments text box that appears once you select PagerDuty (Perl), then uncheck the boxes Start or end of flapping state and Start or end of scheduled downtime under Host Events and Service Events for the Notification Method (not the Notification Options). Click Save when you are done.
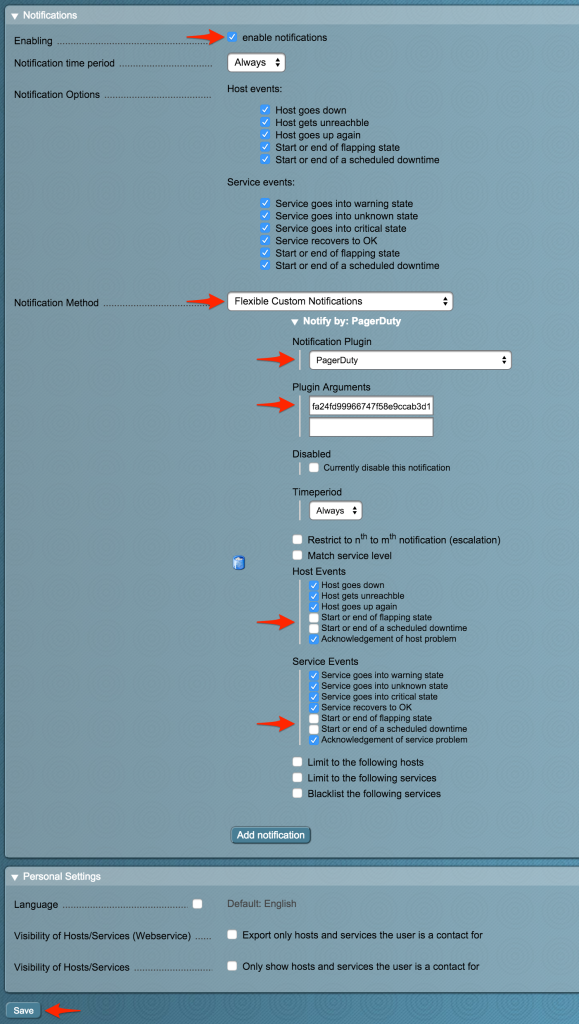
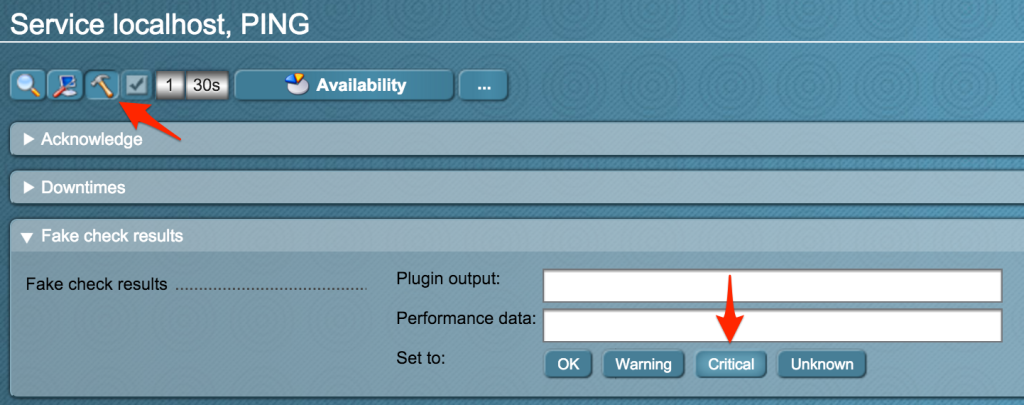
You can test the integration to make sure everything works as expected by going to a host or service in the Checkmk interface and clicking the Execute icon (hammer). In the Fake check results box, click Critical (if on a service) or Down (if on a host), then click Yes! to confirm you want to send the fake alert. You should see a new incident created in PagerDuty momentarily, however keep in mind that the test incident may be resolved quickly, as the fake check results are replaced by real check results on the next scheduled check.
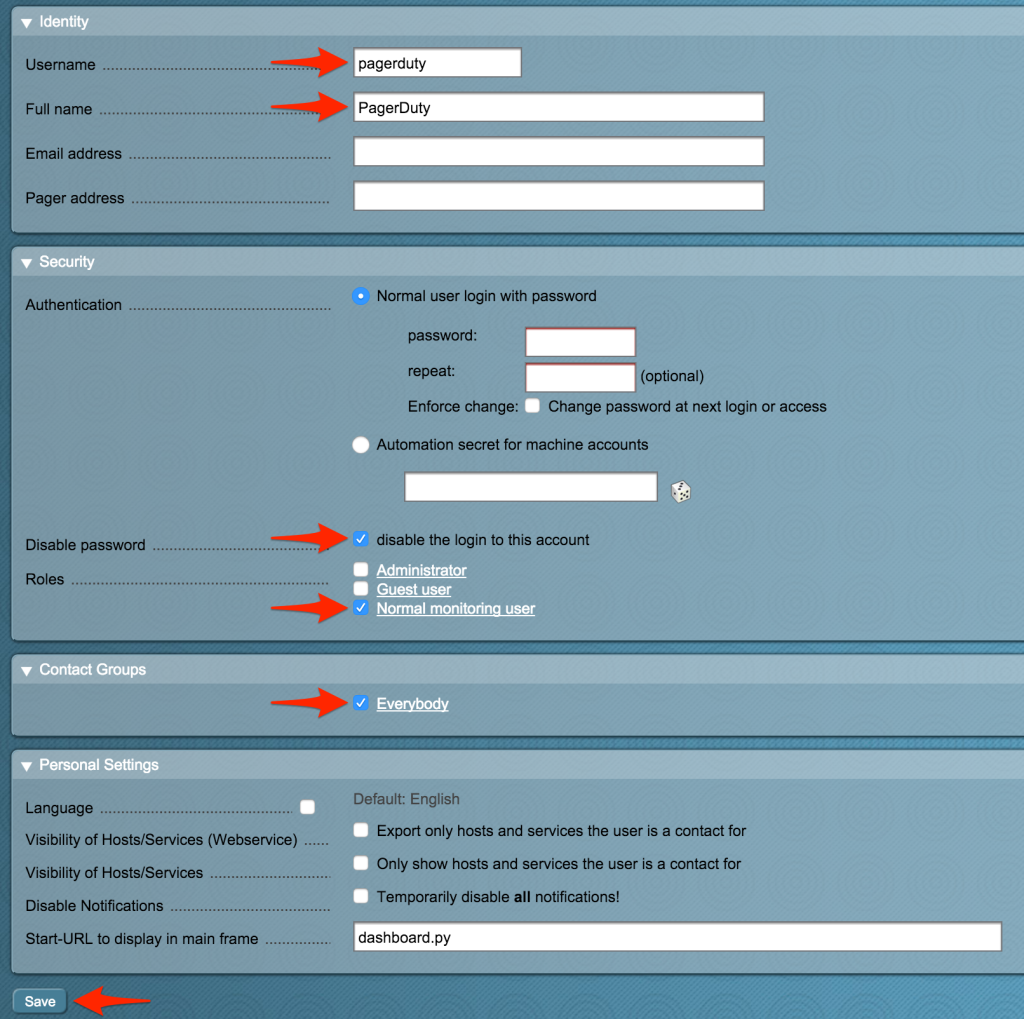
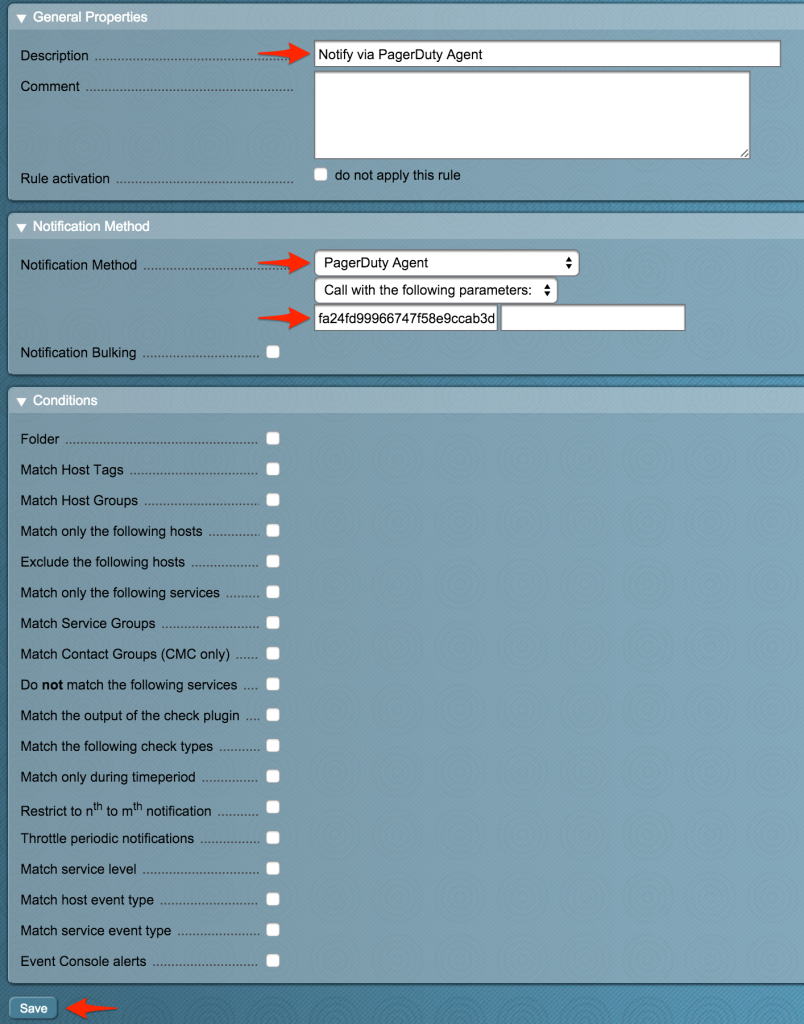
This is easy to do with the current integration, as a Checkmk service in PagerDuty is directly mapped to a user in Checkmk. In order to configure multiple services, just create multiple users in Checkmk with different names (i.e. pagerduty_database, pagerduty_network, etc). Then copy and paste the corresponding Integration Key from PagerDuty into the Notification Method parameters/Plugin Arguments field. Don’t forget to activate your changes for the configuration to take effect.
If a PagerDuty server can’t be reached for any reason, events will be stored to an on-disk queue. The cron job will attempt to re-send the events once every minute.
You should configure an external ping check service such as StatusCake or NodePing to monitor your site’s external connectivity. Of course, you can use PagerDuty to receive alerts from these services as well.
First, check syslog for messages containing pagerduty_nagios.
For Debian-based systems:
grep pagerduty_nagios /var/log/syslog
For RHEL-based systems:
grep pagerduty_nagios /var/log/messages
PagerDuty can process PROBLEM, ACKNOWLEDGEMENT, and RECOVERY messages. All other messages, including FLAPPINGSTART and FLAPPINGSTOP, or custom messages, are ignored.
Try PagerDuty free for 14 days — no credit card required.