- PagerDuty /
- Integrations /
- PingFederate SSO Integration Guide
PingFederate SSO Integration Guide
PingFederate is a federation server that provides identity management, web single sign-on and API security on your own premises. PingFederate supports all of the current identity standards including SAML, WS-Federation, WS-Trust, OAuth and OpenID Connect, so users can securely access any applications they require with a single identity using any device.
This guide and its screen shots are based on PingFederate version 8.0 using a local Active Directory data store. Some steps and UI elements may differ depending on your version, data store, and other existing configuration options in PingFederate.
Note
You must be the Account Owner of your PagerDuty account in order to make these changes. Additionally, SSO capabilities within PagerDuty are only available on our Business and Digital Operations plans. Please contact our sales team if you are interested in upgrading your plan.
Start in PingFederate
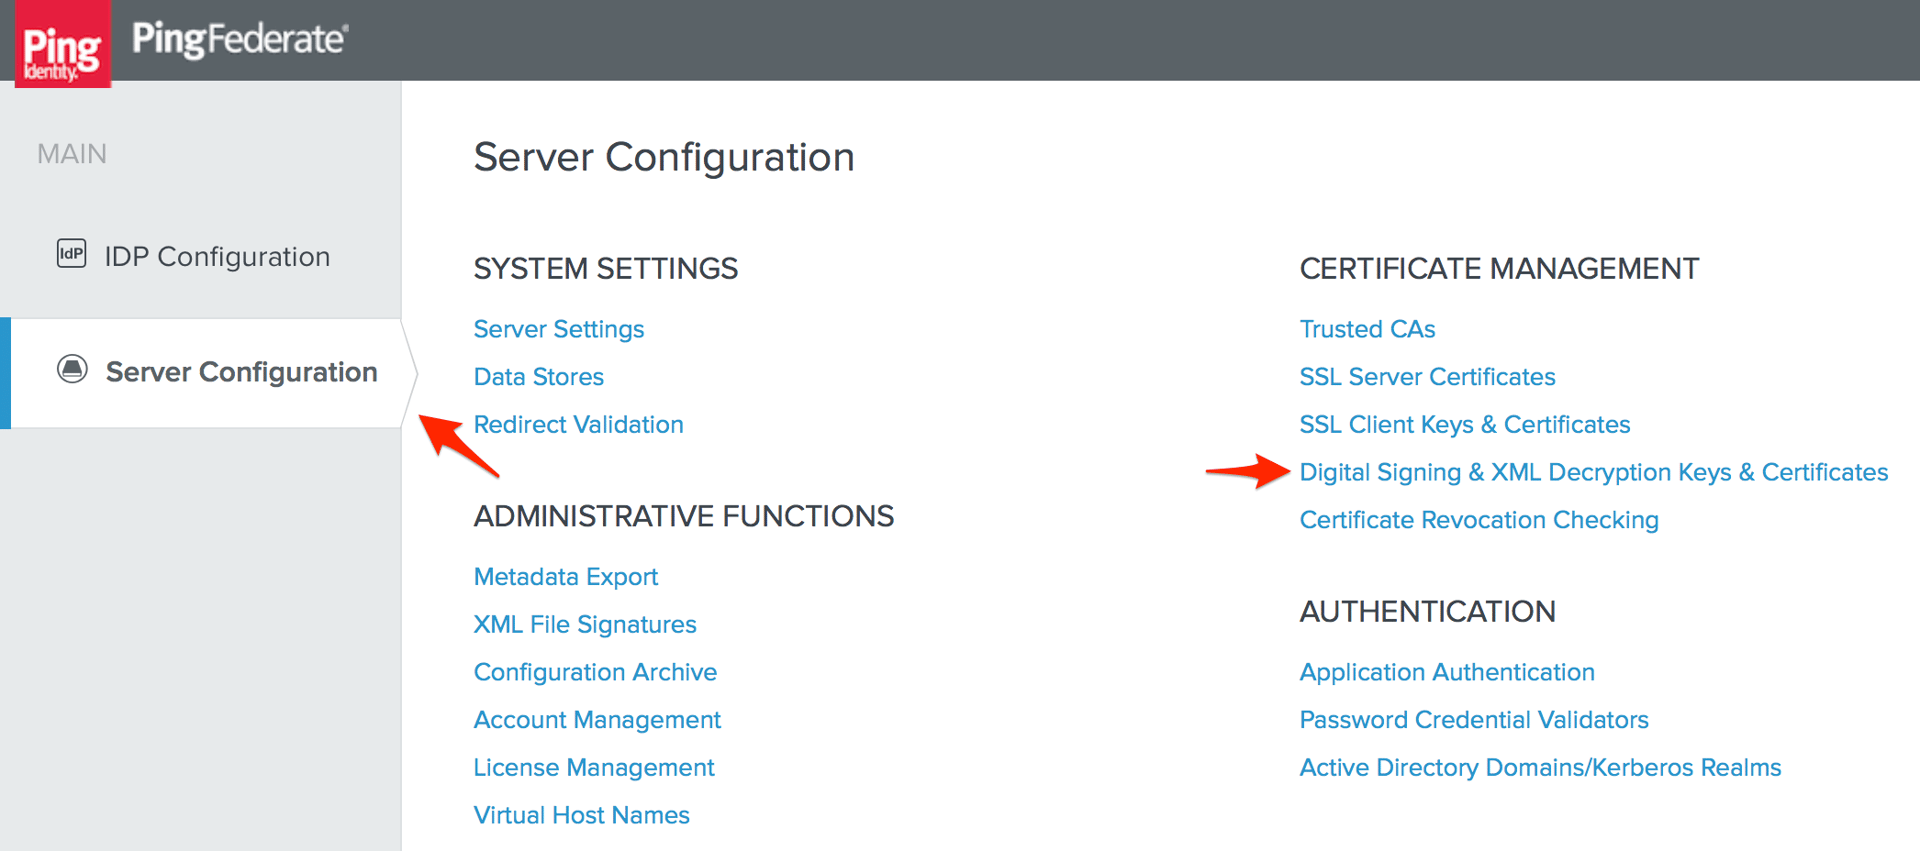
- Log in to PingFederate and go to the Server Configuration page, then click Digital Signing & XML Decryption Keys & Certificates.
- Skip to step 4 if you already have a certificate you want to use for your SSO configuration with PagerDuty, otherwise click Create New.
- Enter the information required to create a new certificate and private key (Common Name, Organization, and Country), click Next, then click Save on the Create Certificate Summary page. Go to Digital Signing & XML Decryption Keys & Certificates again.
- Note the Serial number of the certificate you want to use with PagerDuty, as you will refer this number in a later step, then click Export.
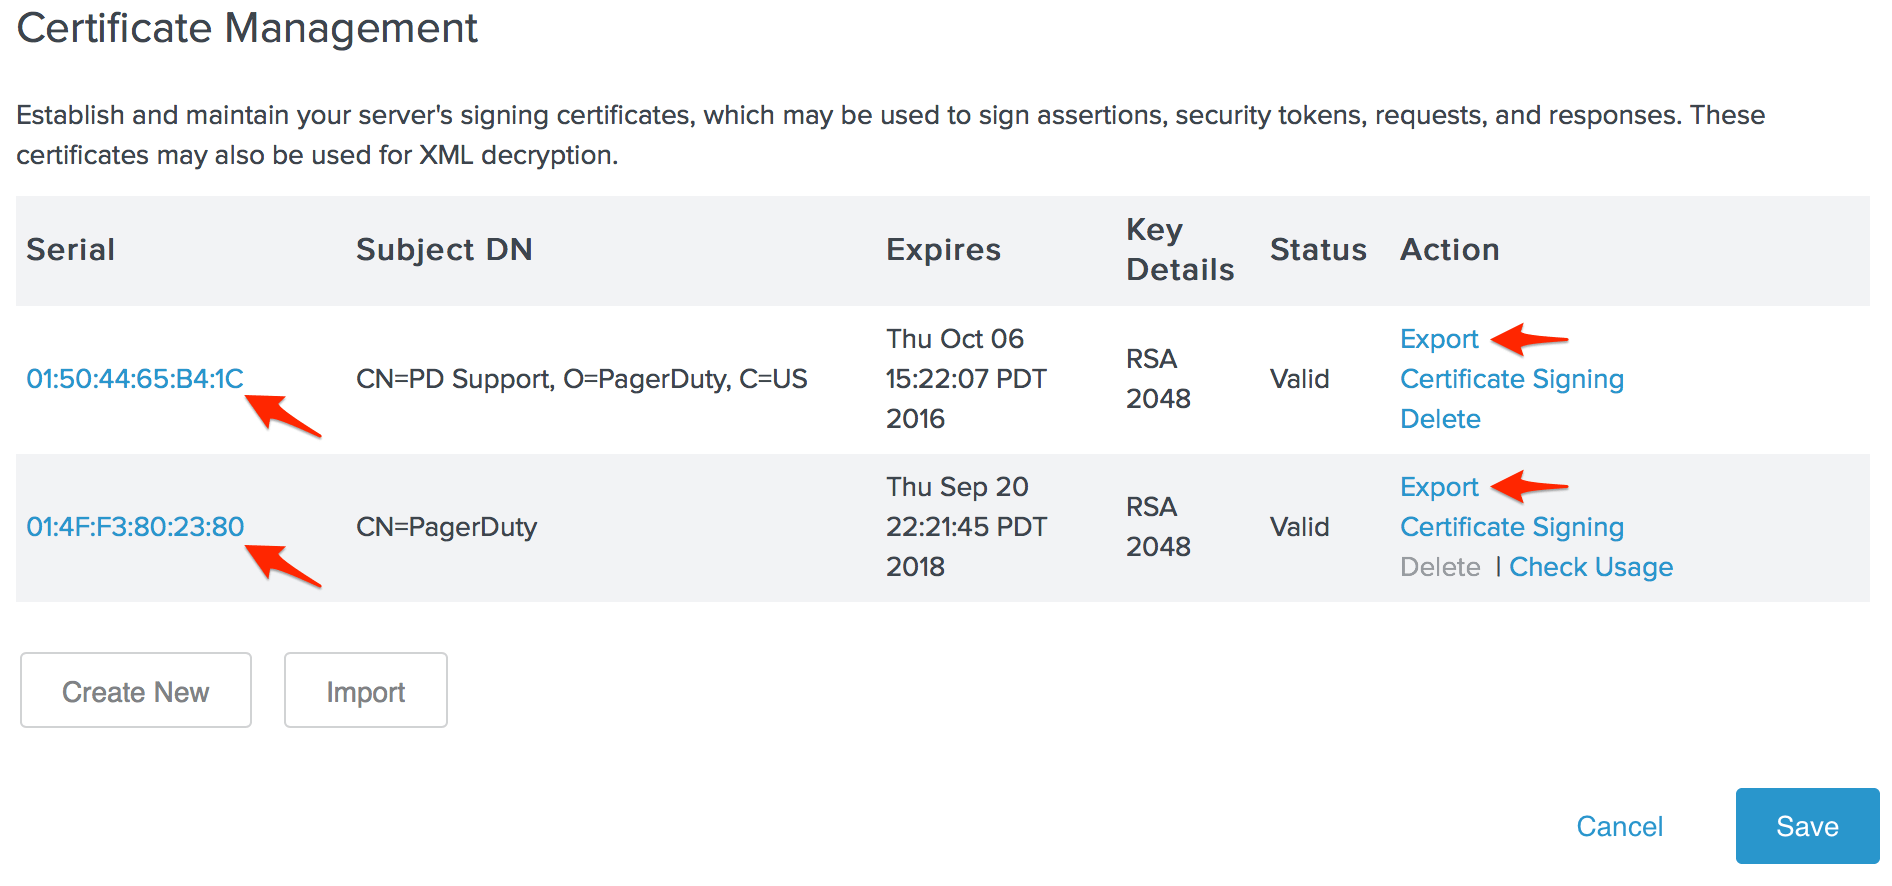
- Select Certificate Only and click Next.
- Click Export and save the certificate file to your computer, then open the file in a plain text editor.
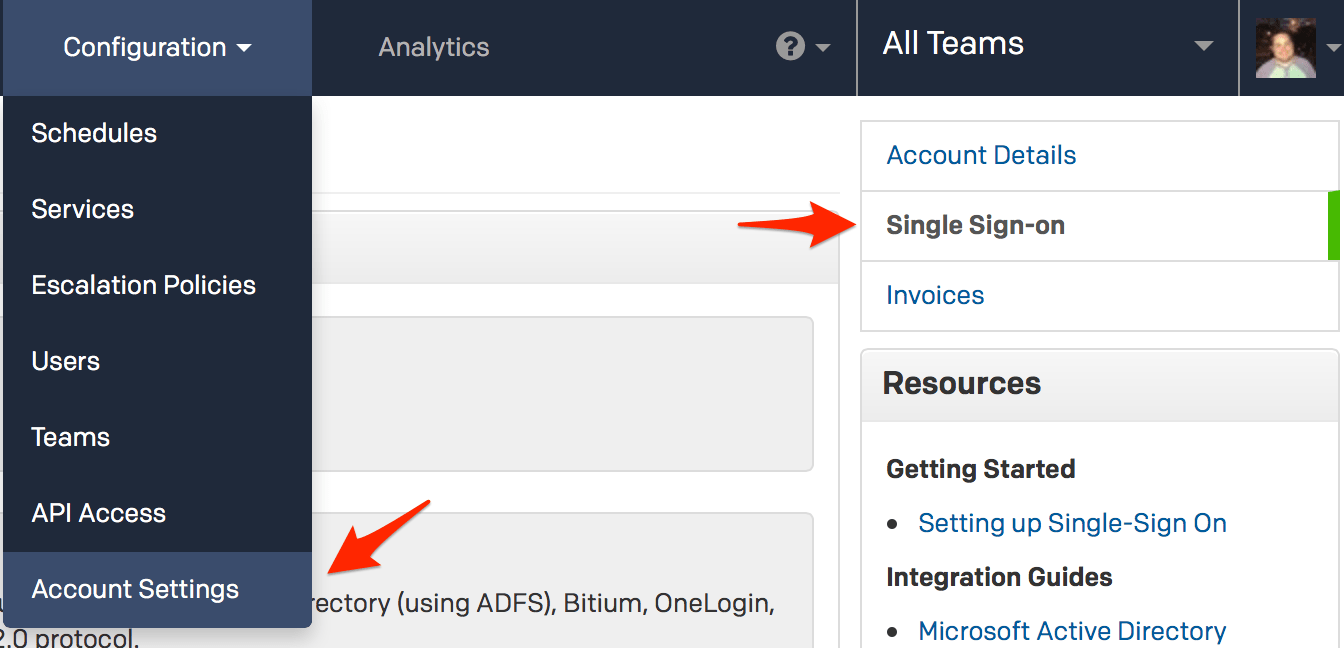
- Log in to your PagerDuty account in a separate browser tab or window, go to the Configuration menu and select Account Settings. When you get to the Account Details page, click Single Sign-on on the sidebar to the right.
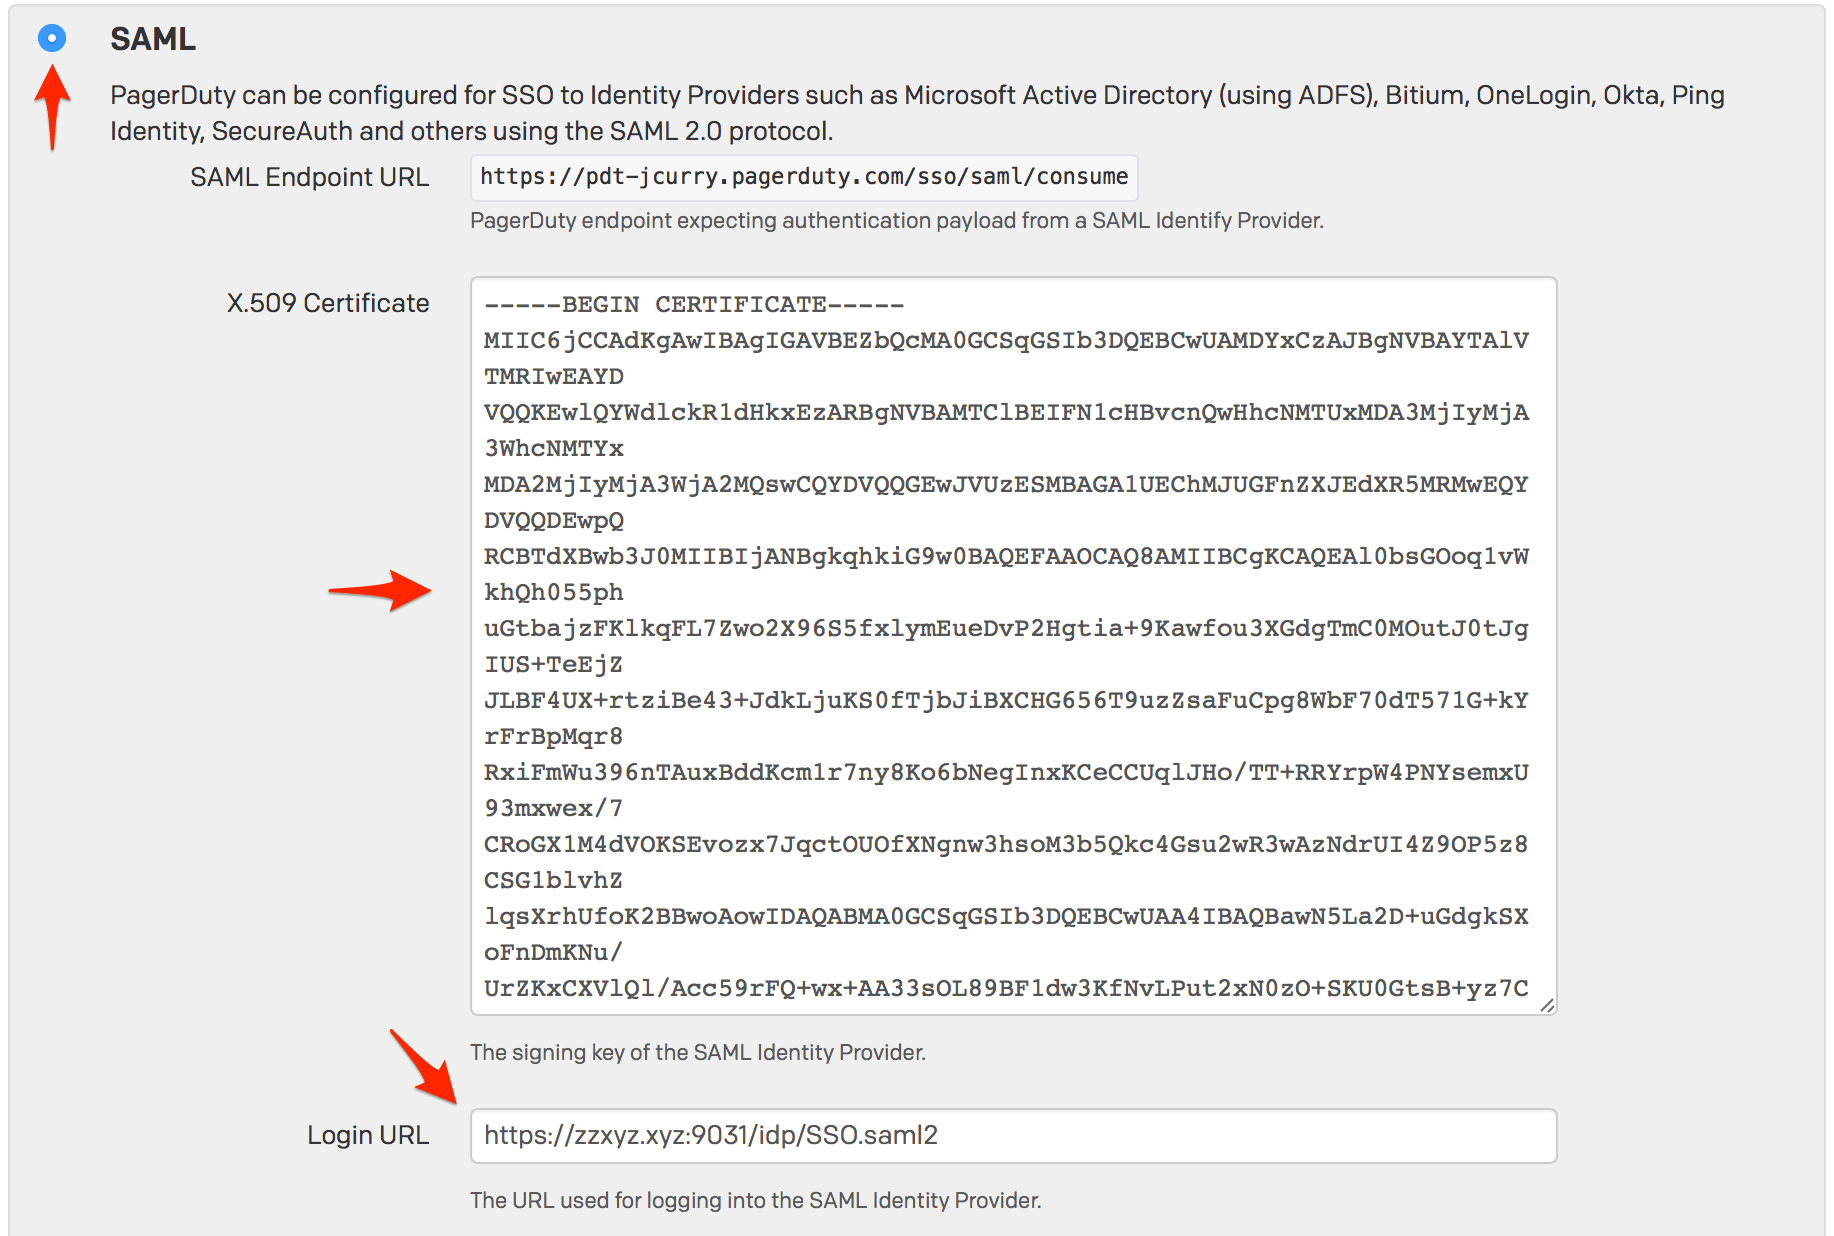
- Click the SAML radio button to configure Single Sign On in PagerDuty. Copy the content of the certificate file you downloaded in step 6 and paste it into the X.509 Certificate field, then enter your PingFederate server's SAML endpoint in the Login URL field.
The default PingFederate SAML endpoint is:
https://YOUR.PINGFEDERATE.SERVER/idp/SSO.saml2
- When you complete the steps in this guide and are done testing, you can return to this page to disable user logins via username and password.
With auto provisioning enabled, you can allow PingFederate users to create a PagerDuty account without manual intervention, however please keep in mind that adding additional users will affect your billing if you go over the number of users included in your pricing plan.
Click Save Changes when you are done on this page.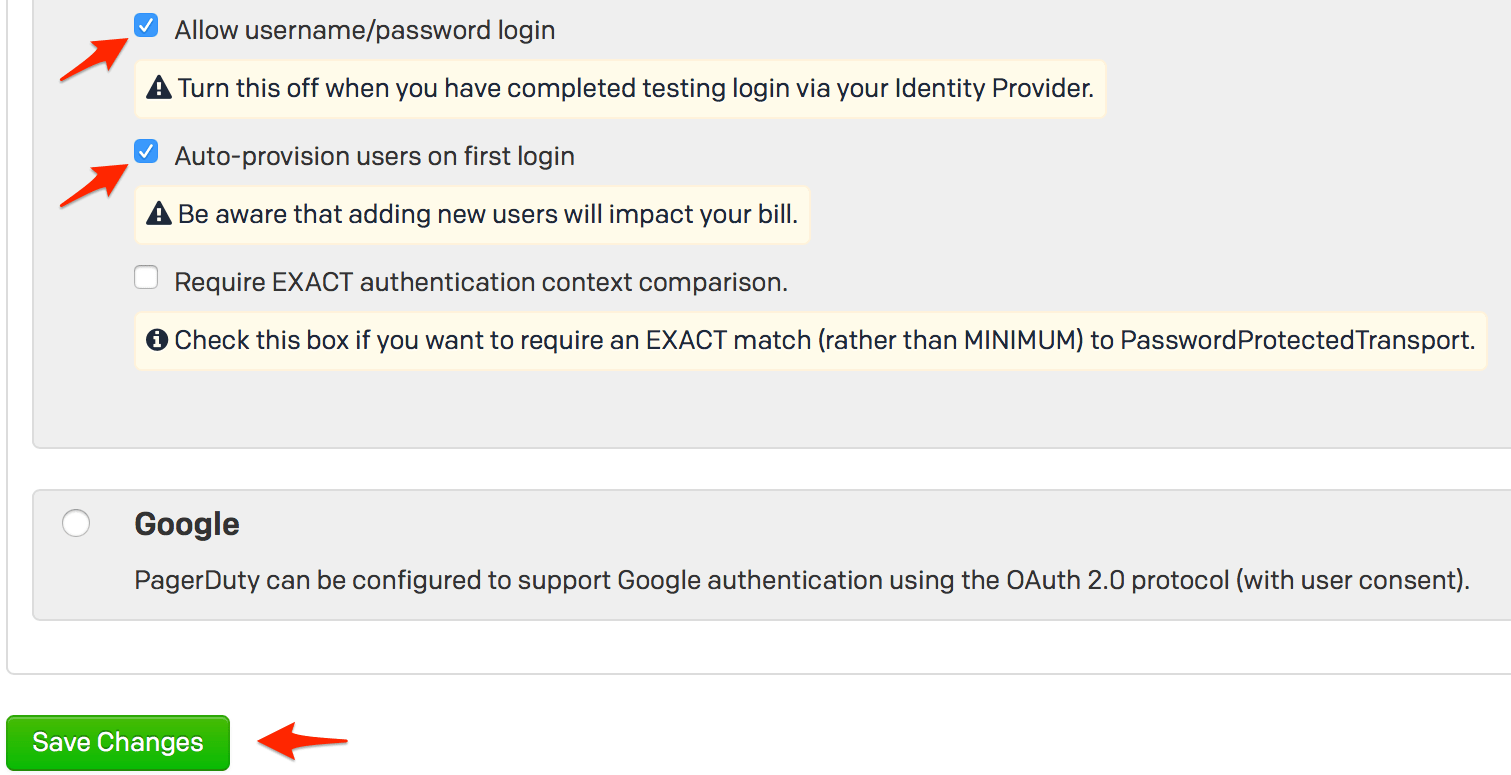
- Copy the SAML Endpoint URL from PagerDuty.

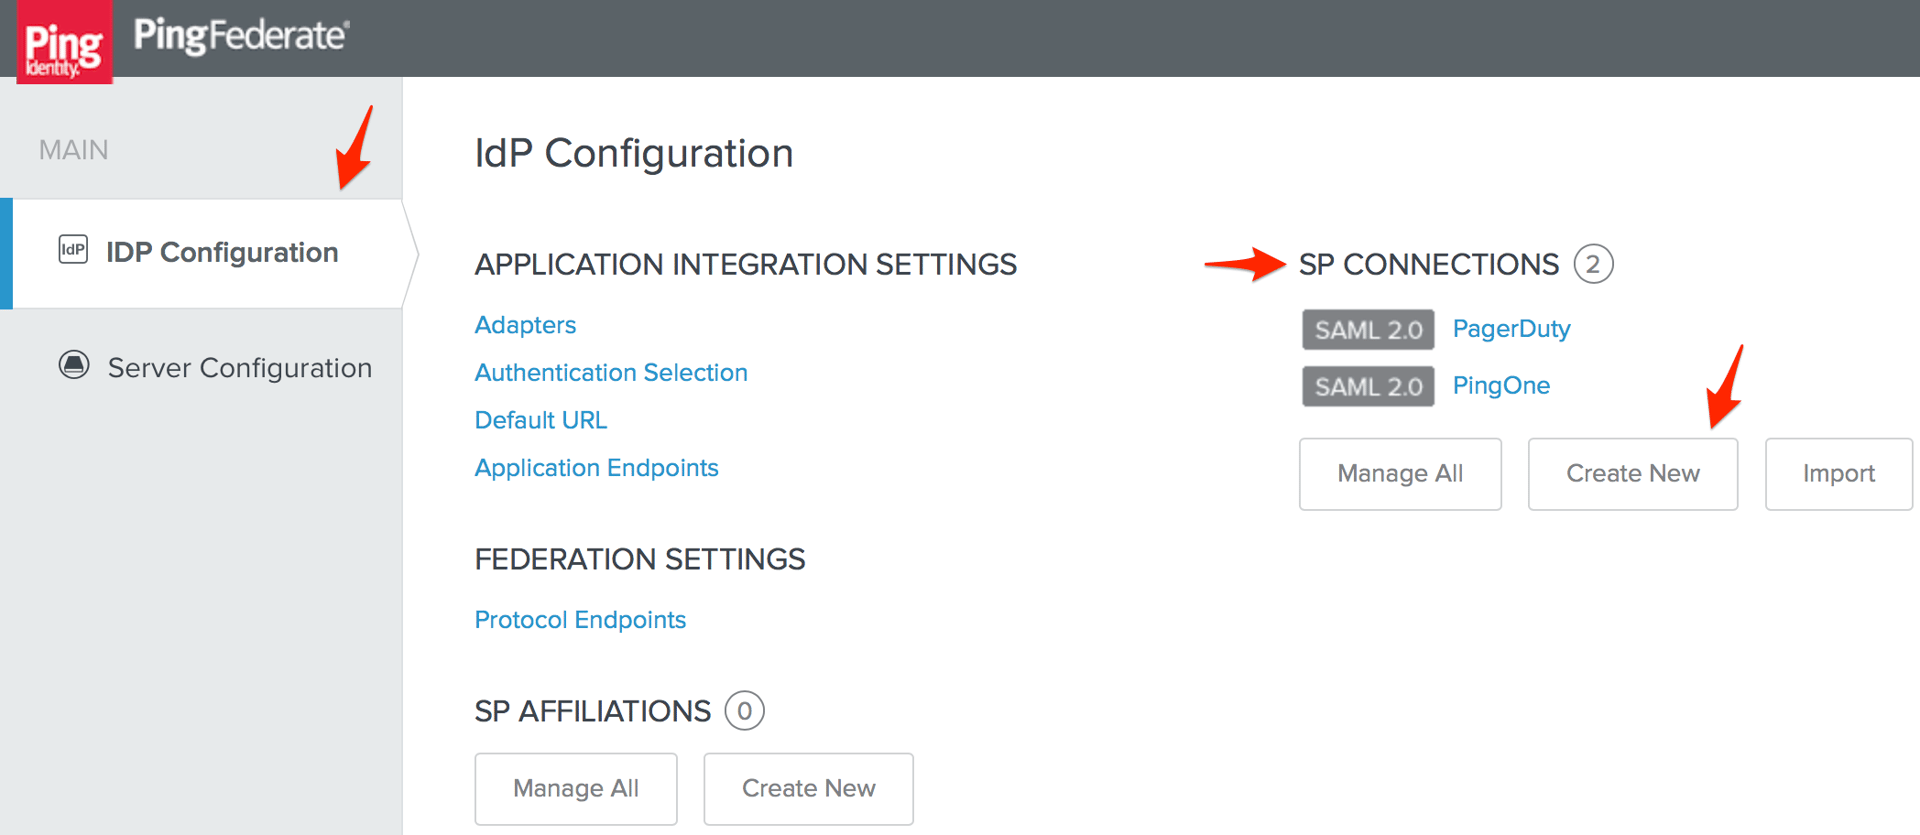
- Go to the IdP Configuration page in PingFederate, then click Create New under SP Connections.
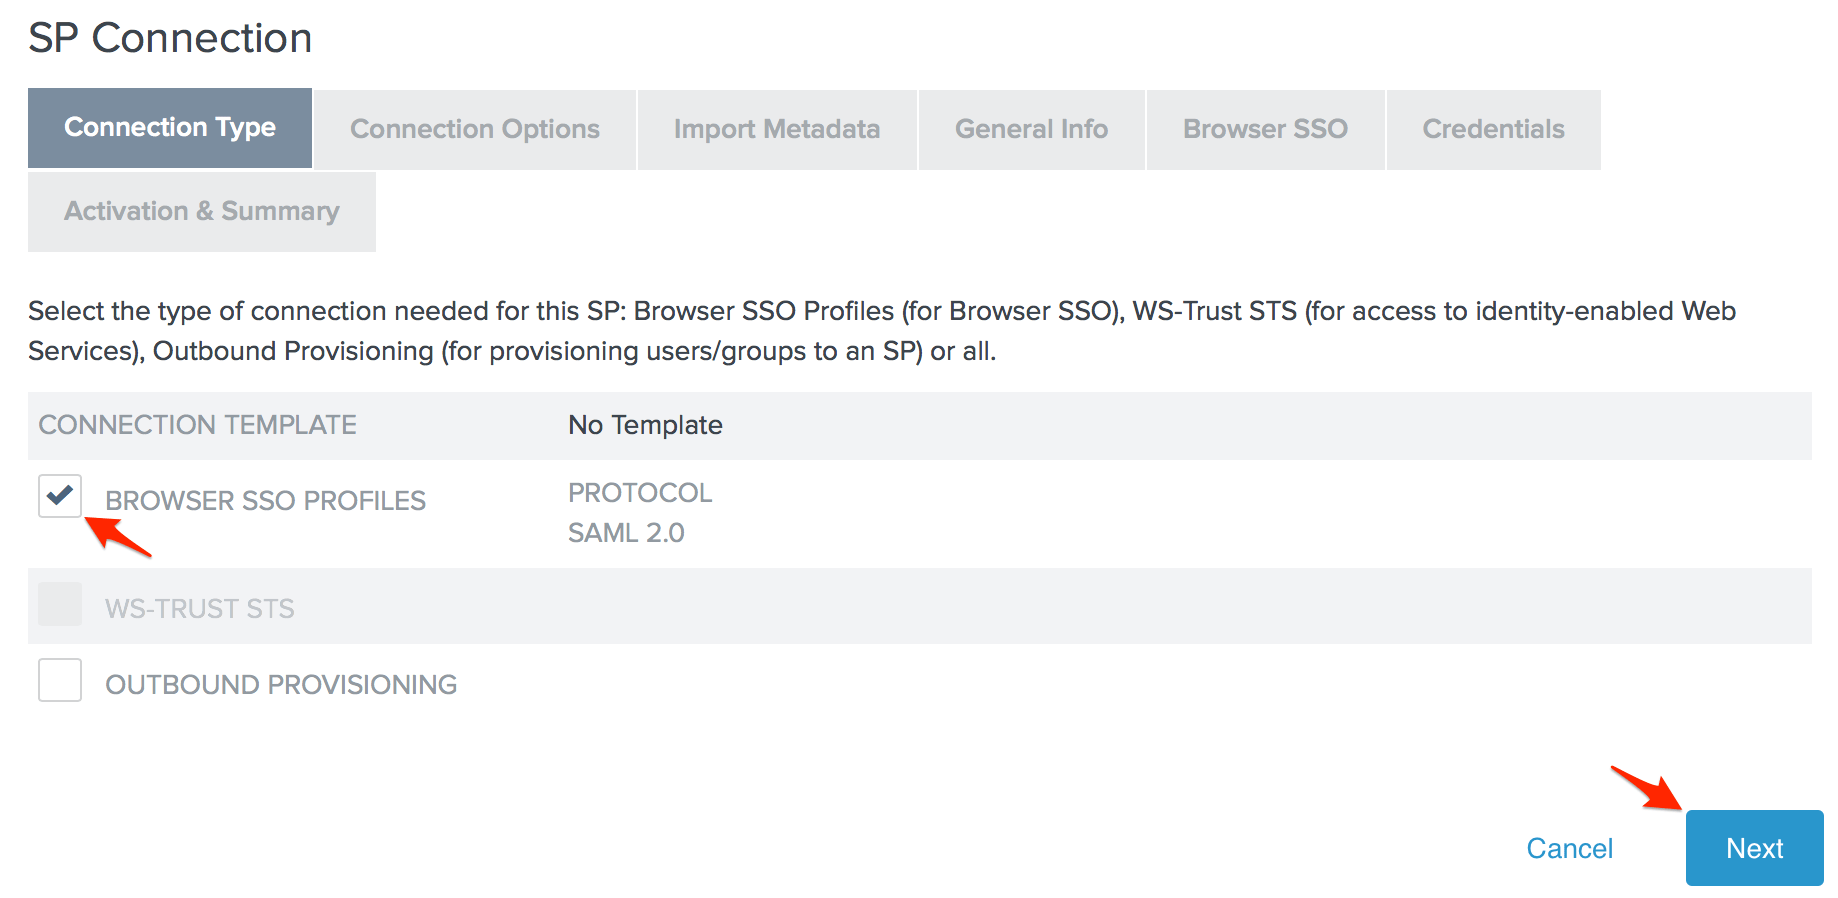
- Check the Browser SSO Profiles connection template on the Connection Type page and click Next.
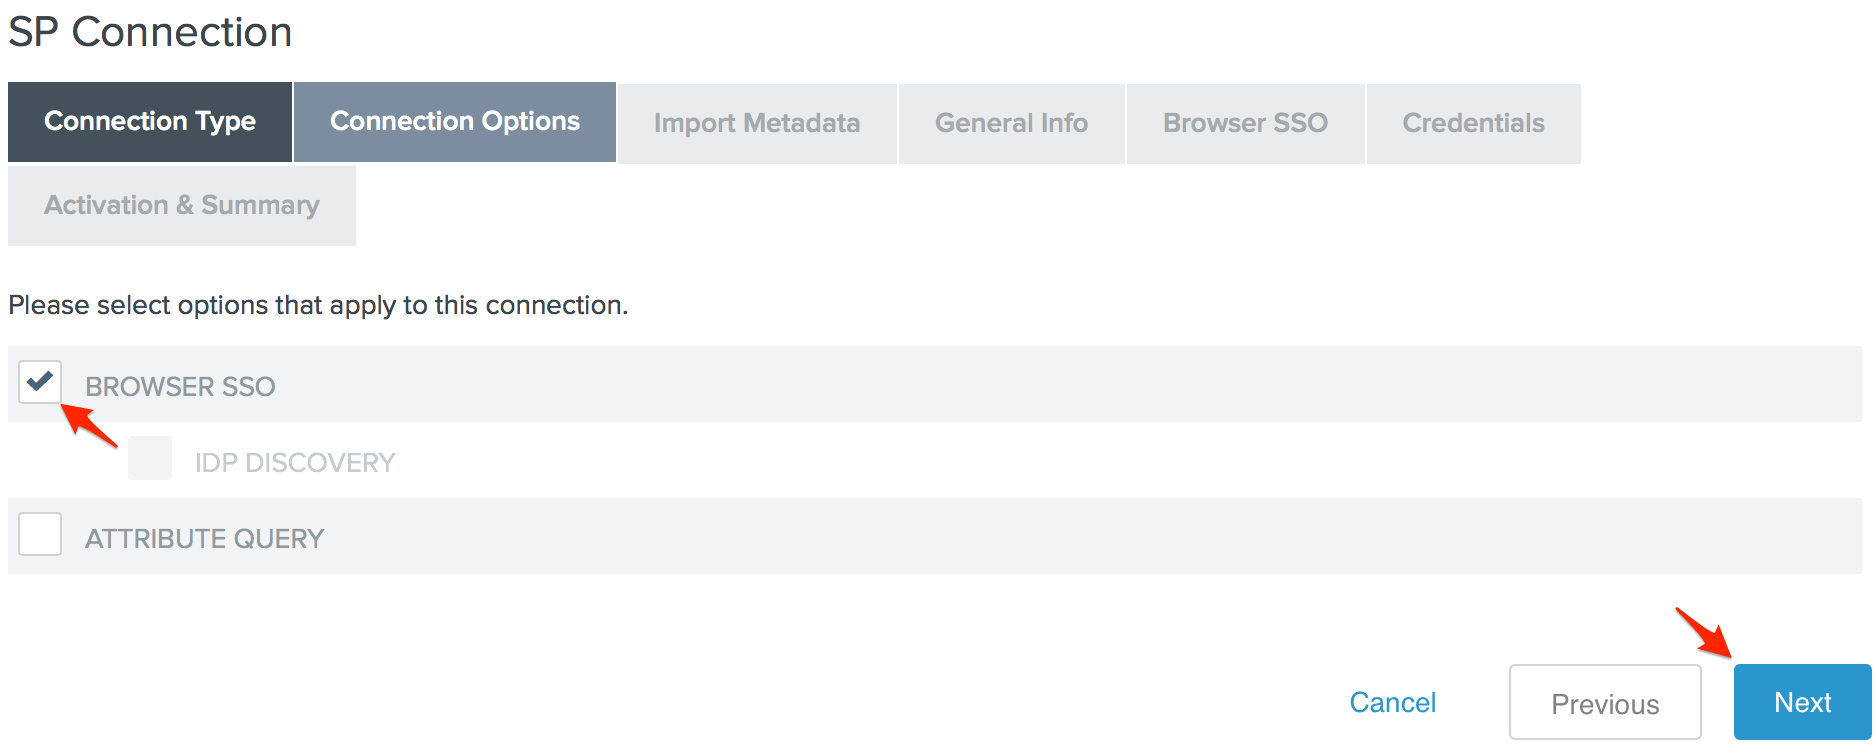
- Check the Browser SSO option on the Connection Options page and click Next.
- There is no metadata to upload on the Import Metadata page, so click Next to skip this step.
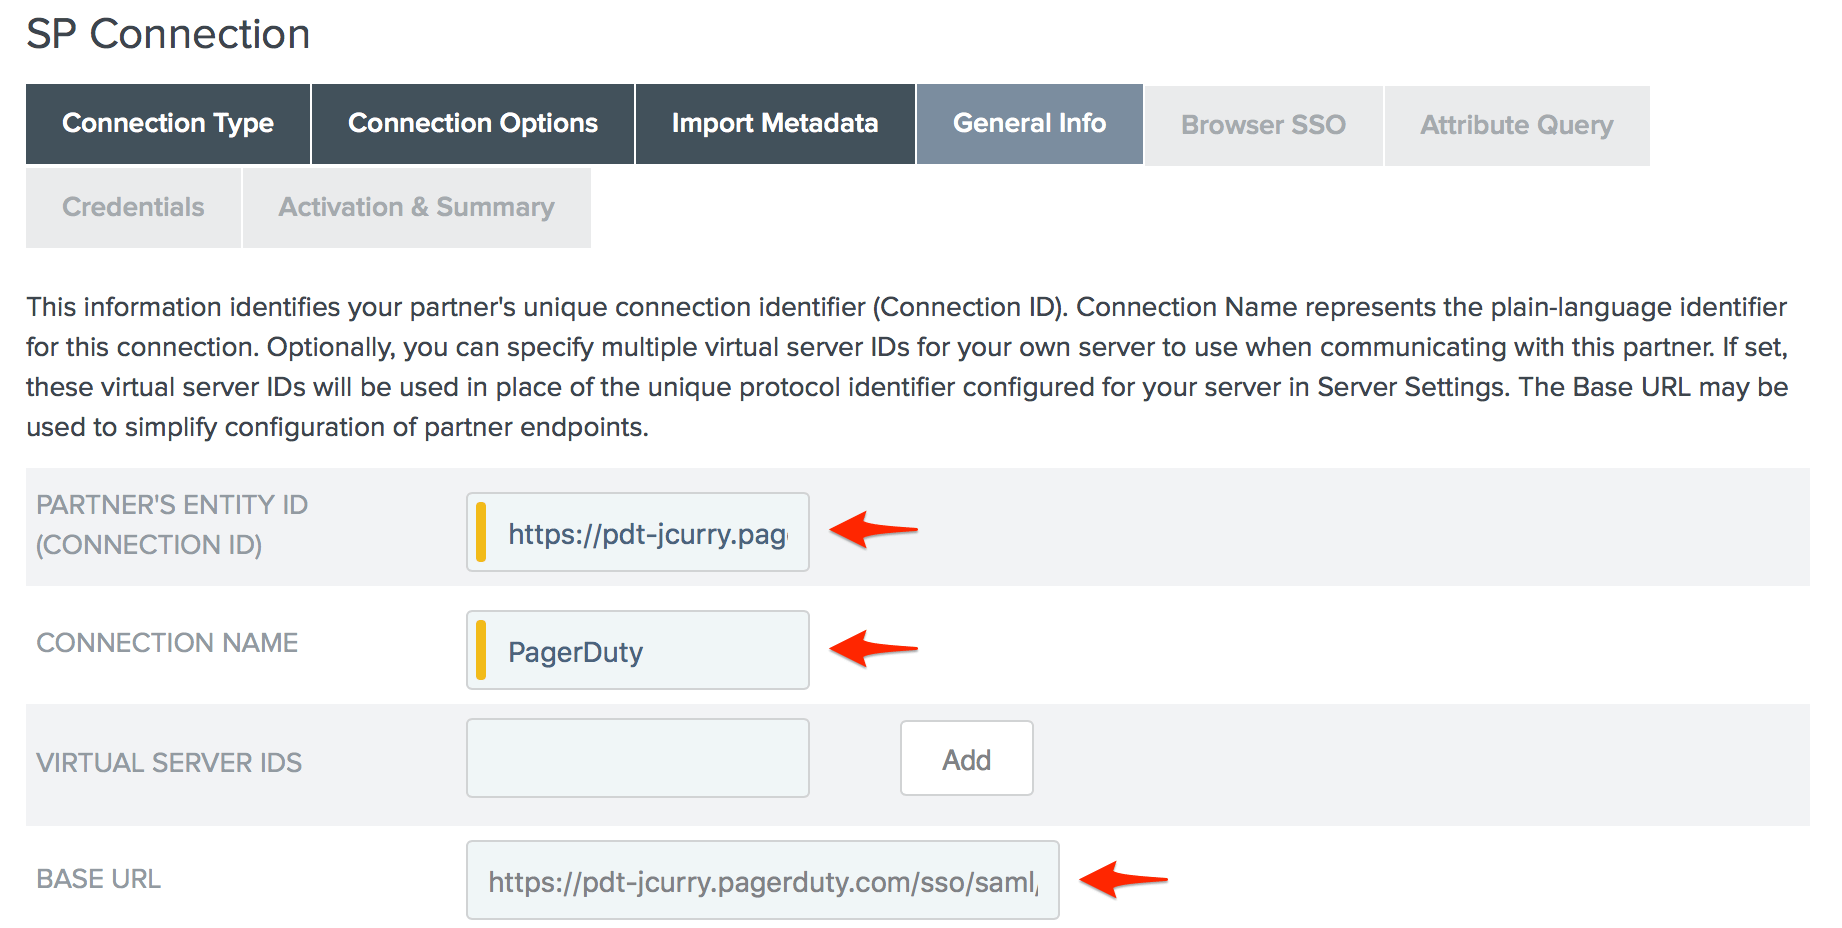
- Enter your PagerDuty subdomain (including the https:// protocol handler) in the Partner's Entity ID (Connection ID) field, your desired Connection Name, and paste the SAML Endpoint URL you copied from PagerDuty in step 10 above in to the Base URL field, then scroll down to the bottom of the page and click Next.
- Click Configure Browser SSO on the Browser SSO page.
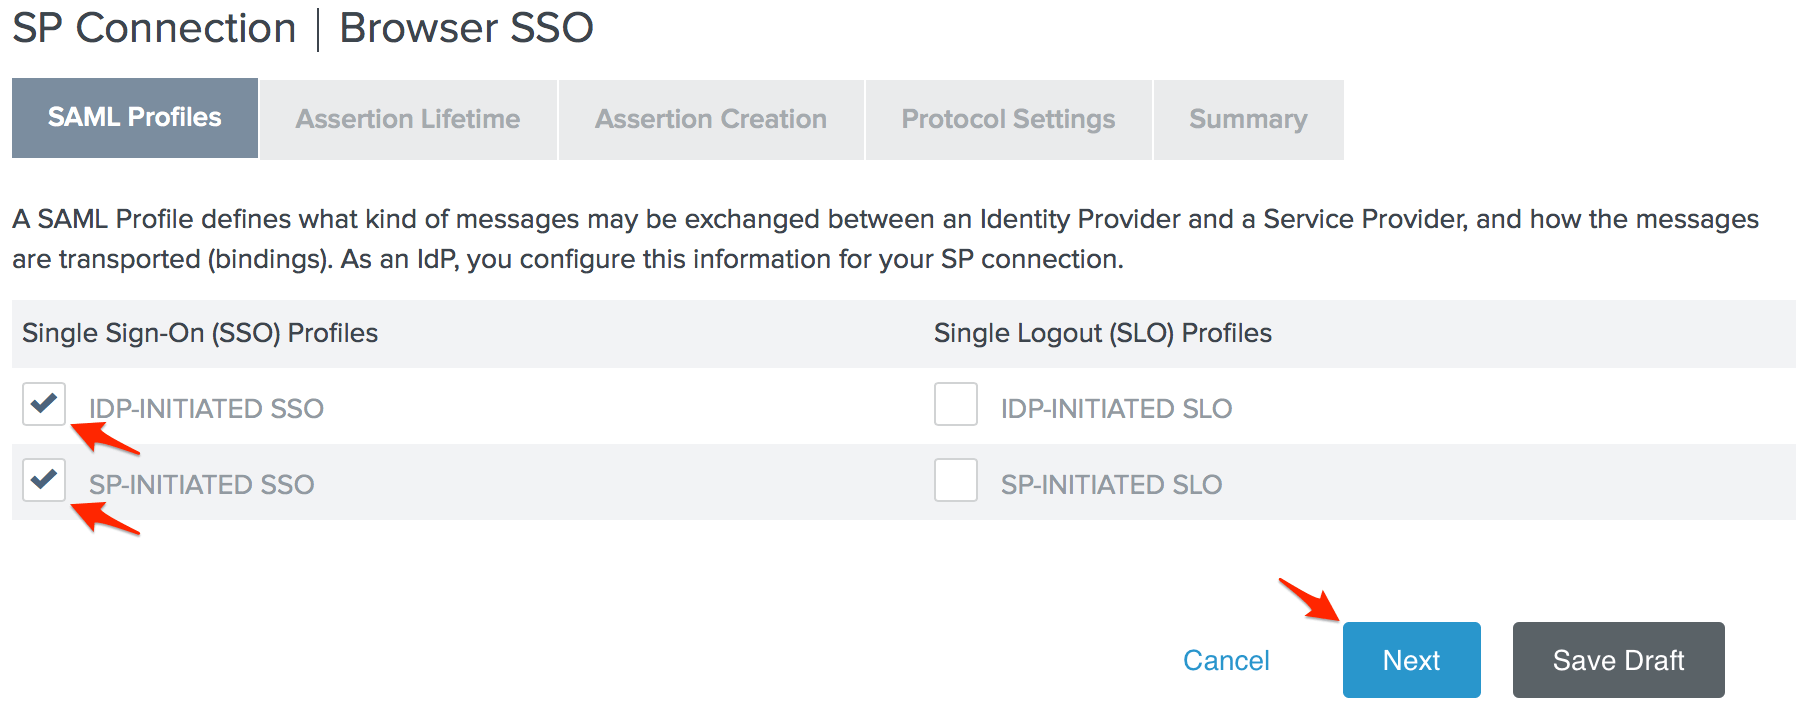
- Check the IdP-Initiated SSO and SP-Initiated SSO options on the SAML Profiles page, then click Next.
- Enter your desired Assertion Lifetime and click Next.
- Click Configure Assertion Creation on the Assertion Creation page.
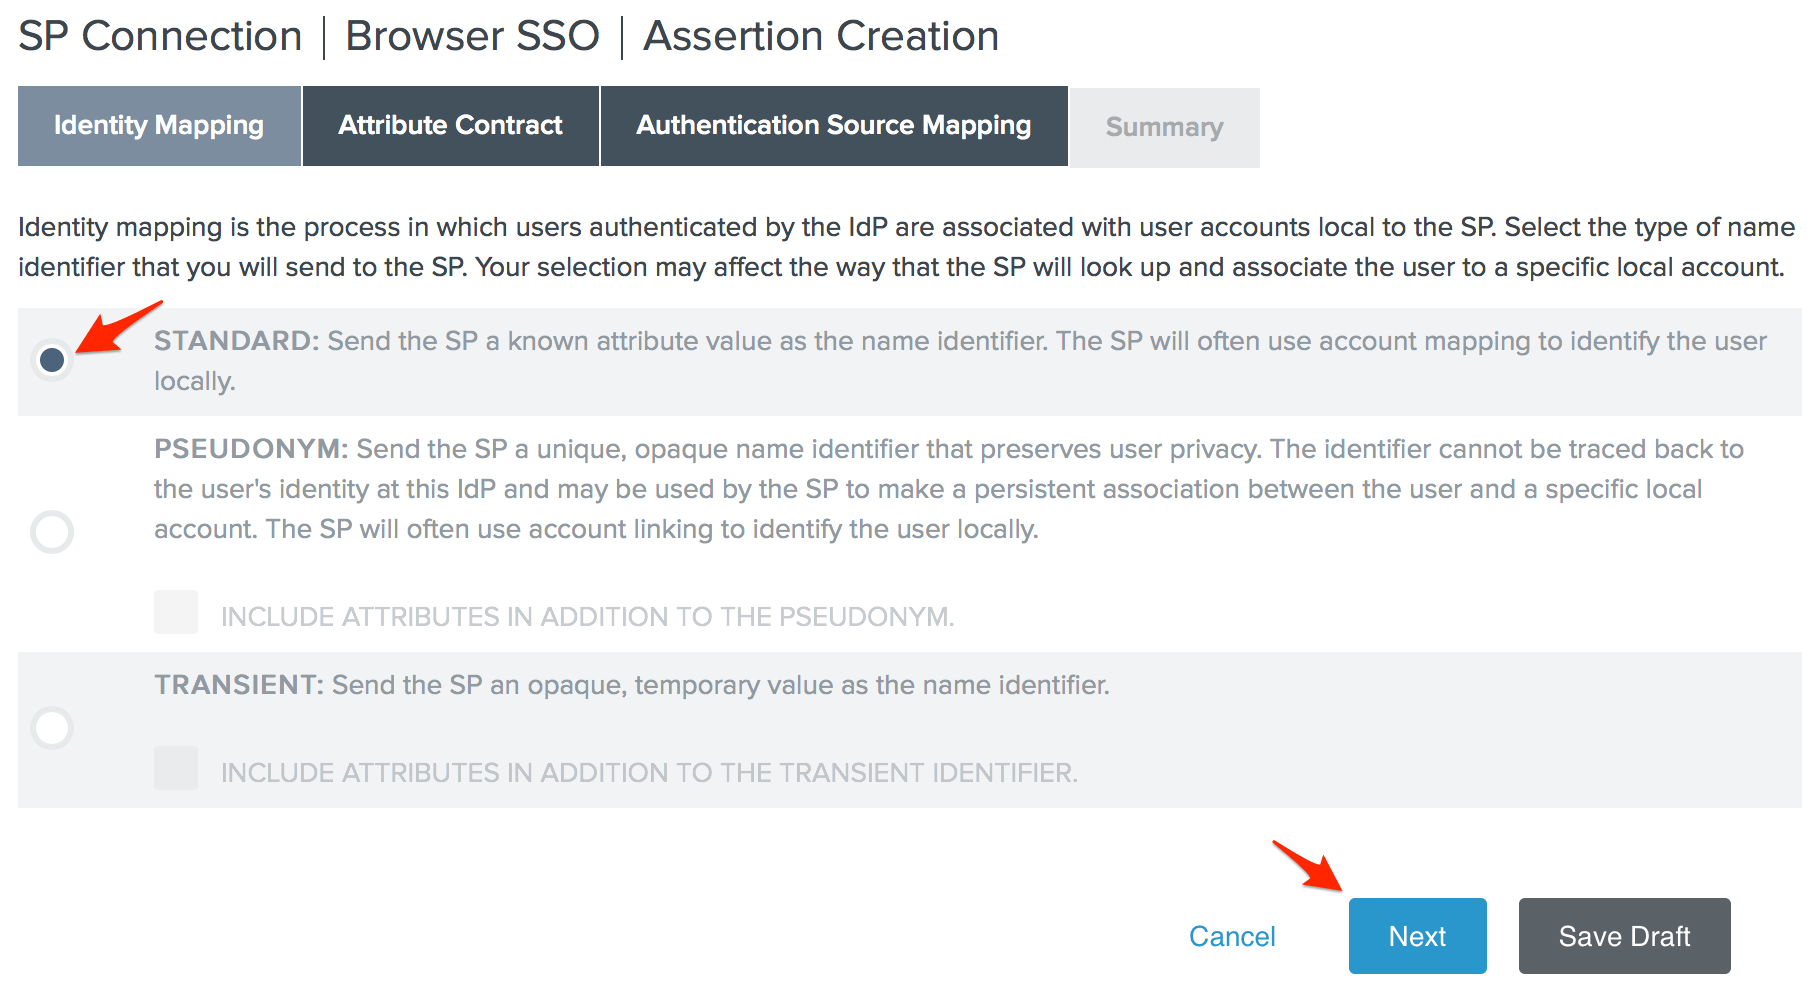
- Choose the Standard Identity Mapping option and click Next.
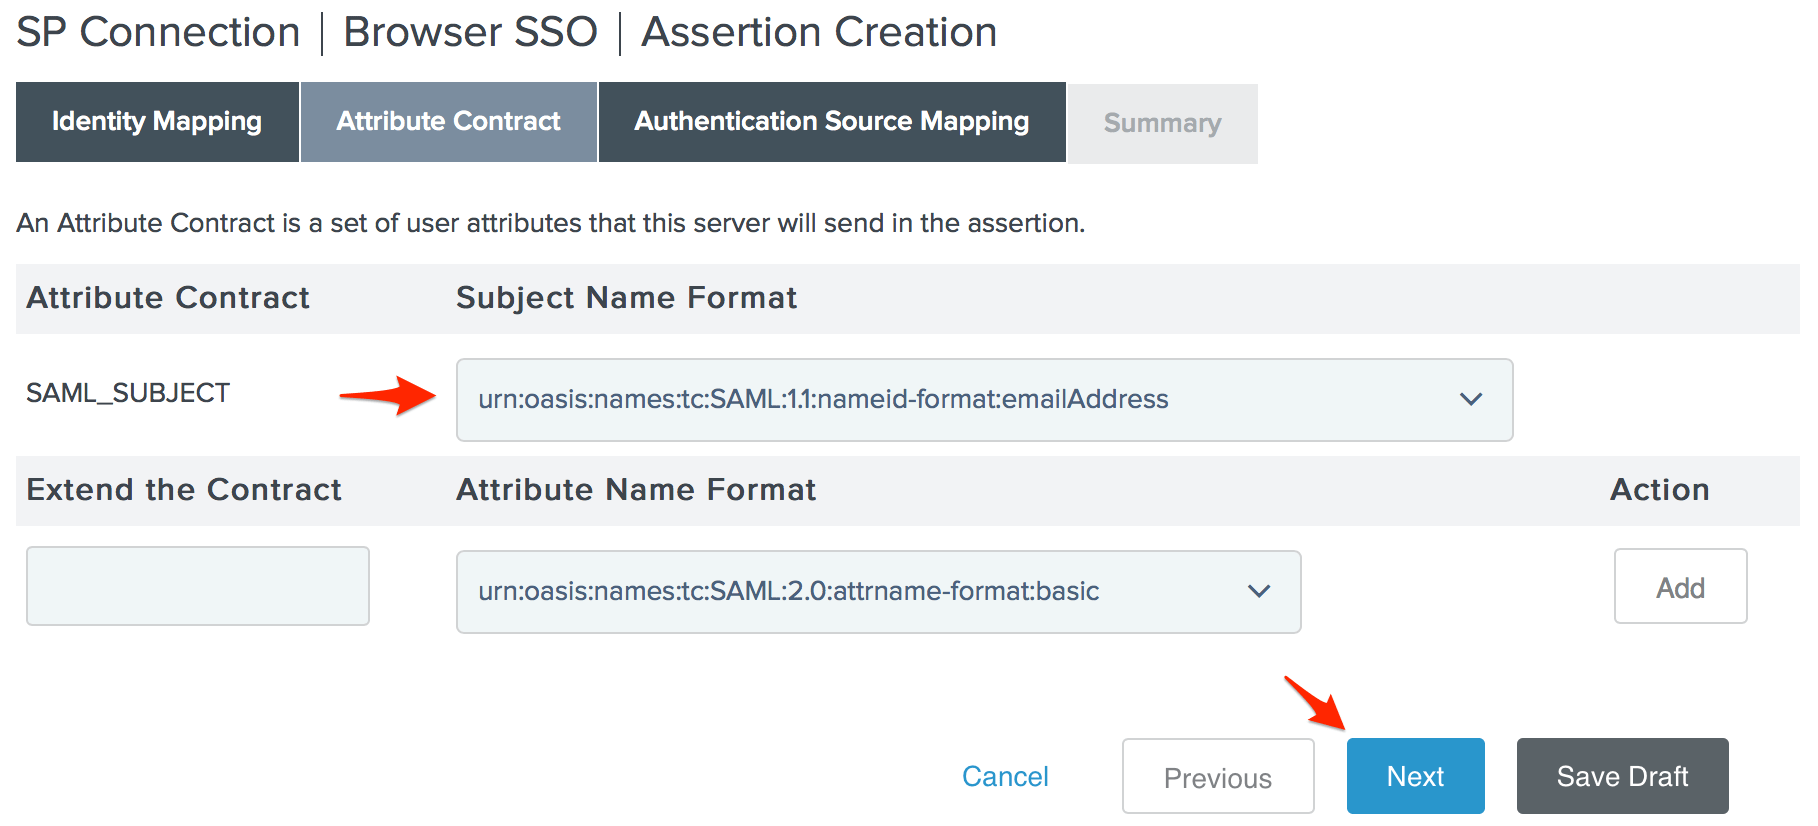
- Change the Subject Name Format for the SAML_SUBJECT to
urn:oasis:names:tc:SAML:1.1:nameid-format:emailAddress, then click Next.
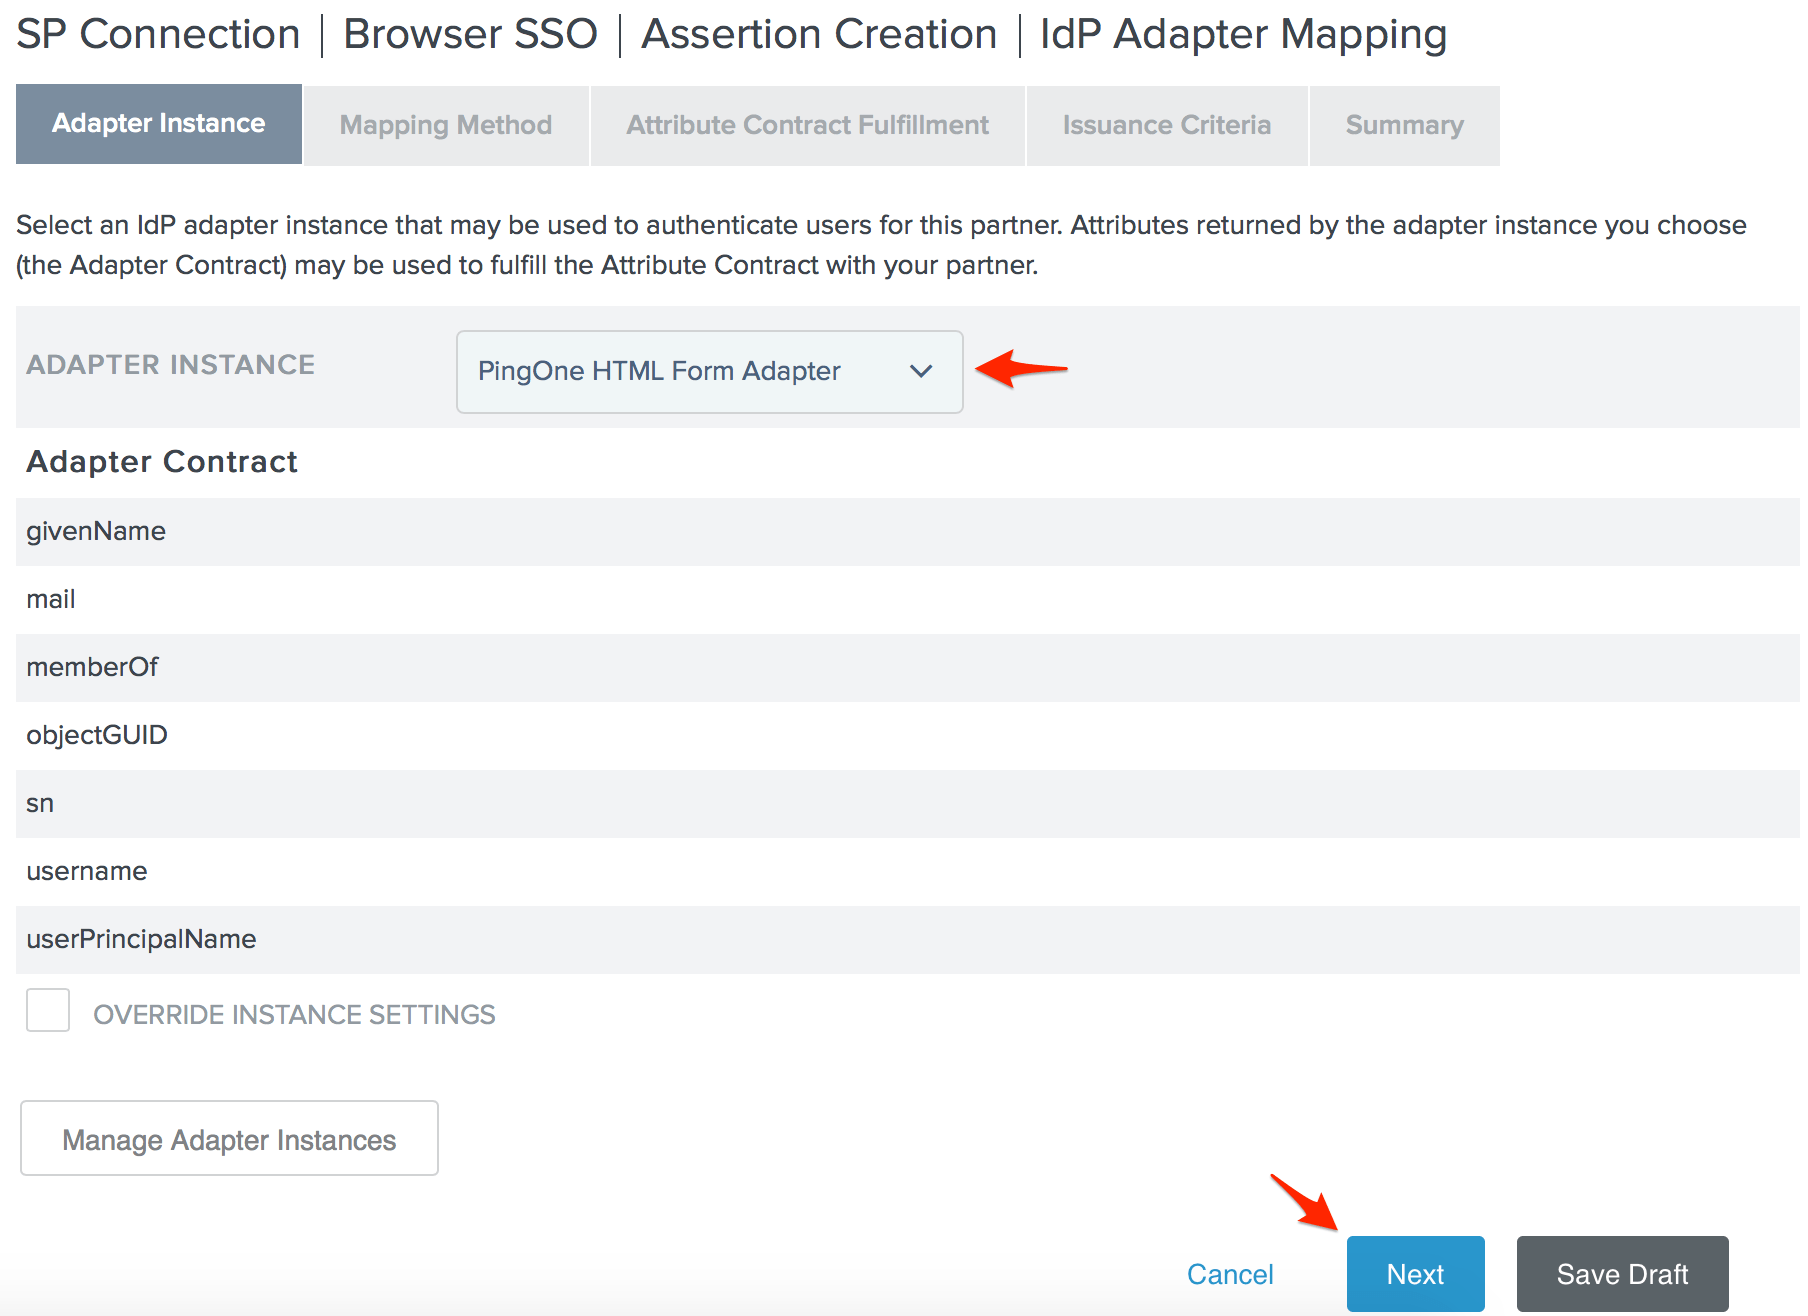
- Click Map New Adapter Instance on the Authentication Source Mapping page.
- Choose your desired Adapter Instance and click Next. For our environment, we're using the PingOne HTML Form Adapter, but you should choose the adapter most appropriate for your environment. The only requirement from PagerDuty is that the adapter you choose must provide the user's email address.
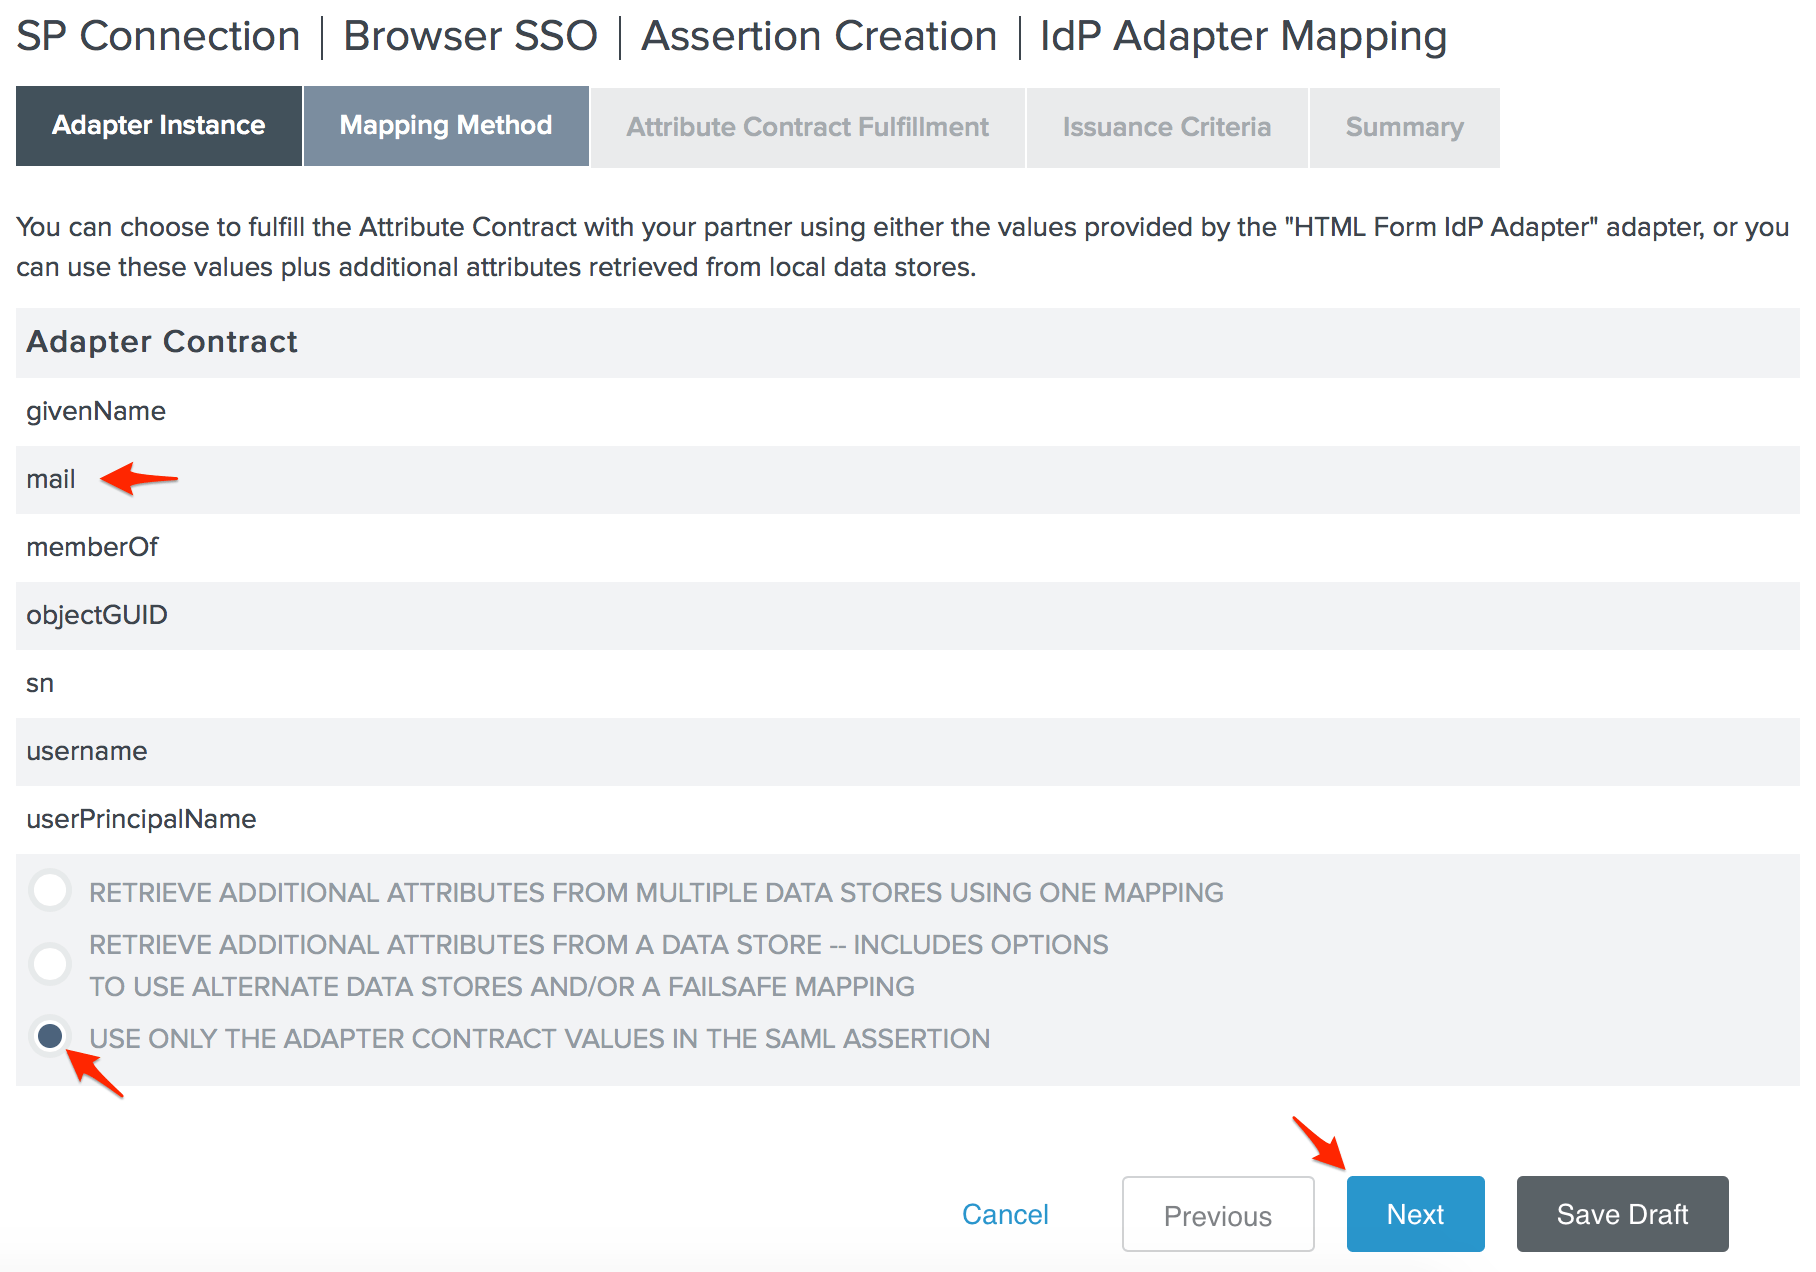
- The adapter we chose for our environment provides the user's email address, so we can select the Use only the adapter contract values in the SAML assertion option and click Next.
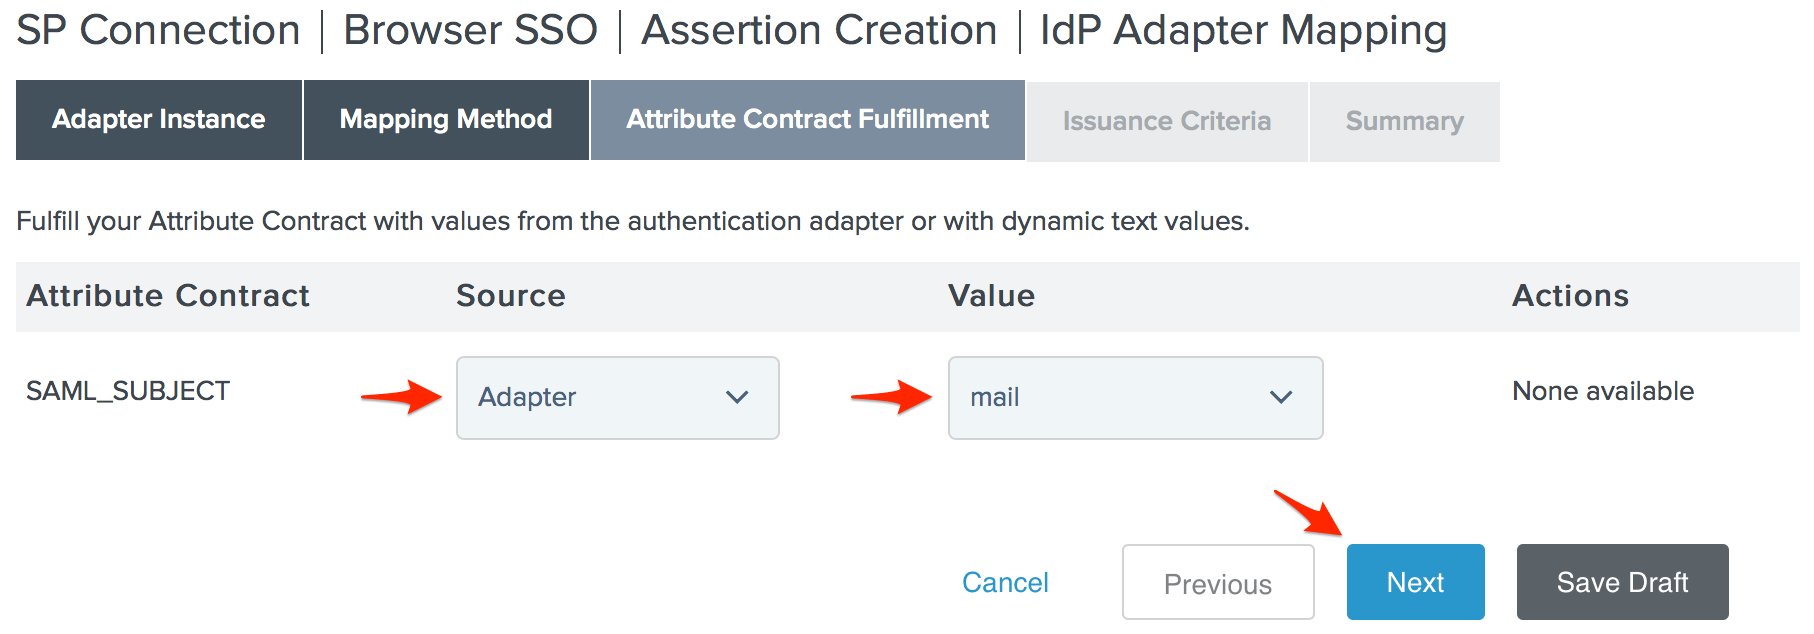
- Set your SAML_SUBJECT Source to your Adapter, and its Value to the user's email address, then click Next.
- Specify any authorization conditions you would like (if any) on the Issuance Criteria page, then click Next.

- Click Done on the Adapter Mapping Summary page.
- Click Next on the Assertion Creation page, click Done on the Assertion Creation Summary page, then click Next on the Assertion Creation page.
- Click Configure Protocol Settings on the Protocol Settings page.
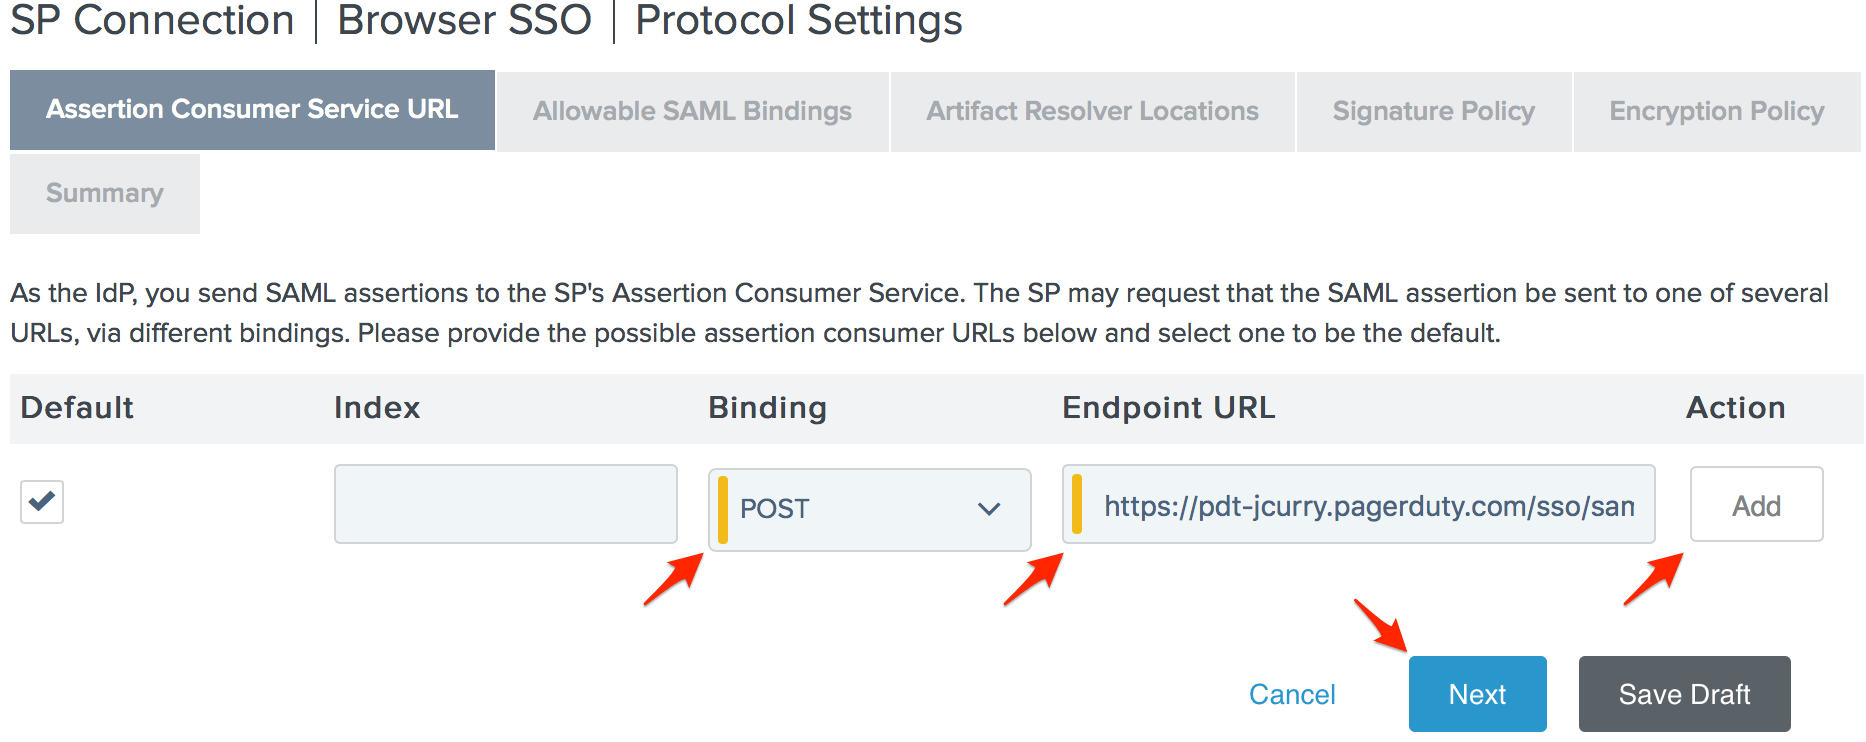
- Set the Binding to POST and paste the SAML Endpoint URL you copied from PagerDuty in step 10 in to the Endpoint URL field, then click Add and Next.
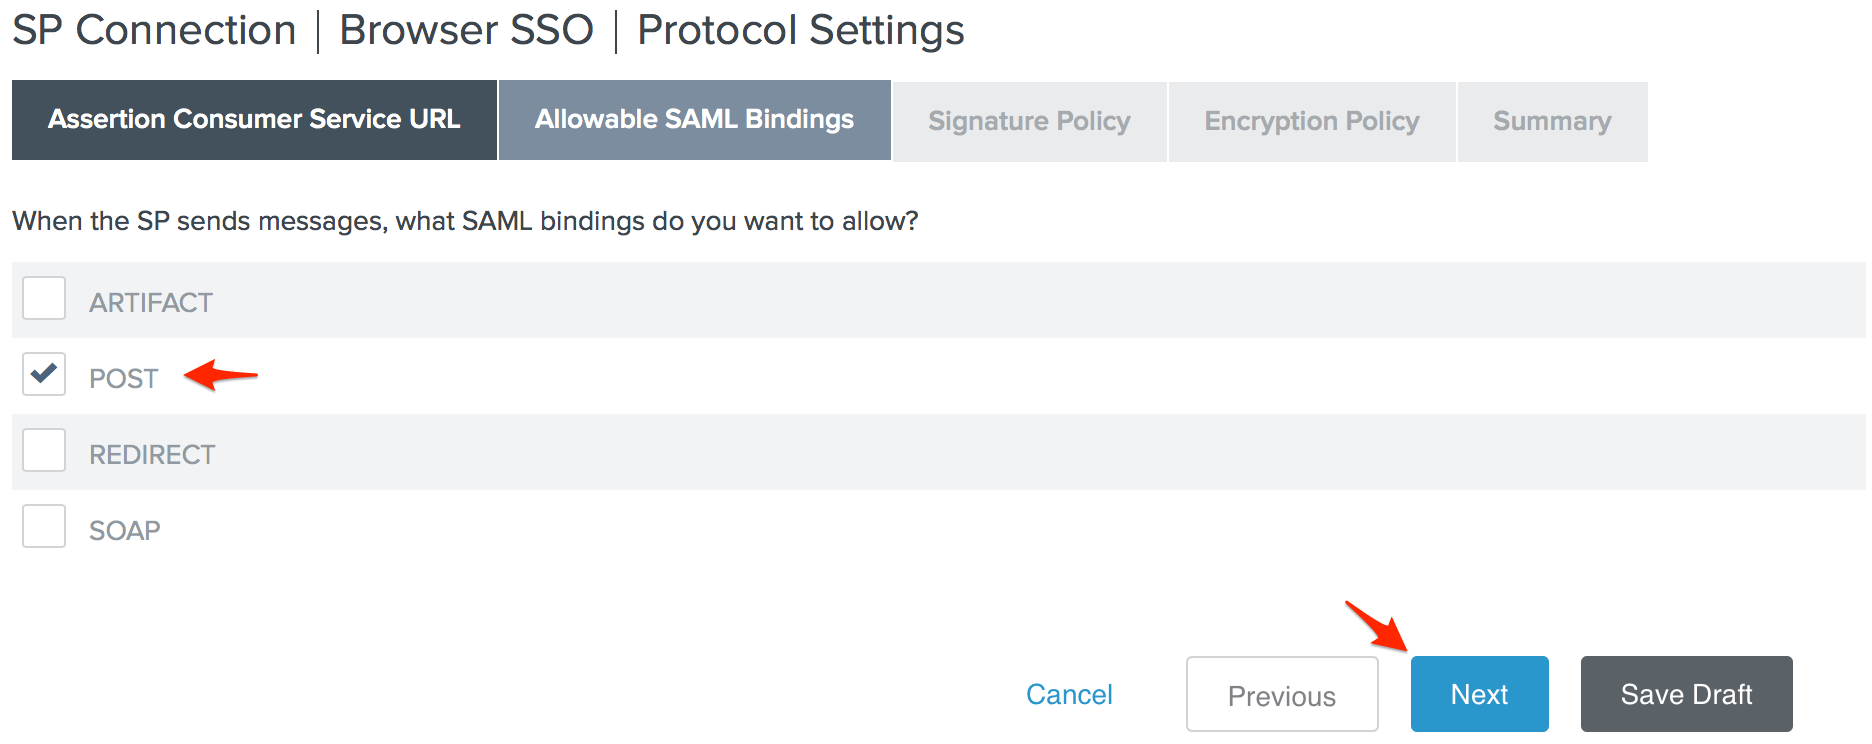
- Check POST on the Allowable SAML Bindings page and click Next.
- Click Next on the Signature Policy page, click Next again on the Encryption Policy page, then click Done on the Protocol Settings Summary page.
- Click Next on the Protocol Settings page.
- Click Done on the Browser SSO Summary page, then click Next on the Browser SSO page.
- Click Configure Credentials on the Credentials page.
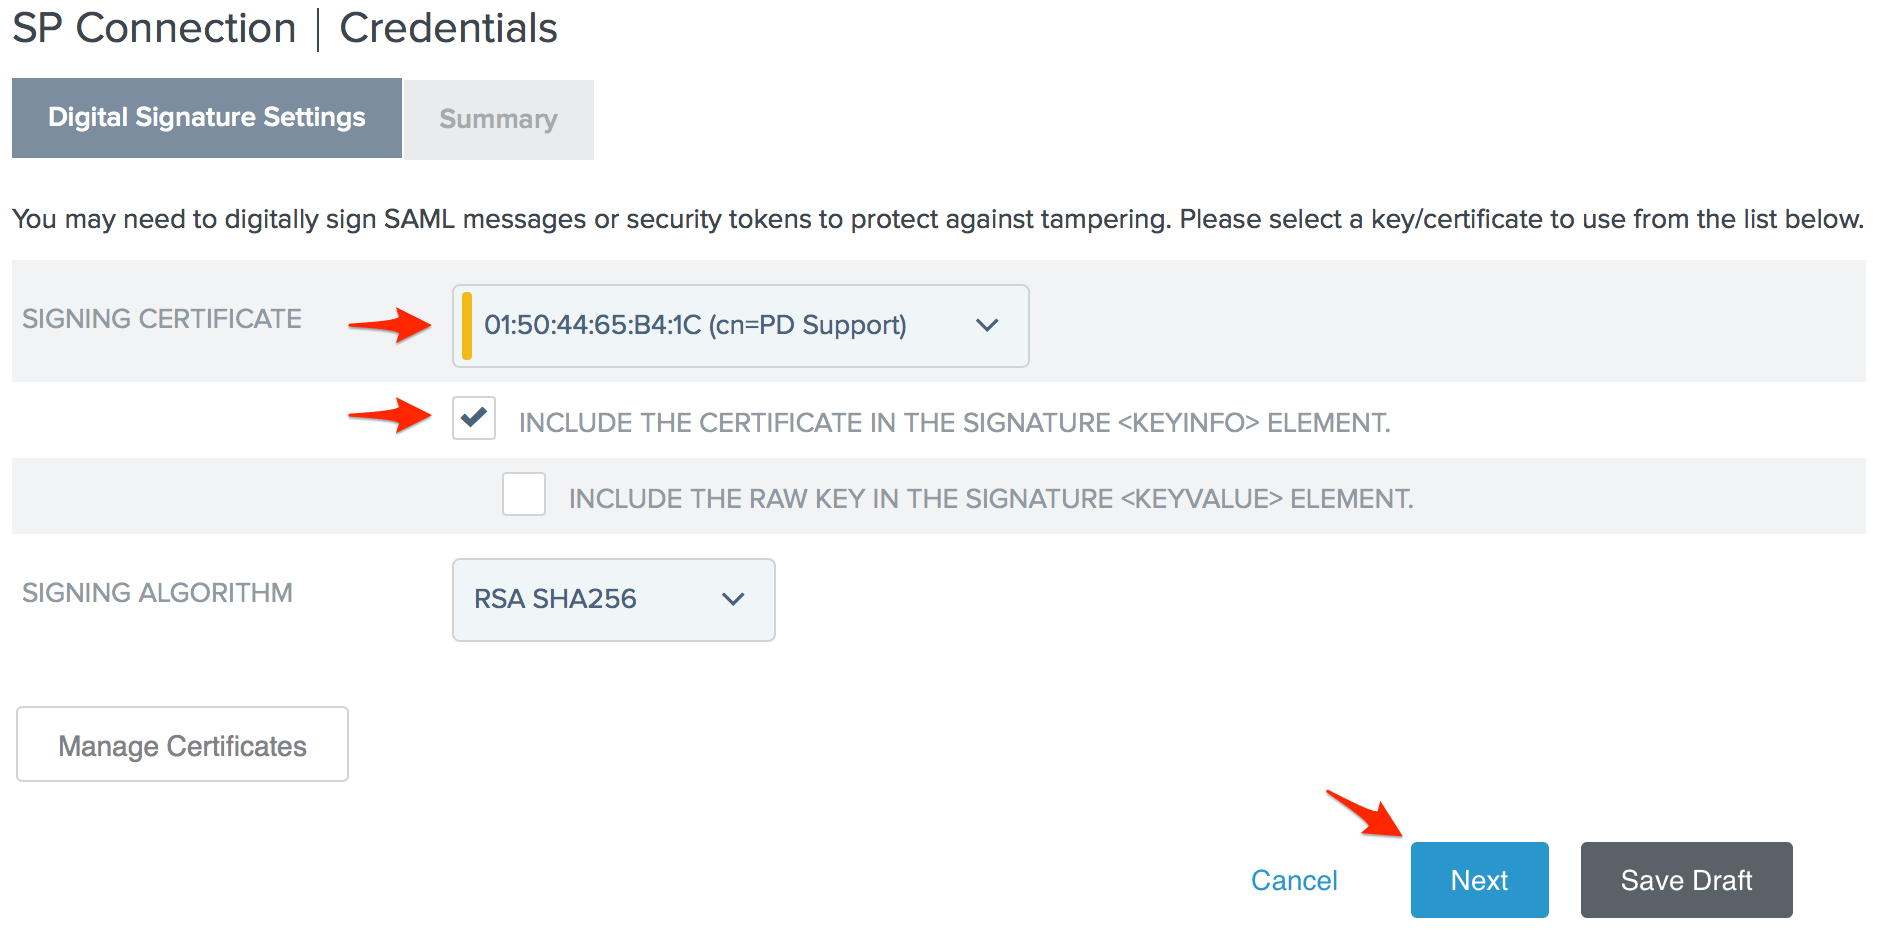
- Select the Signing Certificate you want to use with PagerDuty. The serial number you noted in step 4 will help you identify the correct certificate. Check Include the certificate in the signature <keyinfo> element and click Next.
- Click Done on the Digital Signature Settings Summary page, then click Next on the Credentials page.
- Change the Connection Status to Active on the Activation & Summary page, then scroll down to the bottom of the page and click Save.
- You're done! You should now be able to login to PagerDuty using PingFederate.
FAQ
Does my PingFederate server have to be publicly accessible for my users to login to PagerDuty?
PagerDuty does not need to be able to reach your PingFederate server, however your users will need to be able to access your PingFederate server so that they may log in to PagerDuty outside of the office. This can be done by giving your users access to a VPN or proxy that they will need to connect to before trying to access the PagerDuty site or mobile app. Note that IP whitelisting likely won't be a viable solution, as users of our mobile app will have unpredictable IPs when connected to cellular networks.
Can the account owner log in without SSO if username and password authentication is disabled?
Even with username and password authentication disabled for users, the Account Owner will always be able to login with their username and password as a backup option should you need to change the SSO configuration or disable it completely.
Why don’t I see the Single Sign-on option when I go to Account Settings?
SSO is only available in accounts on our current Standard or Enterprise plans. Please contact our sales team if you are interested in upgrading your plan.
Ready to get started?
Try any product on the Operations Cloud for free.
No credit card required.