
DIY Arduino YUN Integration for PagerDuty Alerts
by Tony Albanese
August 26, 2014
| 4 min read
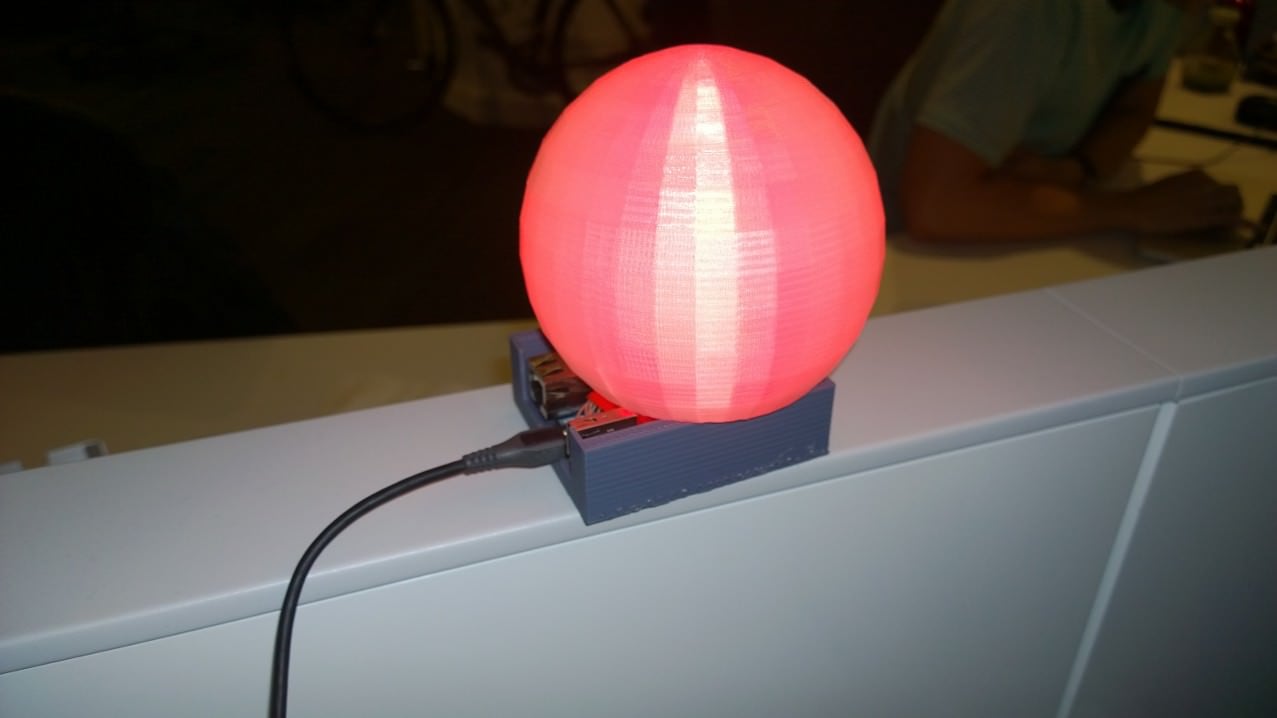
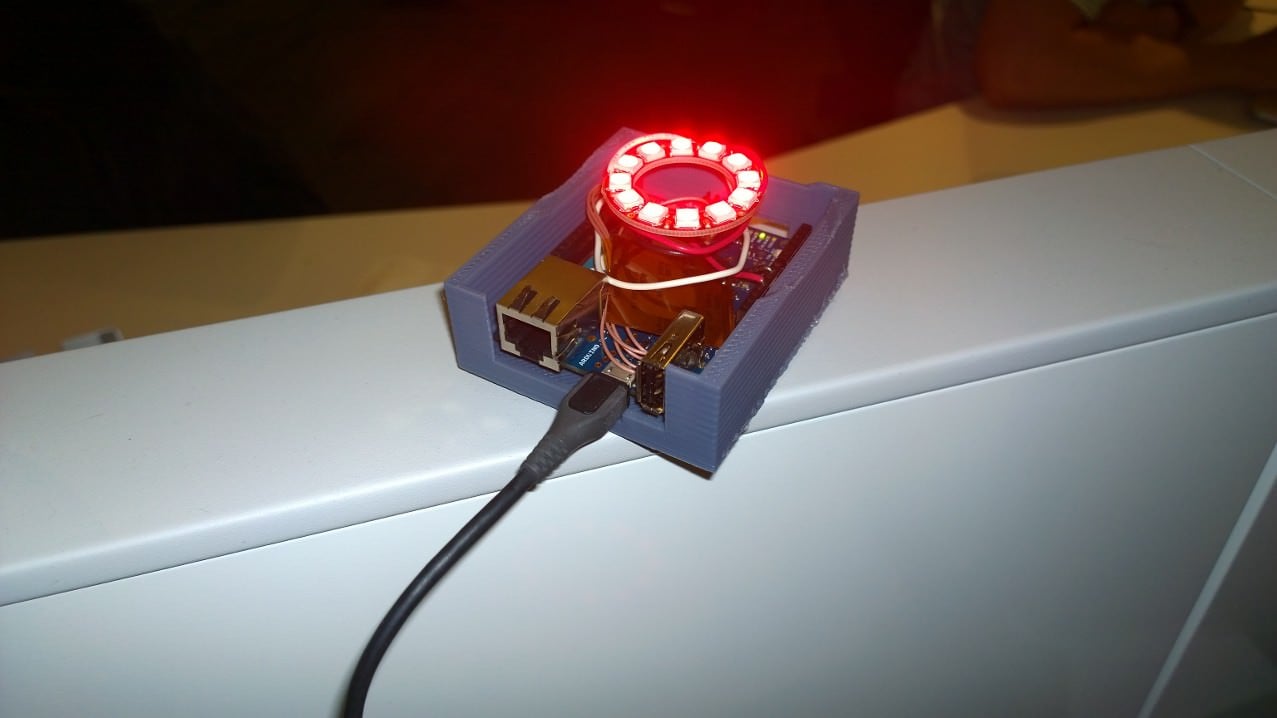
Using a little code inspiration from the Gmail Lamp, Daniel Gentleman of Thoughtfix (@Thoughtfix) built an awesome PagerDuty Arduino integration by combining an Arduino YUN, a 3D printed sphere and Adafruit’s Neopixel Ring to create visual status check of his PagerDuty dashboard. Check it out in the video of his device (and his cat) in action below:
Using PagerDuty’s API, the device checks in with PagerDuty every 15 seconds to update it’s status. The device is configured to see both both acknowledged and triggered alerts. When it discovers acknowledged or triggered alerts, the globe turns orange then to red, giving it a brief pulse of orange. Daniel notes that this is intentional as a way to see that there are alerts in both states, but the lamp will stay red for the duration of a 15 second cycle to show the more critical status. When all alerts are resolved the lamp glows green.
Keeping the Integration Reliable
Like many DIY projects the PagerDuty Status Lamp started out as a for-fun project. But Daniel saw this lamp filling a real need to have a quick visual cue for his open incidents, which in the future may possibly be used as a visual queue for others to leave him alone when his lamp is red. To make the integration reliable, Daniel added a simple function to the Arduino to check for WiFi to ensure that a connection is always established.
By creating a ping -c 1 shell script in the home directory and wrapping the PagerDuty API calls in a test for a ping. Daniel told us that in his final version, he has the device ping Bing.com every second (much more frequently than the calls to PagerDuty, which occur every 15 seconds). If the connection is lost the lamp will fade to a blue light.
Future Possibilities
Because the device uses very simple shell scripts and one I/O pin on the Arduino Yun, Daniel explained that it’s possible to expand this to show who is on-call, having the lights change depending on which team has alerts and even physically move a robot based on PagerDuty API calls.
Ready to Build Your Own?
Here’s what you will need:
- Arduino YUN: Needed specifically for WiFi and curl commands.
- Adafruit’s Neopixel Ring and Library – LED control attached to Pin 6
- 3D Printed Sphere: Specs to print your own sphere and base
Source code:
// This code is for a PagerDuty status lamp using an Arduino Yun
// with an Adafruit NeoPixel ring (12 LEDs) on pin 6.
// It requires three files in root’s home directory:
// ack.sh (curl request to PagerDuty’s API to check for acknowledged alerts)
// trig.sh (curl request to PagerDuty’s API to check for triggered alerts)
// cacert.pem (from http://curl.haxx.se/ca/cacert.pem for SSL curl requests)
//
// Example ack.sh (change status=acknowledged to status=triggered for trig.sh
// curl -H “Content-type: application/json” -H “Authorization: Token
token=[your token]” -X GET -G –data-urlencode “status=acknowledged”
https://[YourPagerDutyURL].pagerduty.com/api/v1/incidents/count
–cacert /root/cacert.pem
//// Obtain a PagerDuty API token from
https://[YourPagerDutyURL].pagerduty.com/api_keys
#include <Adafruit_NeoPixel.h>
#define PIN 6
#include <Process.h>
Adafruit_NeoPixel strip = Adafruit_NeoPixel(12, PIN, NEO_GRB + NEO_KHZ800);
void setup() {
// Initialize Bridge
Bridge.begin();
// Initialize Serial
Serial.begin(9600);// run various example processes
strip.begin();
strip.show(); // Initialize all pixels to ‘off’
colorWipe(strip.Color(0, 0, 255), 50); // Blue
delay(100);
}
void loop() {
int ackd = runAckd();
int trig = runTrigger();
if ((ackd == 0) && (trig == 0)){
colorWipe(strip.Color(0, 255, 0), 50); // Green
}
if (ackd >= 1){
colorWipe(strip.Color(255, 153, 0), 50); // Orange
}
if (trig >= 1){
colorWipe(strip.Color(255, 0, 0), 50); // Red
}
delay(15000);
}
int runTrigger() {
Process p;// Create a process and call it “p”
p.runShellCommand(“/root/trig.sh”);// Check for Triggered events
// A process output can be read with the stream methods
while (p.running()); // do nothing until the process finishes, so
you get the whole output
int result = p.parseInt(); /* look for an integer */
Serial.print(“Triggered:”); /* Some serial debugging */
Serial.println(result);// Ensure the last bit of data is sent.
Serial.flush();
return result;
}
int runAckd() {
Process p;// Create a process and call it “p”
p.runShellCommand(“/root/ack.sh”);// Check for Triggered events
// A process output can be read with the stream methods
while (p.running()); // do nothing until the process finishes, so
you get the whole output
int result = p.parseInt(); /* look for an integer */
Serial.print(“Ackd:”); /* Some serial debugging */
Serial.println(result);// Ensure the last bit of data is sent.
Serial.flush();
return result;
}
void colorWipe(uint32_t c, uint8_t wait) {
for(uint16_t i=0; i<strip.numPixels(); i++) {
strip.setPixelColor(i, c);
strip.show();
delay(wait);
}
}
Have a DIY PagerDuty project of your own? Let us know by emailing support@pagerduty.com.