
How-To: Twitter Trend Alert System
by Richard Cao
April 26, 2018
| 7 min read
Hi! My name is Richard and I am a software engineering intern on the Platform Team here at PagerDuty. In other times of the year, I am also known as a second-year Computer Engineering student at the University of Waterloo. In this post, I would like to guide you through my March Hackday project, which allows you to create a Twitter Trend Alert System in fewer than 40 minutes and with minimal coding knowledge.
How to Leverage PagerDuty to Monitor Your Brand on Twitter — in only 40 minutes or less
Managing brand reputation has never been more complicated than in the age of social media. With 66.7 percent of all public company mentions happening on Twitter, you want to promote interesting and impactful content at the right time; i.e., when your customers are the most engaged. At the same time, you want to watch for major public relation incidents so that your team is ready to mobilize quickly and that your brand will not lose customers and revenue. What you need is a competitive edge, which means being on top of social media trends as soon as they happen, whether it’s opportunity or trouble.
Example Use Case:
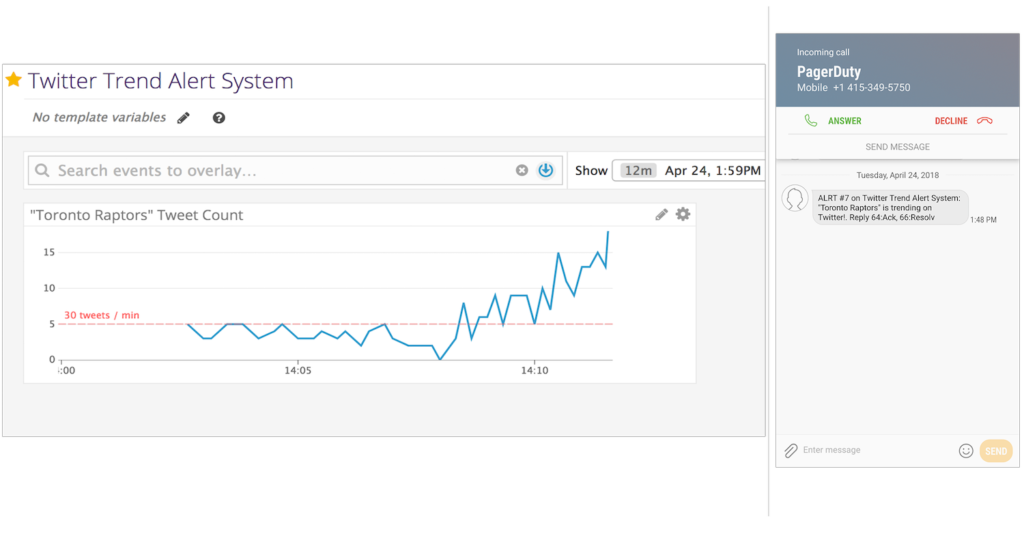
It seems like everyone is talking about the Toronto Raptors right now. Perhaps this is the best time to advertise our 50% sale on jerseys!
PagerDuty Solution
Most companies use PagerDuty for managing customer-impacting disruptions, alerting the right responders, and analyzing the impact of incidents on employee and customer satisfaction.
But did you know you can also leverage PagerDuty as a Twitter Trend Alert System?
The beauty of PagerDuty is how easy it is to extend it to your needs. By the end of this guide, you will have created an automated application that can track any Twitter keyword, mention, or retweet in real time and instantly alert you via email, SMS, or phone when there’s a spike in social media activity. The best part: This will take you less than 40 minutes and requires minimal coding knowledge. So without further ado, let’s get down to business.
Steps … aka The “Engineering Stuff”
Step 1: Configure Your Twitter Application
- Create a new Twitter account
- Since you do not need to use your company’s Twitter account for this project, we recommend making a new Twitter account for security and testing purposes.
- Get your Twitter API keys
- Ensure you’ve confirmed your email.
- In order to use the Twitter API, you will also need tokens so that Twitter can associate the application to your account. Visit https://apps.twitter.com/ and create a new app.
- Under the “Keys and Access Tokens” tab, generate a token. Keep this tab open so that we can copy the keys later.
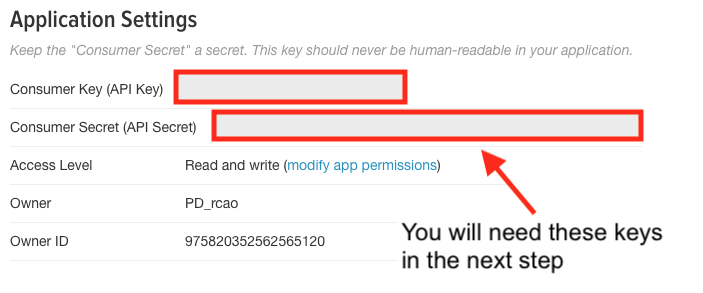
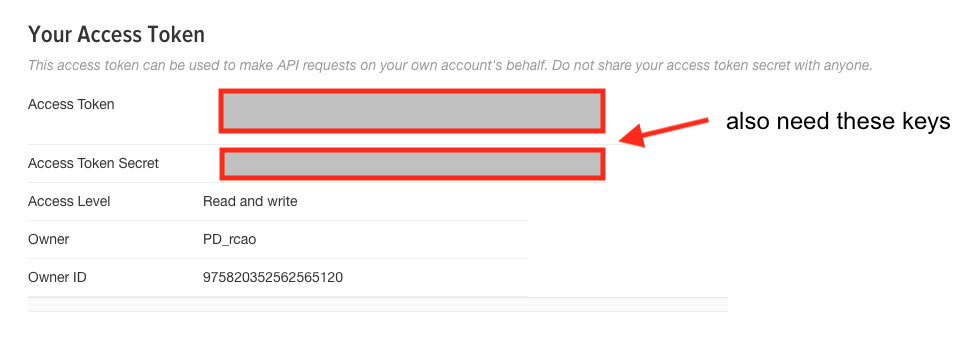 Your Twitter account should now be configured for development use.
Step 2: Download Project Code
PagerDuty uses GitHub to manage our code repositories.
- To download the project code, make sure you have Git installed.
- Visit https://github.com/pagerduty/twitter-trend-alert-system. In terminal/CMD, run “git clone https://github.com/pagerduty/twitter-trend-alert-system” to download the project code.
- The project uses Python 2.7.14. If you don’t have it installed, visit https://www.python.org/downloads/.
- Verify your installation by entering “pip –version” and you should get this:

- Follow the instructions listed in the README to configure the project. You will be missing the Datadog API key for the time being.
Tip: For this guide, we are going to run the project on your local computer. If you would like to run this indefinitely, we recommend running a small server.
By the time you finish this, you will have a process that filters through all the statuses posted on Twitter and returns only statuses that contain the keywords that you have listed.
Step 3: Configure PagerDuty
If your company is not currently using PagerDuty, then you will need to visit https://signup.pagerduty.com/accounts/new and create a free 14-day trial account.
You can skip the onboarding pages, BUT make sure you set-up notifications:

After that, there are only a few steps to set up the service.
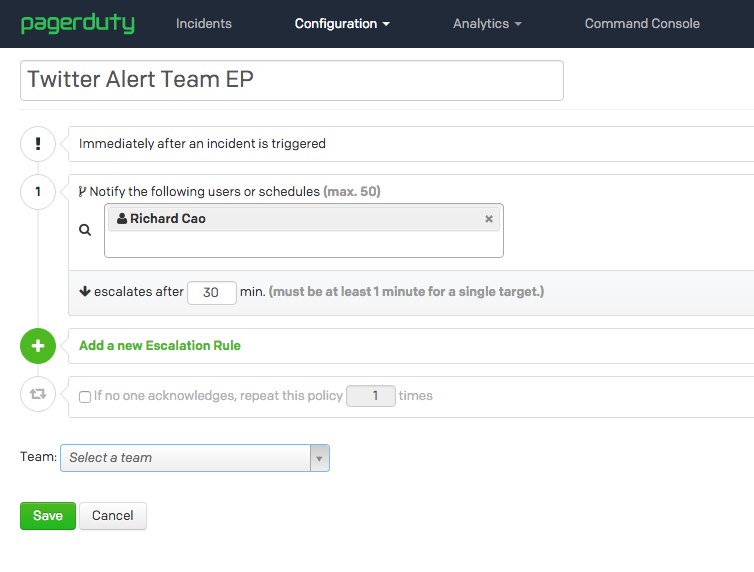
- First, we set up an escalation policy (EP). Typically, EPs can help escalate situations to the right people, ensuring that someone is able to respond to the incident. You can find more info here: https://support.pagerduty.com/docs/quick-start-guide#section-create-an-escalation-policy
- From the home page, go to Configuration → Escalation Policies → New Escalation Policy
- Create a name for the EP
- Second, we set up a service. Services are designed to corroborate related information. For more info, please visit: https://support.pagerduty.com/docs/quick-start-guide#section-create-a-service
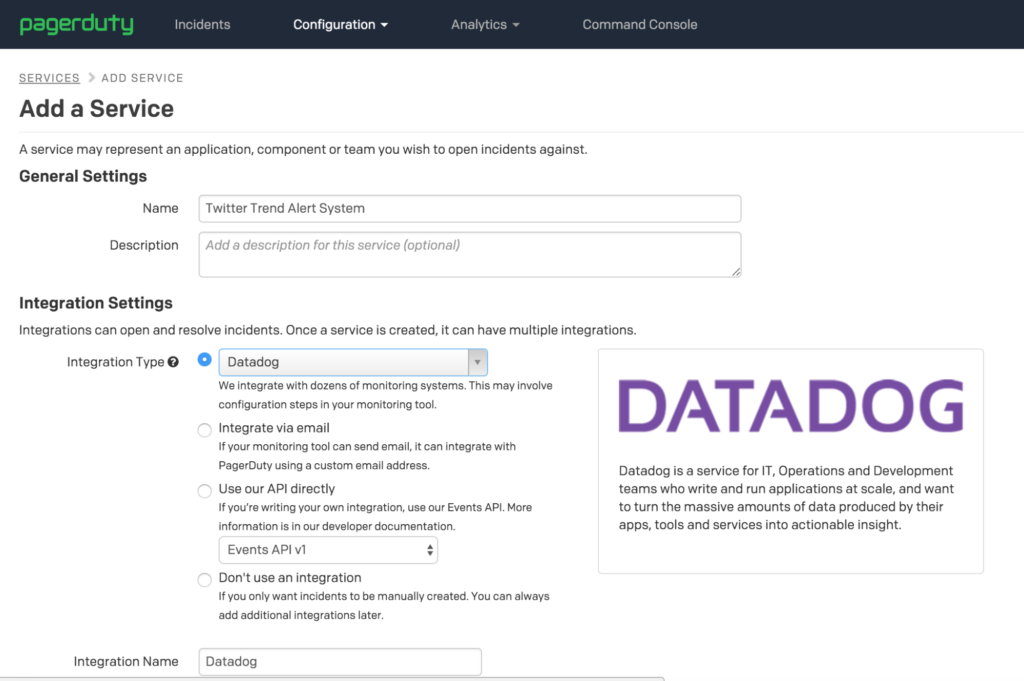
- Go to Configuration → Services → Add New Service.
- Create a neat name.
- Be sure to list Datadog under “Integration Type.”
- For the field “How should responders be notified?”, what you choose depends on your situation. If you would like to monitor Twitter to time your content to trends, I would recommend a low-urgency service. If you are monitoring for major customer support incidents, I recommend a high-urgency service. For more information about the difference between low- and high-urgency services, please visit https://support.pagerduty.com/docs/service-settings#section-use-case-1-critical-and-non-critical-incidents
Tip: Why Datadog?
PagerDuty comes with over 200 integrations and one of them is Datadog! If your team uses other tools, then it’s very likely that we have an integration for it. You can also use our simple REST API.
We now have an alerting service to notify the right people at the right time when content is trending or a code-red social media situation needs control.
Step 4: Create a Datadog Host
Now, we will configure a Datadog Host to analyze the trend.
- Create a new trial account at https://app.datadoghq.com/signup.
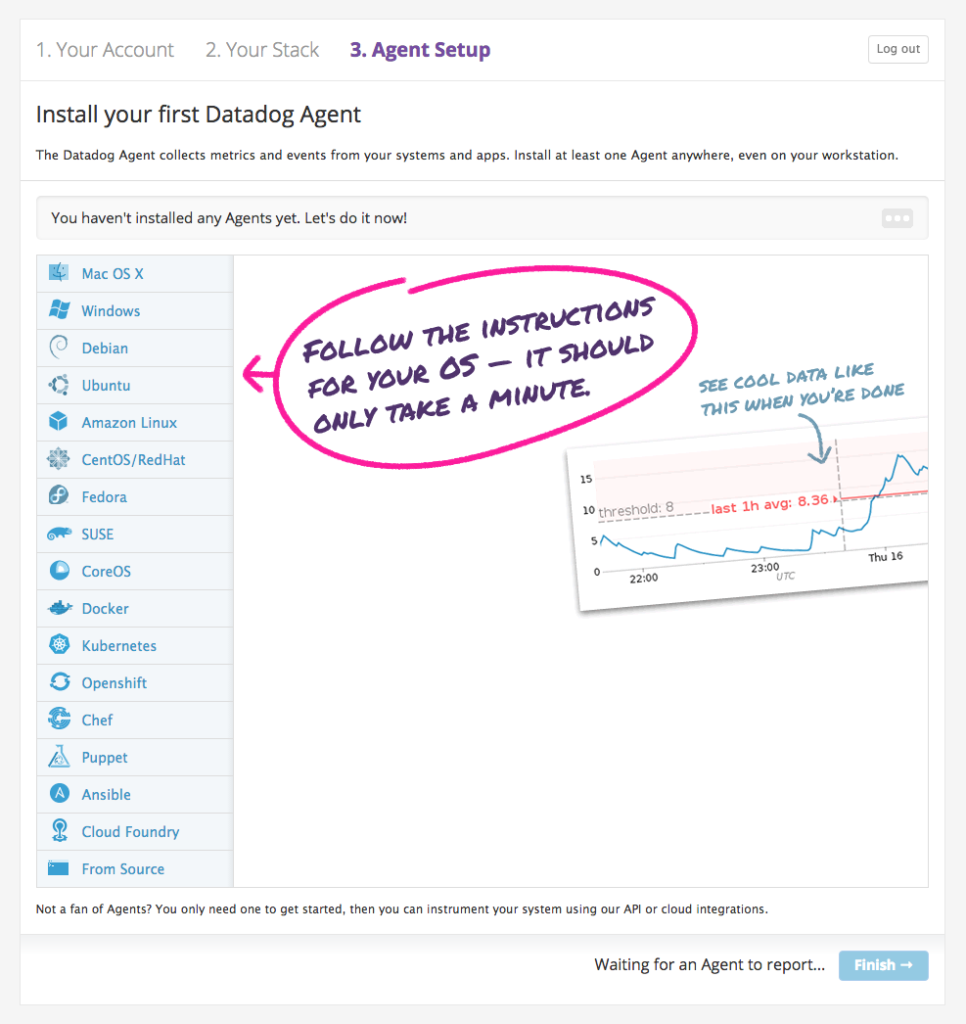
- Follow the instructions to set up a Datadog Agent on your Mac or Windows computer. On Mac, run the code snippet in Terminal. On Windows, download and use the Installer.
-
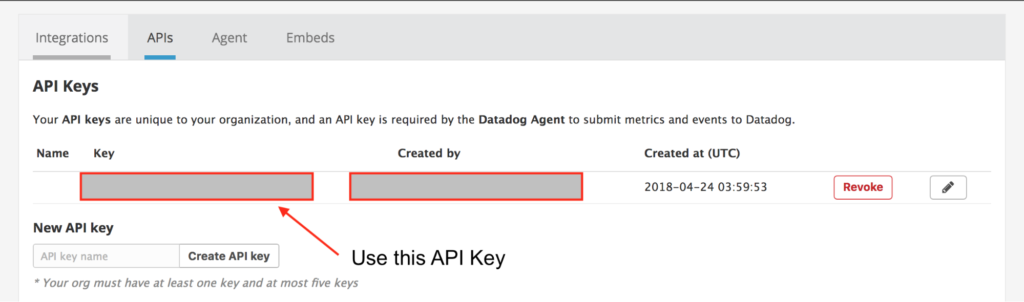
- Go to https://app.datadoghq.com/account/settings#api and copy the API key. Paste it into the configuration file:
-
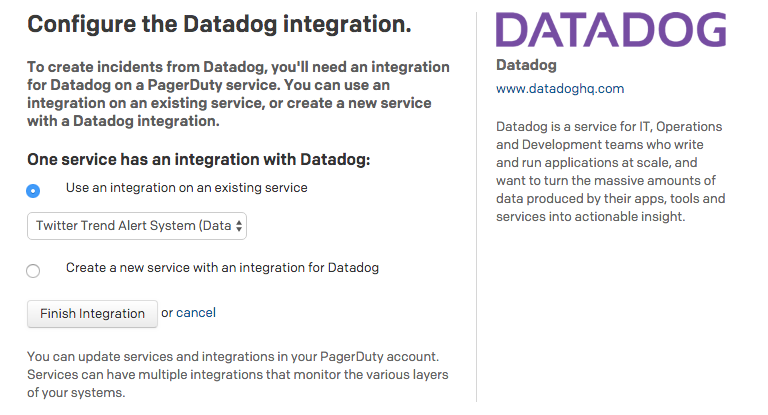
- Follow this quick guide to set up the PagerDuty integration with Datadog. Since we have already set up the service, you should get a screen like this:
-
- We now need to run our app. See README.md for instructions on how to start the application! After the first tweet is tracked, the metric should now exist in Datadog.
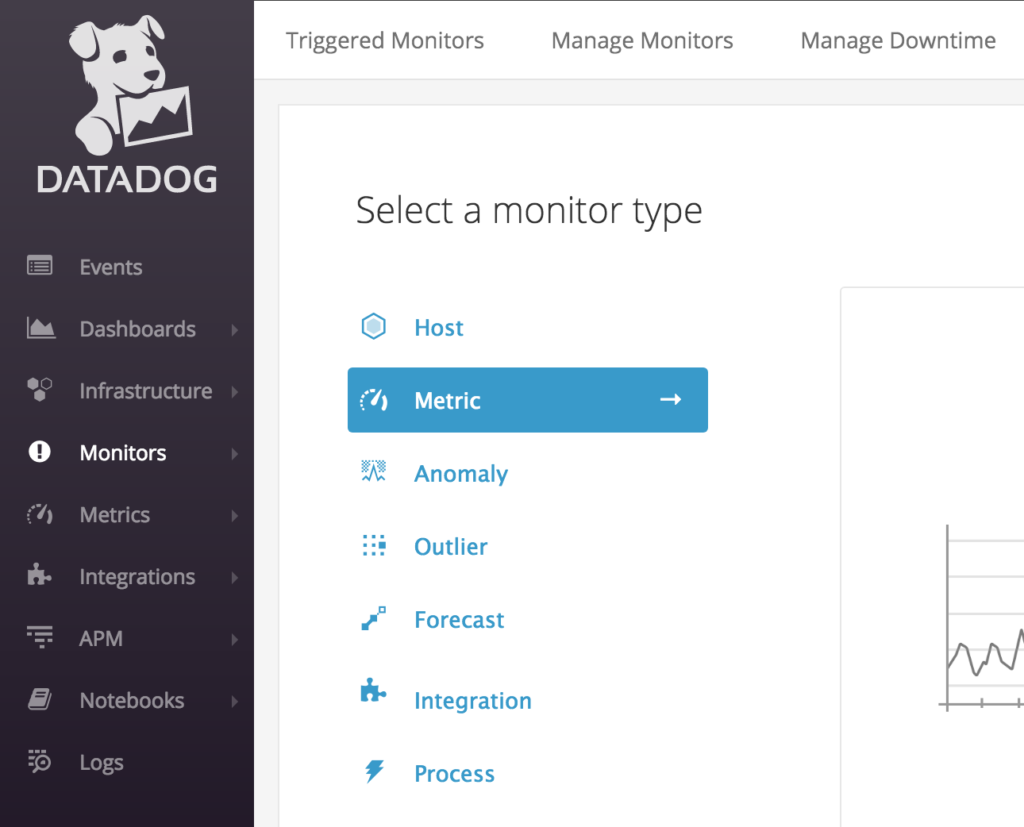
- Go to Monitors → New Monitors and create a new metric monitor.
-
-
- Select the metric to be <keyword>_tweet_count
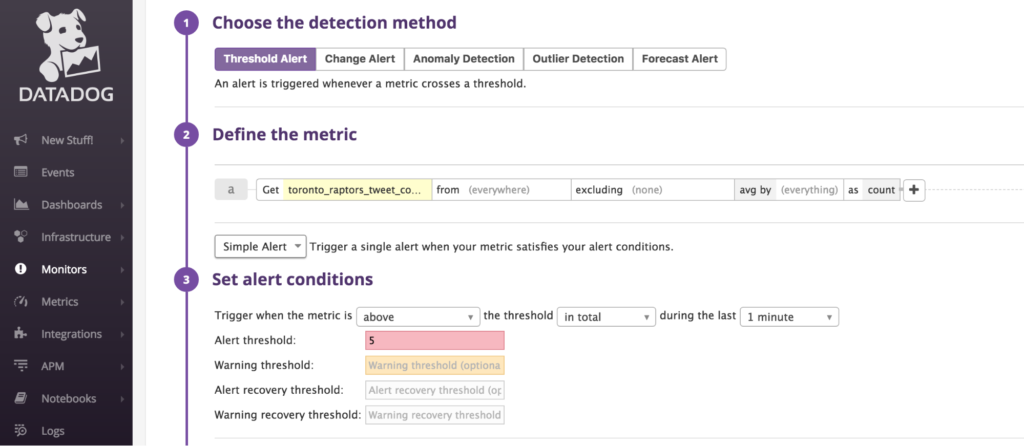
- Set a low alert threshold (e.g., 5) just to verify that the system works. For example:
-
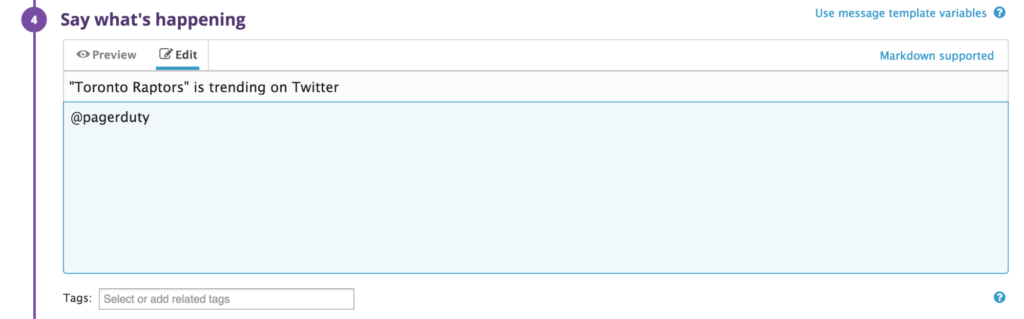
- Add a useful message as the title and make sure @pagerduty is tagged in the description! See the following picture:
As soon as you click save, you should be getting an alert on your phone in a few minutes!
If you did, that means we now have a complete Twitter Trend Alert System!
Step 5: Polishing Up
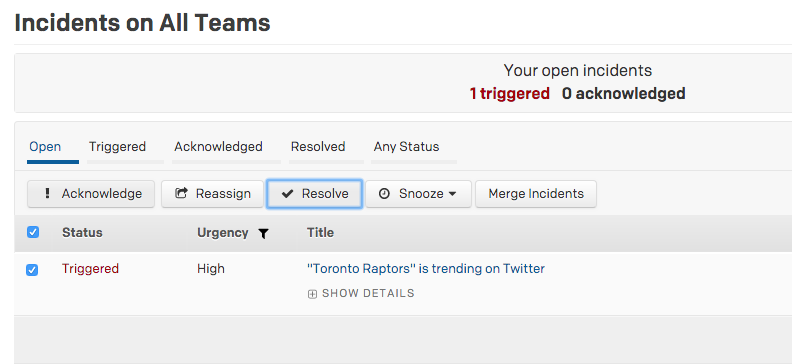
Now that we know it works, let’s resolve the alert.
- Let’s raise the threshold in Datadog to avoid further alerting from our test. Go to Monitors → Manage Monitors. Hover over the monitor with your message title and click edit. Now, change the alert threshold to a large number like 100,000.

- For PagerDuty, you can resolve the alert by replying to the phone call or text message. Alternatively, you can resolve the incident through the website.
Next Steps
You now have a complete working Twitter Trend Alert System! It’s about time we start taking advantage of social media trends as soon as they happen.
Are you interested in how PagerDuty enhances the functionality of your system?
Here are some great next steps to get the most out of our product:
- Escalation Policy. Certain public relation incidents require upper-management decisions. Speed up the time to contact them and ensure they get notified by setting up Escalation Policies.
- Stakeholder Users. Are there people within your company who would like to be notified of a major public relation incident as it happens? Then consider setting up stakeholder users.
- Operations Command Console (OCC). Monitor how your customers are reacting on Twitter during a major incident.